Thursday, June 27, 2013
Wednesday, June 26, 2013
Copycat Pottery Barn Buffet

This project began as an amazing find by my bestie, who just so happens to work at an apartment complex and is in a position to grab see all the 'stuff' people leave behind when they move! She knew that I had been looking for something small to use as a buffet for my back porch transformation and when she saw THIS:

Well, she knew that it was just what I needed!
With her help, I initially sanded it down and painted it white, but I wasn't really happy about how it looked against the brick on the house. It sort of just blended in and the cottage-style table I had refinished for the dining area was also white. Ugh - boring!
Here's the only picture I can find of it in white, but you can get a feel for what I'm talking about. At this point, I was also still trying to figure out what to do with the missing drawer front . . .

And then I spotted THIS beauty in the Pottery Barn catalog last summer and was inspired!

So . . . I stripped off the white on the top and stained it a dark walnut. Then I painted a coat of ochre on the doors and sides before covering everything but the inset panels of the doors with a bright green.

I distressed the whole thing with my sander so that the various colors would show through and rubbed the whole piece down with the leftover stain, to give it a more aged/weathered appearance.

Just like my flag project, I was able to use paint samples (and already had the white), so this project cost me very little to complete. Certainly much less than the $999 price tag on the PB inspiration piece! Here they are side by side. What do you think?!

I solved the drawer problem by removing the drawer altogether, painting the inside and using two wicker baskets on the inside instead! They work great and I didn't lose any functionality of the space! The baskets were about $7 each.

I did change the handles on the piece as well, which were regularly $5 each at Hobby Lobby, but since I waited for a sale - I got them both for $5 instead!

It's turned out to be such a cute and serviceable piece that I just love it! And with 100 degree weather predicted this weekend, we'll be spending all our time out back (in the pool) enjoying it too!
Happy summering y'all!
Sharing this sassy project at some or all of these great parties: Under the Table and Dreaming, Totally Overflowing with Creativity, Three Mango Seeds, Classy Cutter, Serenity You, House of Hepworth, Skip to my Lou, LadyBug Blessings, Nap Time Creations, The Style Sisters, Polkadots on Parade, Rae Gun Ramblings,Costal Charm, Not Just a Housewife, Domestically Speaking, The Shabby Creek Cottage, Sumos Sweet Stuff, The Gunny Sack, Gingersnap Crafts, Southern Lovely, Lil Luna, Someday Crafts, The NY Melrose Family, The DIY Dreamer, The Blackberry Vine, Homeworks, The Rustic Pig, Cornerstone Confessions, Kathe with an E, House on the Way, PJH Desgin, Glued to my Crafts, The Crafty Blog Stalker, Seven Alive, Made in a Day, Live Laugh and Love, A Creative Place, Have a Daily Cup of Mrs. Olson, Home and Gardens, It Happens In a Blink, I Gotta Create, Domestic Super Hero, All Pretty Things, Katie's Nesting Spot, 52 Mantels, Truly Lovely, Twinkle in the Eye, Happy Hour Projects, Six Sisters Stuff, Tutus and Tea Parties, Mop It Up Monday, Saturday Show and Tell, Moonlight and Mason Jars, The Scoop, Wow Us Wednesdays, Take-A-Look Tuesday
Thursday, June 13, 2013
A Grand 'Old' Flag Project

We've done A LOT of fence building in the 10 years we have lived in this little corner of paradise (Texas), which has left me with a lot of old fence boards that I just couldn't bear to part with, just in case I found something wonderful to do with them. It's one of the things Speed endures loves about me! I swear!
Anyhoo, these particular fence boards have been waiting for their new destiny since Hurricane Ike blew through in 2008. And needless to say, they were getting a little anxious! Until last summer, when I spotted this amazing flag in the Pottery Barn catalog and knew it was time to get to work!

So last year I figured out how many boards I would need and dug through my stash to find 8 that were even and relatively flat that I could piece together to make my flag form. Eight seemed like the perfect number to get my overall dimensions right for a flag, even though I knew it was going to make 13 stripes a bit problematic, but we'll get to that soon enough!
For the construction, I simply took two other fence boards, cut to fit (by me) and screwed them into the boards on the back. Incidentally, I did take pictures of this last year, but I haven't been able to find them. No matter, it was super simple!
Now for most people, painting would be the easy part, but for some reason I spent way too long just trying to decide whether or not to put fifty stars on my flag. So long, that one day I arrived home to discover my project moved off the porch and put back into 'storage.' Well, for those of you with too many kids and too little craft space, you know what that can mean. Putting an unfinished project away can be the kiss of death! At at that point last year, July 4th had already come and gone without a finished flag, so I wasn't feeling any real pressure to finish it either.
My how time does fly . . . and another 4th is fast approaching. It was past time to get this old girl finished! So here's what I (finally!!) did:
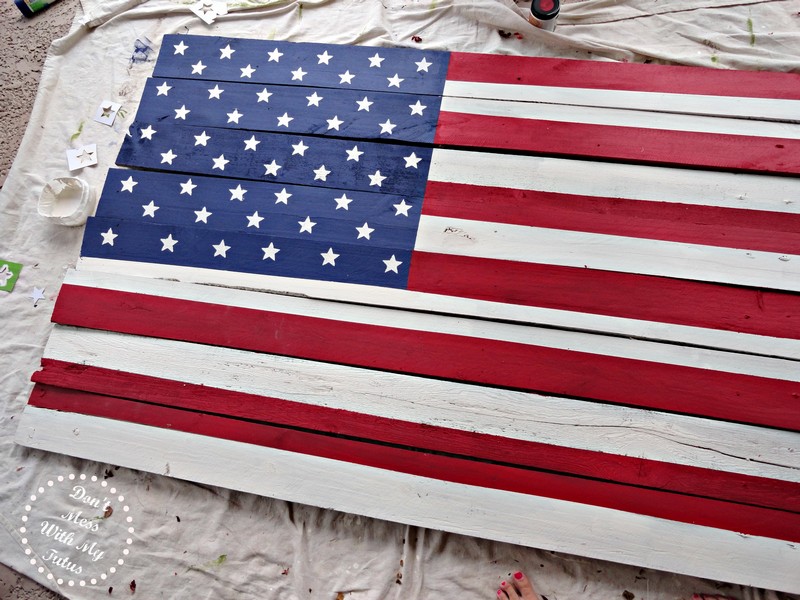
1. I taped off my blue section using Frog Tape. LOVE this tape by the way. It was the first time I'd used it and it really did prevent bleeding under the tape. Highly recommend this stuff!

2. Painted my blue section using a color sample of Behr paint in 'Signature Blue.' Super cheap way to get paint for projects like this!

3. Used my 1" star punch and some cardstock to see about the stars. Wasn't sold on the stars and wasn't at all sure how I was going to get them painted anyway, so used a Cricut to cut some larger stars from cardstock for a potential stencil. Hmmmm. Decisions, decisions.

4. Used the Frog Tape again to mask off first my white stripes and then my red stripes, allowing the paint to dry in between. With eight boards, I simply couldn't make 13 stripes work, so I forced myself to settle on 12 and keep going. Those of you who know me, this was a feat in itself!

5. Ultimately, I just couldn't do it unless I went with the 50, so 50 it would have to be. First, I experimented with cutting out a star from a sponge and seeing if I liked it enough to use for my flag because I really wasn't looking forward to painting 50 of those babies - nah! Too sloppy for my taste. Especially with my crisp lines on the stripes. The barn red I used is actually Behr 'Geranium' by the way.

6. The Frog Tape was working so well that I tried to cut a stencil out of it by sticking it to some slick card stock and using my punch to get some really sharp stars. But after peeling it off the cardstock and trying to stick my stencil in a straight line on uneven fence boards, that was a no-go as well. I still think it would work, just not for this project - ugh!

7. Because I am a master re-purposer (or is it repurposeur?!), I was able to use my tape covered cardstock as stencils instead. Ultimately, a stencil and a small paintbrush seemed to work the best and didn't take me nearly as long as I was afraid it would, so don't be scared!

And here's my beauty, drying on the porch! It occurred to me afterward that I already had a white Sharpie paint pen upstairs that probably would have worked even better, but it still looks pretty darn good to me!
My original plan was to distress the whole thing once it dried, but my sander seems to be MIA at the moment, so I will have to post an update when (and if - ha) that ever happens. In the mean time, I already love, love love how it looks along the side of our garage, facing the pool.

Only five years and one baby later, my fence boards have found a new lease on life as 'Old' Glory and I must say they are lovin' it!
And I am too!
Sharing this sassy project at some or all of these great parties: Under the Table and Dreaming, Totally Overflowing with Creativity, Three Mango Seeds, Classy Cutter, Serenity You, House of Hepworth, Skip to my Lou, LadyBug Blessings, Nap Time Creations, The Style Sisters, Polkadots on Pararde, Rae Gun Ramblings,Costal Charm, Not Just a Housewife, Domestically Speaking, The Shabby Creek Cottage, Sumos Sweet Stuff, The Gunny Sack, Gingersnap Crafts, Southern Lovely, Lil Luna, Someday Crafts, The NY Melrose Family, The DIY Dreamer, The Blackberry Vine, Homeworks, The Rustic Pig, Cornerstone Confessions, Kathe with an E, House on the Way, PJH Desgin, Glued to my Crafts, The Crafty Blog Stalker, Seven Alive, Made in a Day, Live Laugh and Love, A Creative Place, Have a Daily Cup of Mrs. Olson, Home and Gardens, It Happens In a Blink, I Gotta Create, Domestic Super Hero, All Pretty Things, Katie's Nesting Spot, 52 Mantels, Truly Lovely, Twinkle in the Eye, Happy Hour Projects, Six Sisters Stuff, Tutus and Tea Parties, Mop It Up Monday, Saturday Show and Tell, Moonlight and Mason Jars, The Scoop, Wow Us Wednesdays, Take-A-Look Tuesday


Wednesday, June 5, 2013
Lemonade Cupcakes!

Are you ready for a taste of summer?
Well these tasty treats will certainly do the trick!
Friday was our last day of school {hooray!} and to celebrate we invited the whole class over for an end-of-year pool party! It was two hours of total chaos FUN! In addition to watermelon and lemonade, we needed something sweet, and cupcakes have been my go-to crowd-pleaser for a while.
The hands-down bestest cupcake recipe ever can be found at Recipegirl and I simply made a couple of changes to turn her White Wedding Cake Cupcakes into lemonade delights. First, I omitted the vanilla. Second, I substituted frozen lemonade concentrate for the water in the cupcake recipe and for part of the milk in the buttercream frosting. I was able to use one 12-ounce can of Minute Maid for both. Third, I added a few drops of yellow food coloring to both the batter and the icing just to jazz up the color a bit more.

After Frosting with a large star piping tip, we 'tarted up' our lemonade cupcakes with sprinkled yellow sanding sugar on top and a section of striped paper straw for decoration! Incidentally, Target is now carrying these cute paper straws in their party section and I was able to cut them into thirds for the cupcakes - darling!
And delicious!
The best part about this recipe is that it makes 3 dozen cupcakes, so it really is fit for a crowd. And everyone liked them so much that we will no doubt be making them again, all summer long!

Sharing this sassy sweet at some or all of these great parties: Under the Table and Dreaming, Totally Overflowing with Creativity, Three Mango Seeds, Classy Cutter, Serenity You, House of Hepworth, Skip to my Lou, LadyBug Blessings, Nap Time Creations, The Style Sisters, Polkadots on Pararde, Rae Gun Ramblings,Costal Charm, Not Just a Housewife, Domestically Speaking, The Shabby Creek Cottage, Sumos Sweet Stuff, The Gunny Sack, Gingersnap Crafts, Southern Lovely, Lil Luna, Someday Crafts, The NY Melrose Family, The DIY Dreamer, The Blackberry Vine, Homeworks, The Rustic Pig, Cornerstone Confessions, Kathe with an E, House on the Way, PJH Desgin, Glued to my Crafts, The Crafty Blog Stalker, Seven Alive, Made in a Day, Live Laugh and Love, A Creative Place, Have a Daily Cup of Mrs. Olson, Home and Gardens, It Happens In a Blink, I Gotta Create, Domestic Super Hero, All Pretty Things, Katie's Nesting Spot, 52 Mantels, Truly Lovely, Twinkle in the Eye, Happy Hour Projects, Six Sisters Stuff, Tutus and Tea Parties, Mop It Up Monday, Saturday Show and Tell, Moonlight and Mason Jars, The Scoop, Wow Us Wednesdays, Take-A-Look Tuesday
.jpg)


Subscribe to:
Posts (Atom)