Pages

Wednesday, September 26, 2012

Game Day Goodness!

 
Sport came home this weekend.  He's the youngest on our 'Varsity Squad' and just started college about three hours away.  In honor of his visit, we thought we'd entice him over celebrate with a cookout and a football game!  It was a good weekend for football.  My beloved Aggies 'beat the HELL outta' S. C. State and the Texans reminded Peyton Manning that he ain't what he used to be!

Sport had initially planned on bringing his roommate and the rest of the Varsity Squad was going to be home as well, so we decided to try our hand at beef ribs . . . and they tasted GREAT!!!

MEEEEEAT!!

Gram brought baked beans and I whipped up some potatoes that are soooo yummy I thought I'd share the recipe with you!  This might have even come off the back of the package at some point, but I've forgotten who taught me how to make these.  Let's just say we've been enjoying these babies for a looong time {SMILE} and I know you will too!


Ranch House Roasted Potatoes

1 sack of new potatoes (small red potatoes), rinsed and quartered
vegetable oil
1 packet of Ranch Dressing mix

Preheat oven to 400 degrees.  Line large cookie sheet with foil for easier clean-up.  Spread quartered potatoes across pan.  Drizzle with vegetable oil.  Sprinkle entire package of Ranch dressing mix over potatoes and toss to coat thoroughly.  Place in oven to roast for about 1 hour.  You can stir them up about half way through for more even roasting.  Mmmm, mmmm good!


So good, in fact, that I don't have a picture of them once they came out of the oven!  Here's one of the 'before' pictures, so you can get the idea!


We rounded it off with a big batch of chocolate chip cookies and some lemonade - and that's how game day is DONE!


Although we cooked for a crowd and would loved to have met everyone's friends, it was awfully nice (and rare these days) to have a day to enjoy our party of five all by themselves.  It's great to watch how they all interact, despite the age gaps.  These are precious moments and I am so blessed to have them!

Because we all know that it seems like only a moment before this:
 
Future backmail picture of Snacks - hee, hee!
Grows up into this!
 
Isn't he handsome?!

Wednesday, September 19, 2012

Meet Mumpkin!

Well, it's definitely that time of year again . . . And I am excited!!  Some of my most favorite holidays (including my birthday!!!) are just around the corner and I. CAN'T. WAIT!!  To kick things off,  I thought I would share a quick and easy Halloween craft with you that I actually posted on a friend's blog (before I resurrected my own . . . does that make this a Zombie blog?!?!) last year.  A few of you may have seen this before over at Randee's Organized Chaos, but for those of you who haven't - enjoy!!
____________________________________________________
 
I don't know where yall live, but where we call home it's hot! Yes, it's true.  Halloween is frequently a warm-weather holiday for us! Which makes decorating with carved pumpkins almost impossible! In addition to to being hard to carve in the first place, they are generally a soupy, swarming mess only a few days later. Frustrating! When my daughter was born, it quickly became apparent that she was both creative (yay) and clutsy (oops) - just like her mom! And that gave me one more reason to stick with pumpkin decorating ideas that do not involve a knife! So for the past few years, we've simply painted them, but this year we decided it was time to try something new. It was so easy and fun (and SAFE) that I wanted to share!


Make Your Own Mumpkin!

1. We picked a medium to large pumpkin, but mini mumpkins would be cute too!

2. Cut gauze fabric into 2-3 inch strips and set aside. We used a half-yard of gauze. You could also buy rolls of gauze and save a step, but the fabric is much cheaper.

3. Cut out felt eyes and mouth in any shape you want.

4. Thin regular white glue with water and pour into a flat container. TIP*** We wash and save our styrofoam meat trays - and use them for all kinds of crafts!

5. Use a large brush to coat the pumpkin in a thin layer of glue.

6. Position eyes and mouth where you want them.

7. Begin wrapping your pumpkin in gauze strips, using additional glue to secure ends. We just painted right over the gauxe with the glue and it will stiffen as it dries.

8. Keep wrapping until your pumpkin becomes a mumpkin and you're done!
This whole project took about 15 minutes to complete from start to finish and Sheep did most of the work! It's a great craft for kids and best of all - no fruit flies!
 

For even more sassy pumpkin ideas head on over here!

Wednesday, September 12, 2012

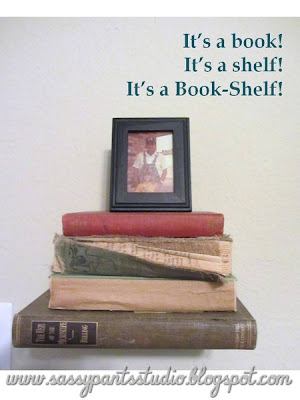
Easy Bookshelf . . . Literally!

 
It's a book!  It's a shelf!  It's a Book-Shelf!

As Sheep would say, "Get it?" . . . Sometimes I crack myself UP!!

My best friend and I ran across this clever idea at Winnie's Antiques in Warrenton, during the best antiques show in Texas!!  Incidentally, it's going to be here again in just a few short weeks and you can read all about it AND our adventure here!  Anyway, my bestie is truly a 'get 'er done' kind of gal, so she headed back to Big D and whipped one up almost as soon as she walked in the door!

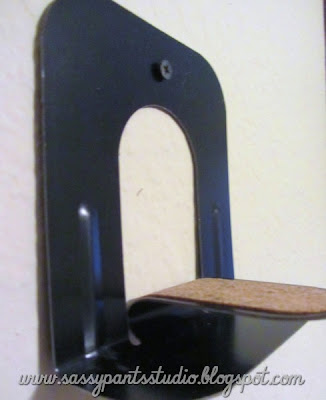
All you need is a metal bookend and some screws to attach it to the wall.


Bend the inner support done so that it's parallel with the bottom and slide on your largest book, positioning the inner support in between the pages so that it's hidden.


Stack a few more books on top (but don't make it too heavy), add a snapshot or other small memento (that's her and her daddy by the way) and voila!


Doesn't it look great as part of her antique sewing table vignette?!!


I think it's a unique and interesting way to showcase your antique or other special books, and this idea is so simple, you could probably get it done before the bus gets here.  Oh wait, that's me!
 
Make it a great one y'all!
 
Sharing this sassy idea at It's Overflowing, Mop it Up Monday, Wow Us Wednesdays, Cowgirl Up!, Whimsy Wednesdays, Debbie Doo's

Monday, September 10, 2012

There's A Lot To Do . . .

 . . . When You're Two!

It really is an AMAZING age!

Just imagine if you were asked today to grow 2-3 inches (while gaining only 10 pounds- ha!) and at least two teeth in the next twelve months.  You'll also be asked to completely change your sleeping habits, method of drinking, method of pottying, your method of being comforted and most likely your method of communicating as well.  Most of us would simply say, "No thank you."  And more than a few of us might consider it downright impossible! 

It's no wonder they call it 'The Terrible Twos.'

So, like most two-year-olds embarking on the transition from babyhood to kid-dom, Snacks has been quite busy over the summer:

Learning to use the potty,


Saying goodbye to his morning nap,
 
 
AND to his most beloved companion
 

BINKY {sniff}
 
 
All in preparation for his first day of 'school!'
It's a MDO program near our home that he attends 4 hours a day, 3 days a week this year.
 
Believe it or not that's a smile these days!
 
He LOVED his first day!!
 
 
No tears at all when I dropped him off and all smiles when I picked him up!
The next two days were a little rougher, but we'll see how he does tomorrow. 
I am so excited to see him growing and expanding his horizons, even though the house is awfully quiet without my little man. . . I guess it's mom's turn for a {SNIFF}