Pages

Wednesday, April 23, 2014

Carrot Door Planter


I hope everyone had a blessed Easter - I know we did!  We had the chance to celebrate with family on both sides, prep for Easter with our friends, join in not one but TWO local Easter egg hunts and celebrate Jesus' resurrection with our church family and family on Sunday back at our house.

Since we were hosting the family Easter lunch and egg hunt here, Speed and I have spent  the last two weeks trying to get the house and yard in shape for Spring, which hasn't left me much time for anything else.  But I did manage to squeeze in a project I had planned on completing last year!  And as you can see, I'm still late to party posting Easter decor after the event. {Oh well.}

And I'm proud to say that the potted plant I used in this cute carrot planter has been alive since last Spring and still looks great I might add - so there!


I've seen these deco-mesh carrots several places, and it seems that people have used lots of different things for their base, but I really wanted mine to be able to hold an actual plant, so it took some savvy shopping to get the parts assembled.  I ended up using a small collapsible easel from Michael's for by carrot, which allowed me to invert it and wedge a small plastic planter into the triangle it made.  Otherwise, it's constructed like any other deco-mesh decor, by simply securing loops of the mesh to the planter at intervals until you're happy with it.  I used orange pipe cleaners to accomplish this and it worked great!

Used a Command hook to hang on my glass front door and voila!  Super easy, super cute and only about $12 for the whole project so super-cheap too!  So pin it for next year - you'll be glad you did!

Happy Easter!  Happy Spring!

Thursday, February 27, 2014

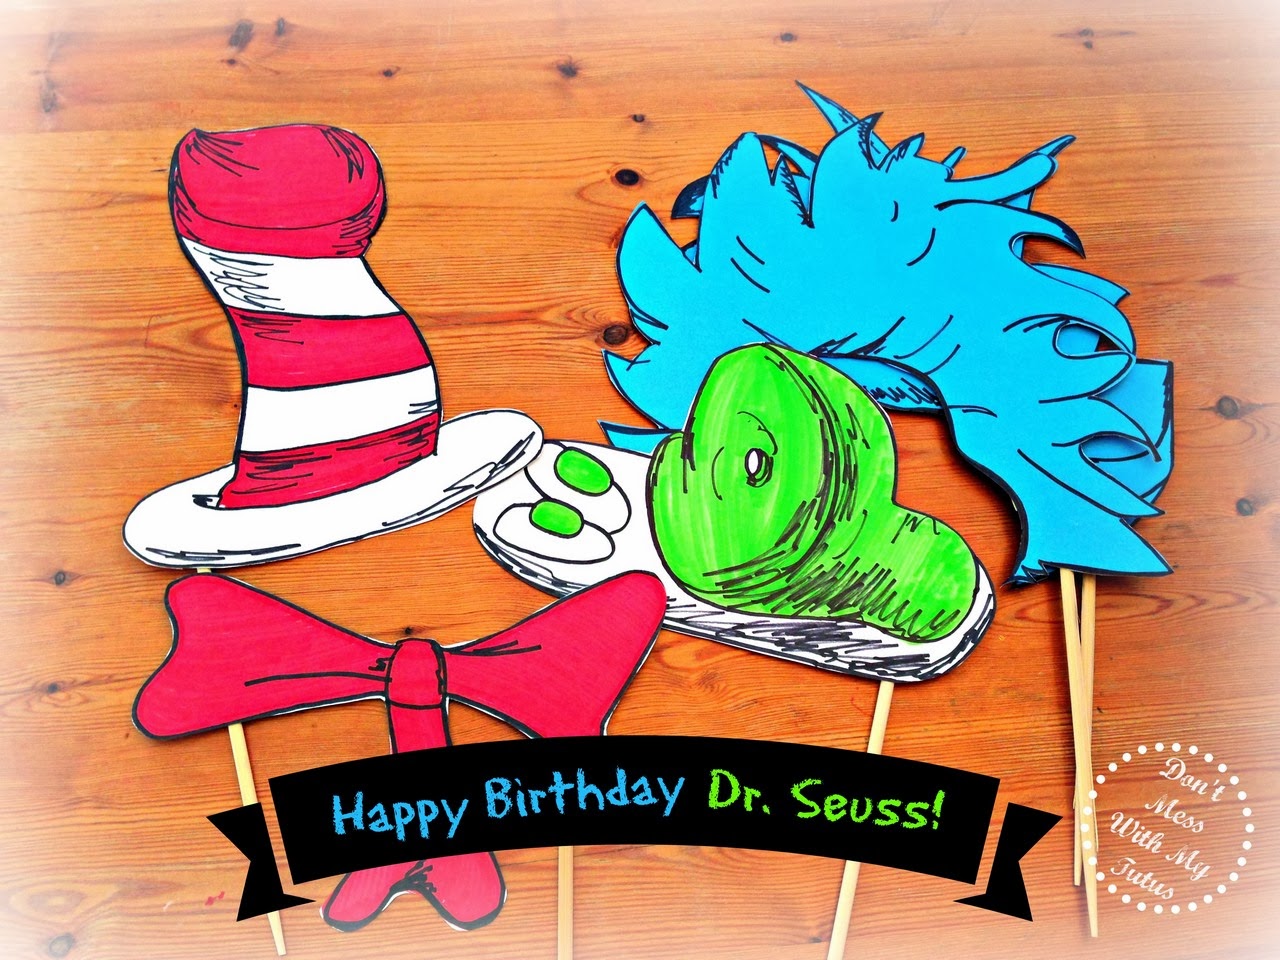
Dr. Seuss Photo Props!


Does your child's class celebrate Dr. Seuss' birthday?

If so, here's a quick and easy craft that's sure to add some fun to this special day!

I made these 'phun' photo props in about 30 minutes using nothing more than some cardstock, sharpies, scissors, glue and chopsticks!  And since you likely have most (if not all) of these supplies around your house, this project was not only quick and easy, it was also FREE!

I like that!

There are certainly lots of creative, crafty sellers on Etsy with downloadable photo props, but I decided to make my own, in part because I wanted my hair for Thing 1 and Thing 2 to be larger than a standard sheet of paper (8.5 X 11), and I figured I could freehand some crazy hair as well as the next person.  I also wanted to make some green eggs and ham for my own little Sam I Am (aka Snacks) and I didn't see any of those on Etsy.

I will also say that while these photo props may not be professional, they are what I call 'preschool perfect.'  In other words, they weren't made to last forever, but they are sturdy enough to get through a day of picture taking in pajamas - 'cause that's how we celebrate Dr. Seuss' birthday in these parts!

Hopefully I will have Here are a few pictures of my little guy using the props for you later this afternoon, but for now,  and here are a few tips for making your own 'preschool perfect' photo props!
  1. HAVE FUN!  That's what Dr. Seuss is all about!
  2. Don't stress if they aren't colored or cut perfectly - the kids will love them anyway!  Personally, the bit of white around some of the cutouts just adds to the cartoon-ish nature of the Dr. Seuss props in my opinion!
  3. If you're making something fairly tall or wide, double your cardstock to give it extra stability.  I did this by simply gluing two pieces together before cutting them out.
  4. Chopsticks are FREE and are the perfect length for kid-sized photo props.  We used chopsticks at Sheep's Valentine's Party, and I swiped the extras thinking I would make photo props later.  Who knew it would be so soon?!
  5. In addition, glue a small strip of cardstock over the chopstick after securing it to the prop to give it more surface area and keep it from separating from the prop so easily.
  6.  Make sure to alternate which side to attach your chopsticks to on the props.  For example, I attached the chopstick on the right side of the bow-tie and the left side of the hat so that the same child can hold both at once if they want to.

Happy Birthday Dr. Seuss!

Sharing this sassy project at some or all of these great parties: Under the Table and Dreaming, Totally Overflowing with Creativity, Three Mango Seeds, Classy Cutter, Serenity You, House of Hepworth, Skip to my Lou, LadyBug Blessings, Nap Time Creations, The Style Sisters, Polkadots on Pararde, Rae Gun Ramblings,Costal Charm, Not Just a Housewife, Domestically Speaking, The Shabby Creek Cottage, Sumos Sweet Stuff, The Gunny Sack, Gingersnap Crafts, Southern Lovely, Lil Luna, Someday Crafts, The NY Melrose Family, The DIY Dreamer, The Blackberry Vine, Homeworks, The Rustic Pig, Cornerstone Confessions, Kathe with an E, House on the Way, PJH Desgin, Glued to my Crafts, The Crafty Blog Stalker, Seven Alive, Made in a Day, Live Laugh and Love, A Creative Place, Have a Daily Cup of Mrs. Olson, Home and Gardens, It Happens In a Blink, I Gotta Create, Domestic Super Hero, All Pretty Things, Katie's Nesting Spot, 52 Mantels, Truly Lovely, Twinkle in the Eye, Happy Hour Projects, Six Sisters Stuff, Tutus and Tea Parties, Mop It Up Monday, Saturday Show and Tell, Moonlight and Mason Jars, The Scoop, Wow Us Wednesdays, Take-A-Look Tuesday, Share Your Stuff Tuesdays

Monday, February 17, 2014

Valentines Handprint Art


I hope everyone  Valentines as much as we did!  It's one of my most favorite holidays, in part because it's (comparatively) so low-key.  No costumes.  No wish list.  No God-forsaken elf, or any other mythical creature, to contend with for that matter.

Just Me+ You = LOVE!

{Simple}

But that doesn't mean I don't like to do a few sweet things in February.
Like this quick hand-print valentine  from The Idea Room that I ran across while looking for class party ideas.

I used it in my CCE class last week, and with the exception of one little girl who appears to be allergic to the Crayola tempera paint we used for the hand-prints, it came out great!


But Sheep decided she wanted to make her valentine for Snacks ( I just love how my littlest two heart each other!) and I wanted one for myself to frame and put out each year.

Problem is, we don't have much space for display and even though their hands are small, the heart ends up bigger than you might think.  I couldn't even get Snacks' on a 5 X 7 sheet of paper and he's not yet four.  So I decided to combine their hand-prints into a single heart instead.


I just lined up their palms so the heart was straight and stamped away!
I love it!


After it dried, I added my own writing around the perimeter.
It took a couple of tries using very light pencil to get the spacing how I wanted it.
Then I went over it with a felt-tipped pen and erased my pencil.
I used thicker, art/watercolor paper for this project so it held up to the writing and erasing well.

I didn't find the saying anywhere - It came straight from my heart.
But feel free to use it if you'd like.

With the exception of the dollar store frame, we had everything else on hand for this project so it was really inexpensive.  And I like it so much that I don't think I'll be taking it down any time soon!

XOXO - Jen


Sharing this sassy project at some or all of these great parties: Under the Table and Dreaming, Totally Overflowing with Creativity, Three Mango Seeds, Classy Cutter, Serenity You, House of Hepworth, Skip to my Lou, LadyBug Blessings, Nap Time Creations, The Style Sisters, Polkadots on Pararde, Rae Gun Ramblings,Costal Charm, Not Just a Housewife, Domestically Speaking, The Shabby Creek Cottage, Sumos Sweet Stuff, The Gunny Sack, Gingersnap Crafts, Southern Lovely, Lil Luna, Someday Crafts, The NY Melrose Family, The DIY Dreamer, The Blackberry Vine, Homeworks, The Rustic Pig, Cornerstone Confessions, Kathe with an E, House on the Way, PJH Desgin, Glued to my Crafts, The Crafty Blog Stalker, Seven Alive, Made in a Day, Live Laugh and Love, A Creative Place, Have a Daily Cup of Mrs. Olson, Home and Gardens, It Happens In a Blink, I Gotta Create, Domestic Super Hero, All Pretty Things, Katie's Nesting Spot, 52 Mantels, Truly Lovely, Twinkle in the Eye, Happy Hour Projects, Six Sisters Stuff, Tutus and Tea Parties, Mop It Up Monday, Saturday Show and Tell, Moonlight and Mason Jars, The Scoop, Wow Us Wednesdays, Take-A-Look Tuesday, Share Your Stuff Tuesdays
Thursday, February 13, 2014

Cupcake Valentines Box!


Well, it's been Valentine's central around here and I've been as busy as cupid himself getting everyone ready for the sweetest day of the year!

In case you didn't know . . . I HEART Valentine's Day!

And like most moms of school-age kiddos, we needed to make a box for Sheep's valentines at school.  She always comes up with something clever, usually centered around puppies, for her box and this year was no exception.  She wanted to make a cupcake valentine box and even had an idea of what she would use to make it - a flower pot on the bottom and an inverted bowl on top.

But mama thought she might try and use something a little less permanent since we don't keep these boxes (thank heavens) forever!  I decided to Google some ideas and see what others had done.  Google was actually very little help, but never fear - Pinterest is here!
 (I should have started there first)

There were literally tons of pins for Cupcake Valentines boxes, but many turned out to be nothing more than a picture, rather than a how to, so I decided to share with you how we got ours done.  Unfortunately, I didn't stop to take pictures along the way, but this project was so easy, you won't need them!


Supplies:
Empty, clean 1/2 gallon Blue Bell (or other round) Ice Cream Carton
Paper bowl with rim so it's able to rest on the top of the carton
Duct tape
2 pieces of scrapbook paper cut into 5" strips
Roll of 6" wide tulle
LOTS and LOTS of hot glue
Embellishments (we used heart confetti and foam stickers)

Instructions:
1.  Start by discarding the lid of the ice cream carton and inverting the bowl on top of the carton.
2.  Use several strips of duct tape on the outside and inside of the bowl to 'hinge' the lid to the carton.  Alternatively, you could tape it all the way around and cut a slit in the top of the bowl to insert the valentines.
3.  Accordion-fold your scrapbook paper strips, gluing the end of one strip to the beginning of the next, forming a circle at the end with all four.
4.  Apply hot glue to the outside of the carton and hold open your paper 'cupcake liner' wide enough to insert the carton through the circle.  This might take an extra set of hands.  Sheep helped!
5.  Push and hold the liner around the carton so the inside edges of the pleats become glued to the carton.
6.  Starting at the center of the bowl, unroll some length of tulle, apply hot glue to the bowl and scrunch the tulle onto the bowl, holding in place (ouch - that's HOT!) until it stays.
7.  Continue unrolling, gluing and scrunching tulle onto your bowl/lid until it is completely covered.
8.  Embellish with confetti, buttons, foam stickers, pom-poms, etc.  We used what we had on hand.  The cherry on top was made from two glittery ladybug foam stickers and a piece of brown ribbon sandwiched in between.  Once the ladybugs head was covered in glue and secured in the tulle it looked just like a cherry!

At this point you might consider robbing a bank or your favorite store as you will have no fingerprints left from the hot glue and will be untraceable - ha!

This project reminded me so much of my mom because I was always coming up with these great ideas that she was then supposed to somehow make happen.
And she did.
And so shall I!

Having been on the other side of it now for a couple of years with my own little creative, all I can say is, "Thanks Mom!"

And Happy Valentine's Day Y'all!

Sharing this sassy project at some or all of these great parties: Under the Table and Dreaming, Totally Overflowing with Creativity, Three Mango Seeds, Classy Cutter, Serenity You, House of Hepworth, Skip to my Lou, LadyBug Blessings, Nap Time Creations, The Style Sisters, Polkadots on Pararde, Rae Gun Ramblings,Costal Charm, Not Just a Housewife, Domestically Speaking, The Shabby Creek Cottage, Sumos Sweet Stuff, The Gunny Sack, Gingersnap Crafts, Southern Lovely, Lil Luna, Someday Crafts, The NY Melrose Family, The DIY Dreamer, The Blackberry Vine, Homeworks, The Rustic Pig, Cornerstone Confessions, Kathe with an E, House on the Way, PJH Desgin, Glued to my Crafts, The Crafty Blog Stalker, Seven Alive, Made in a Day, Live Laugh and Love, A Creative Place, Have a Daily Cup of Mrs. Olson, Home and Gardens, It Happens In a Blink, I Gotta Create, Domestic Super Hero, All Pretty Things, Katie's Nesting Spot, 52 Mantels, Truly Lovely, Twinkle in the Eye, Happy Hour Projects, Six Sisters Stuff, Tutus and Tea Parties, Mop It Up Monday, Saturday Show and Tell, Moonlight and Mason Jars, The Scoop, Wow Us Wednesdays, Take-A-Look Tuesday, Share Your Stuff Tuesdays

Monday, February 10, 2014

Valentine Infinity Scarf!


This super-simple infinity scarf in a valentine print fabric is like a hug for your neck!

I have had the idea to make my own infinity scarf for over a year.
I even bought some inexpensive winter scarves to give it a try, but never got around to it.
And then I ran across this super-cute valentine graphic fabric last week - two days before my annual girls weekend with some of my college besties - and was inspired!

We had something special to celebrate this year with our dear friend who has been battling breast cancer - and WINNING!!  I hadn't seen her in person since the whole ordeal began, but what better way to remind her that I'm rooting for her (even if it is long distance) than a pretty PINK scarf?!


She is just as beautiful (and fierce) as ever!!
I am so thankful for the time to reconnect with her, and all my friends.

There are literally tons of tutorials for making infinity scarves on the internet, but I used this one from Simplicity, with only a few adjustments of my own.

1.  I bought 60" fabric as recommended, but bought 2 yards and cut it lengthwise, instead of across, so my scarf would be longer than 60".
2.  I cut my fabric into thirds vertically, so I was able to make 3 scarves out of two yards of fabric, each approximately 10" wide when finished.
3.  I made sure to embroider my fabric before sewing up the seams, so that the underside of the monogram didn't show once it was completed.
4.  Since I had 7 of these 'hugs' to crank out in 24 hours (what can I say?), I skipped the hand-stitching and used fusible webbing to close my opening after turning the scarf right-side out.

I love, love, love how they turned out!
A beautiful friendship, valentines, breast cancer (without being too breast cancer-y)goody all rolled into one!
The girls loved them too!
Unfortunately, all our group pictures were taken on someone else's camera Saturday night, but trust me - we looked fabulous!


We'll all be wearing them on Thursday, and I'll be thinking of them every time I do.

Love y'all and Happy Valentine's Day!

Sharing this sassy project at some or all of these great parties: Under the Table and Dreaming, Totally Overflowing with Creativity, Three Mango Seeds, Classy Cutter, Serenity You, House of Hepworth, Skip to my Lou, LadyBug Blessings, Nap Time Creations, The Style Sisters, Polkadots on Pararde, Rae Gun Ramblings,Costal Charm, Not Just a Housewife, Domestically Speaking, The Shabby Creek Cottage, Sumos Sweet Stuff, The Gunny Sack, Gingersnap Crafts, Southern Lovely, Lil Luna, Someday Crafts, The NY Melrose Family, The DIY Dreamer, The Blackberry Vine, Homeworks, The Rustic Pig, Cornerstone Confessions, Kathe with an E, House on the Way, PJH Desgin, Glued to my Crafts, The Crafty Blog Stalker, Seven Alive, Made in a Day, Live Laugh and Love, A Creative Place, Have a Daily Cup of Mrs. Olson, Home and Gardens, It Happens In a Blink, I Gotta Create, Domestic Super Hero, All Pretty Things, Katie's Nesting Spot, 52 Mantels, Truly Lovely, Twinkle in the Eye, Happy Hour Projects, Six Sisters Stuff, Tutus and Tea Parties, Mop It Up Monday, Saturday Show and Tell, Moonlight and Mason Jars, The Scoop, Wow Us Wednesdays, Take-A-Look Tuesday, Share Your Stuff Tuesdays