Pages

Showing posts with label Easter. Show all posts

Wednesday, April 23, 2014

Carrot Door Planter


I hope everyone had a blessed Easter - I know we did!  We had the chance to celebrate with family on both sides, prep for Easter with our friends, join in not one but TWO local Easter egg hunts and celebrate Jesus' resurrection with our church family and family on Sunday back at our house.

Since we were hosting the family Easter lunch and egg hunt here, Speed and I have spent  the last two weeks trying to get the house and yard in shape for Spring, which hasn't left me much time for anything else.  But I did manage to squeeze in a project I had planned on completing last year!  And as you can see, I'm still late to party posting Easter decor after the event. {Oh well.}

And I'm proud to say that the potted plant I used in this cute carrot planter has been alive since last Spring and still looks great I might add - so there!


I've seen these deco-mesh carrots several places, and it seems that people have used lots of different things for their base, but I really wanted mine to be able to hold an actual plant, so it took some savvy shopping to get the parts assembled.  I ended up using a small collapsible easel from Michael's for by carrot, which allowed me to invert it and wedge a small plastic planter into the triangle it made.  Otherwise, it's constructed like any other deco-mesh decor, by simply securing loops of the mesh to the planter at intervals until you're happy with it.  I used orange pipe cleaners to accomplish this and it worked great!

Used a Command hook to hang on my glass front door and voila!  Super easy, super cute and only about $12 for the whole project so super-cheap too!  So pin it for next year - you'll be glad you did!

Happy Easter!  Happy Spring!

Wednesday, March 27, 2013

Toilet Paper Roll to Easter Treat Tutorial

 
Easter is just around the corner, but you've still got time to whip up some of these adorable treat boxes for classroom parties and baskets of course!  And they're so easy - even a rabbit can make them - ha!
 
Supplies
Toilet paper rolls
Orange acrylic or tempera paint
Clear nail polish or Mod Podge spray gloss
Green tissue paper
Glue
Staples
CANDY!
 
I had actually seen these made up as candy corn treat boxes last year at Halloween, but never had time to make them in the Fall.  And then I got to thinking, why not use that same shape to make carrots and Easter Bunnies instead?
 
 
I never actually got farther than painting the roll white for the bunny, but you can figure it out from the instructions below and I think they would be adorable as well!  Simply start by painting your rolls with tempera or acrylic paint.  I had tempera paint on hand, so that's what I used.
 
 
I would have stopped here, but the paint I had dried very dull and I wanted them to be shiny.  You could certainly spend a little and get glossy finish paint or try spray paint, but I decided to try clear nail polish instead.  Again, it was what I had on hand and since I'm usually crafting while supervising homework and starting dinner, I'm frequently left to 'make do'.  Hey, it was smelly, but it worked!
 
 
However, if you're going to be making lots of these, I would go ahead and grab the Mod Podge glossy finish spray - much faster and less smelly!  Once it's dry, you're ready to glue down one end.  I had Elmer's on hand, so i held it together with a clip for a minute or two before moving on to the next one, but tape runner or hot glue would make quick work of this if you're making in bulk for baskets or classrooms.
 
 
Now you're ready to fill 'em up!
 
 
Then grab your green tissue paper and make your carrot tops!  I made mine two different ways and liked them both.  On some I cut several squares out and fringed the ends.  On others, I pinched the squares in the middle the same way you would to stuff a gift bag.
 
 
Now the trick to making the carrot shape is to seal the roll on top by pinching it closed in the opposite direction from the bottom.  This gives you the triangle shape you need for the carrots and reminds me of the little cream packets they used to have at restaurants when I was a kid too - yum!  Since I'm not planning on these being reusable, I simply inserted my tissue paper tops and stapled closed.  The tissue paper seems to hide the staples just fine and they're easy to open as well!
 
 
We'll be passing these out tomorrow at the class party!  Aren't they cute?!


Happy Easter Y'all!


Monday, March 18, 2013

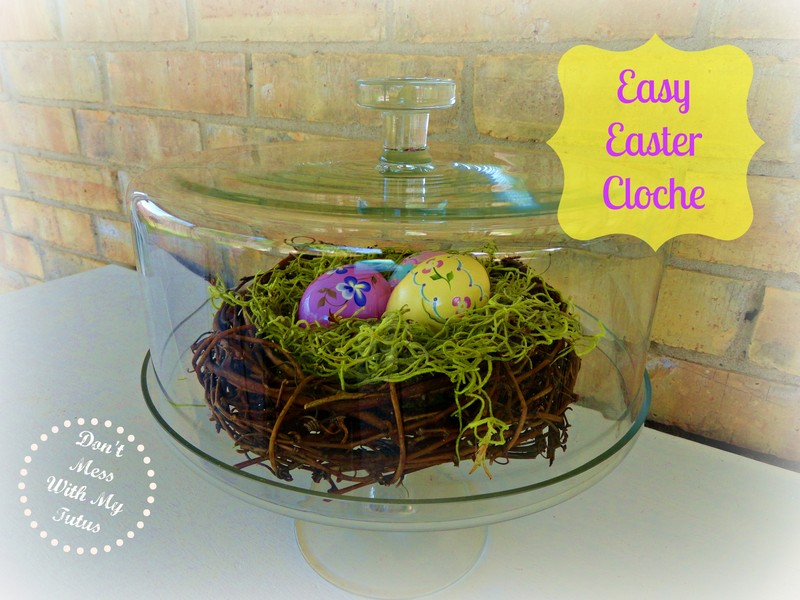
Easy Easter Cloche


This is a re-post of an Easter project from last year, but with so many awesome, new bloggy friends, I thought I might share this quick and easy idea again! Sheep and I spent some time doing a few new projects during Spring Break last week, but we also started pulling out our Easter decorations from last year and this is one of my favorites. You might even have everything you need to complete this project at home already! So, what are you waiting for . . . hippity, hop to it!
___________________________________________________________

With all the other activities going on this month, Easter has really sort of hopped up on me - ha! But I managed to locate some of my decorations over the weekend and make a couple of new things too!  I don't have a real cloche, but I've seen lots of cute ideas using them, including nests, and decided one of my glass cake stands would work just as well for this project!

As usual, I put my own spin on it, by simply buying a small grapevine wreath and filling it with Spanish moss to use as my nest. I just love the springy color of this moss so I will be finding more uses for it!


The wooden eggs nestled inside were hand painted by my cousin many years ago and I just love them! Aren't they exquisite? She is a true artist! I have several more, but only three would fit in my tiny taste of Easter, so the others are up on my mantle in baskets - out of Snacks' reach! It will be nice when he's a little older and things can 'come back down,' but for now Easter will have to stay under glass!


I have a few uncompleted Easter projects from last year as well, including a new wreath for my door. Hopefully (or should I say Hop-fully?), I will get these wrapped up this week. What are you up to for Easter this year?

Sunday, April 15, 2012

Sassy Sunday Blog Hop #10

He is not here, for He has risen.  Just as He said. ~ Matthew 28:6

Happy Easter everyone!  By the way, did you know that the Easter 'Octave' actually lasts eight weeks?!  So, even though we took a week off last week, it's not too late to wish you all a Happy Easter!  Last week, I decided to take the WHOLE week off and celebrate Easter (and a wedding - so fun!) with my family.  Good fellowship (and GREAT music) in church, followed by good food, a GREAT time with family and more Easter egg hunting than I can remember!  We are truly blessed!

Last week's party was full of great Easter and Spring decorating ideas, so I hope everyone took a few minutes to look around and leave a comment or two for your fellow crafty party goers.  I know I love hearing from others and I'm sure you do too!  In honor of the NEW life we have been given in Christ, I wanted to introduce you to three newcomers to our Sassy (Sleepy) Sunday Blog Hop and thank ALL of you for sharing your ideas with us!

First, check out this cute, quick cabinet redo from Bee @ Beez Rental Designs!  Her site is dedicated to crafty decorating solutions for those living in space that's not their own (aka: rental property).  What a great idea!!


Second, look at this table runner from Fifi @ About Blogging Time!  Can you say Fab-u-lous?!?!  I love it!!


And last, but not least, this darling Easter Cloche from Marisa @ Marisa's Pieces Online.  I too am a fan of Ballet Slipper Pink (wink, wink) and this project is super cute!!


At the last party, a SURPRISE giveaway was up for grabs to the crafty gal with the most views who also linked back to one or both the hostesses sites and I am happy to announce that Kate @ A Creative Cookie is our winner with her adorable sock bunnies!!!


And here's what she's won!!


What is it you ask?!  Well, that's a very good question.  It's obviously very old and used to measure things, but what exactly it is . . . . well, I'm not really sure!  It has an adjustable piece with brass inlays to help keep it accurate over time and a tiny metal pin on one end that makes me think of a compass, but I don't think that's what it is.  I have asked a few people, including a carpenter and an architect, if perhaps they had any ideas, but so far I haven't come up with anything definitive yet. 


Would, love, love, love if anyone knows anything to let the rest of know so we can all learn something new about this little piece of history I found in Round Top!  I look forward to sharing all my 'Friday Finds' from Round Top this week, as well as a couple of of projects I am finishing up for the kids' room!  In the mean time, you know the rules . . . .!


Wednesday, April 4, 2012

My Paint Chip Project


I have been seeing paint chip projects all over blogland recently and decided to try my own for Easter - although I must admit that I was feeling more than a bit guilty swiping all those paint chips knowing full well that I had no intention of painting anything in my house either Green Acres or any shade from Kumquat to Desert Sunrise.  I mean, does anyone in blogland consider the downstream consumer cost of swiping paint chips for their so-called 'free' decorating projects?  Not saying I didn't follow my friends off the proverbial cliff, just sayin' maybe I shouldn't have . . . .

And I must admit that this sassy little carrot bunting is pretty cute!  Even though the rest of my Easter mantle is nothing more than a hot mess!  I bought that darling, yellow PEEP cutout over a month ago and it's been sitting on my mantle since then.  It was supposed to be inspiring me.  Oh well - there's always next year, right?!


This project was 'super cinchy' (as Sheep would say) and went together quickly as well.  And quick is good when it's T-5 days until Peter 'Chocolatail' (as Snacks says) arrives!

Once I made the template for the carrot, Sheep traced and I cut and it only took about 15 minutes working together!  And I have enough cut out for a second bunting as well.  I love, love, love thinking up projects that we can do together!  Memories in the making I pray.

The carrot tops were just fringed paint chip squares that were then rolled and flattened.  I haven't seen anyone piecing paint chips together though (have you???), so I had to use my noodle for this part.  I was initially going to use colored staples just 'cause they're fun, but I didn't have any/forgot to go get some for a few days, so I resorted to what I had on hand and used my trusty sewing machine instead.  You could certainly use staples or glue if that's what you have handy.


I also used some leftover ribbon to string them together, but jute twine would have looked just as cute.  Since the coat rack left all my ribbon has returned to it's sad state of disorder and I couldn't find the jute, so ribbon it is!

This project was quick, easy and 'free' . . . but the irony of Easter decorations from 'stolen' paint chips has not escaped me.  So, how about 10 Hail Marys and a quart of paint and we'll call it even?!?!

Happy Easter Y'all!

Sharing this sassy project with School House Scraps, Savvy Southern Style, Randees Organized Chaos, Cowgirl Up, The Shabby Creek Cottage

Tuesday, April 3, 2012

Easter Under Glass


With all the other activities going on this month, Easter has really sort of hopped up on me - ha!  But I managed to locate some of my decorations over the weekend and make a couple of new things too!  I wish I could remember where I saw this, so if you remember seeing the nest with eggs in a coverd cake stand, please let me know so i can give credit where credit is due!

As usual, I put my own spin on it, by simply buying a small grapevine wreath and filling it with Spanish moss to use as my nest.  I just love the springy color of this moss so I will be finding more uses for it!


The wooden eggs nestled inside were hand painted by my cousin many years ago and I just love them!  Aren't they exquisite?  She is a true artist!  I have several more, but only three would fit in my tiny taste of Easter, so the others are up on my mantle in baskets - out of Snacks' reach!  It will be nice when he's a little older and things can 'come back down,' but for now Easter will have to stay under glass!


Wednesday, March 21, 2012

Easter Bunny Pie!

Hippity Hoppity - Easter's on it's way!

And what to do with all those Chocolate bunnies come Monday?
Make Easter Bunny Pie of course!


If I remember correctly, this recipe was 'discoverd' by my sister-in-law on the back of the Carrot Patch Pete Easter Bunny left in her basket one year - by the Easter Bunny himself of course!  And this pie is so yummy, it's become an Easter tradition around here.  In fact, we usually don't wait for the bunnies to appear in the baskets to make it and just grab a bunny or two at the grocery store instead so we can enjoy this pie on Easter Sunday!

Easter Bunny Pie

1 6 oz. milk chocolate bunny
18 large marshmallows, cut in half
1/4 C milk
16 oz. unsweetened whipping cream
1 graham cracker pie crust
Set aside left ear for garnish (If you can . . . Snacks was 'helping' in the kitchen so that poor ear didn't have a chance). 
'This is for me, right mom?"

Break remaining bunny into small pieces.  Melt bunny and marshmallows together.  Add milk and stir until smooth.  Let cool completely.  Meanwhile, whip cream until stiff peaks form.  Fold into cooled chocolate mixture.  Spoon into crust and chill until firm (usually 2-3 hours). Garnish with chocolate shavings from the ear.


Now if you look closely, you can tell that I've made at least one change to this recipe - I used a flaky pastry crust rather than a graham cracker crust.  Mostly because I didn't have any graham crackers handy yesterday, but also because I wanted to see if the pastry crusts that I had in the freezer from my strawberry icebox pie a few weeks back really held up when you thawed then later.

It worked beautifully!  And I promised to share the recipe if I decided it was a keeper, and I think it is, so here you go!

Flaky Pastry

5 C flour
2 C shortening
1 Tablespoon brown sugar
1 Tablespoon vinegar
1/4 teaspoon baking powder
1 egg, beaten
1 1/2 teaspoons salt
Water

Sift dry ingredients together.  Cut shortening into dry ingredients until mixture is the consistency of course meal.  Combine vinegar and egg and add enough water to make 1 Cup of liquid.  Add liquid to dry ingredients and mix until dough forms a ball.  Divide dough and pat out with hands into desired shape on waxed paper.  Smooth with rolling pin.  For a baked shell, prick with fork and cook at 450 degrees for 12-15 minutes.  Dough will keep several months in freezer tightly wrapped.  Yields 5or 6 9" crusts.

I made a couple of other changes as well.  I used a mixture of dark and milk chocolate bunnies because I wanted to amp up the chocolate taste and I prefer dark chocolate.  I also added a teaspoon of Mexican vanilla to my filling as well - just 'cause.  It's what I do!

Hoppy Easter Y'all!

Sharing this sassy recipe at Savvy Southern Style, Delightful Order, Somewhat Simple, The Brambleberry Cottage, Glue Talks and Stuff & Nonsense, Serendipity & Spice