Pages

Monday, January 30, 2012

I Heart Chair Covers!


I first came up with the idea for chair covers back at Halloween, when I was probably overwhelmed with laundry or trying to find a moment alone spend quality time with my children and didn't bother to check my e-mail for a couple of days, thereby missing the e-mail about the class party.  For those of you with school age children, you know what I am talking about!  Being the last to acknowledge the group e-mail about the upcoming class party can be disastrous!!  Invariably all the good (easy) items to bring have already been taken and your stuck coming up with a brilliant game idea that 22 kids can play in 10 minutes that doesn't cost a whole bunch (because you're donating it) AND won't be too messy, too sugary or somehow politically incorrect - uugh!   I could have simply ignored the e-mail altogether, but then I might be labelled as a slacker mom and how would this impact Sheep's future education/reputation/opportunity here in small town USA?!?!?!

Let's face it, the stakes are high! 

Needless to say,  I was dismayed  to discover that the only item not taken was decorations.  And have you looked in your child's classroom lately?  It is generally so cluttered with posters, projects and other paraphernalia that it's hard to imagine what kind of 'decorations' would even be noticed!

Once again, Pinterest to the rescue!!

I saw these cute little ghost chair covers from Family Fun and the wheels started turning!  I got so excited about the whole thing, I rushed right up to school, snagged a chair and got to work!  And the square shape of the classroom chair lends itself to all kinds of  fun holiday shapes that aren't possible on a full-sized chair!!!  They were SO STINKIN' CUTE and Sheeps' classmates loved them so much that I knew I'd be doing these again for the other holidays as well!

Like the Halloween chair covers, these sweet little numbers don't cost much $$$ either, because they are made with felt!  So let's get started!

Supplies:
Felt
Pinking shears
Sewing machine or hot glue
Ribbon

Step 1:  Measure your chair.  You will need three measurements:  Width across the back (A), The length from the top of the back to the bottom of the back (B) and the length of the back support (C).


Step 2:  Make your template.  I made mine out of felt. transferring my measurements and drawing a rectangle so you know how wide your heart will need to be.  Once you have your rectangle, you can freehand your heart, leaving a little for seam allowance, though you don't need to leave much because felt doesn't ravel - yay!!


Step 2.5:  Once you have your template, you can use your mad math skills to calculate how many hearts you are making and how much felt you will need!

Step 3:  Cut out your heart on felt that has been doubled so that you have a front and a back.  I used my pinking shears to add some additional visual interest but you don't have to, it's up to you!  Though I must say, the pinked felt looks SO CUTE!

Step 4:  If you want to add any embellishments, now's the time to do it!  Especially if you plan on sewing the chair cover together rather than hot gluing.  I cut a simple XOXO design out of white felt and stitched it on.  You could glue here as well, but I thought stitching might be more durable and once you've made 22 of these, you aren't going to want to be doing this again every year.  Make them to last and you can reuse them yourself (if elementary school is in your future for the next 6 years like it is mine) or give them to your child's teacher - what a great teacher gift!!


Step 5:  Sew (or glue) your hearts together, leaving plenty of room at the sides to get it over the chair back.  You can sew one side down further than the other to keep it as snug as possible, but don't go too far - it's no fun to rip on felt!!


Step 6:  You can simply cut a slit at the bottom to use as a button hole to clasp the two hearts together at the bottom, or you can actually make a button hole like I did - your choice!  With this shape, I think the button hole is important, because kids are wiggly, squirmy and just generally don't sit still - and you don't want them slipping off and becoming a distraction rather than a decoration!


Step 7:  Tack about 18 inches of ribbon to the inside back of your chair cover so that it can be threaded through the button hole and tied in a bow!  A button would look cute too, but I liked the ribbon!


Step 8:  Deliver to your child's classroom and prepare for lots of ooo's and ahhh's!  Mine will hopefully be arriving February 1st so they have two weeks to enjoy them!!

I am also going to do some shaped like envelopes, so I'll be sure to post a pic or two of those as well!  Happy Valentine's Yall!

UndertheTableandDreaming
br />


michellepaige

Adventuresindinner

Sunday, January 29, 2012

At the Hop!

All you gals and chicks can get your kicks at 'The Hop.'  A new blog hop that is!

I am very excited to announce an upcoming blog hop with Randee @ Randee's Organized Chaos and Leanne @ Because I Think I Can!  We will start 'officially' hosting the blog hop next weekend, which will include super SASSY prizes, perhaps even something monogrammed by yours truly (!!), but I am too excited to wait and thought  I would give it a little test drive today!


Just a couple of quick rules:
1.  Have fun!!
2.  Share some sass with some of your awesome fellow bloggers!!
3.  Grab the link and post on your own page so everyone can dance!

So . . . . Let's go to the hop! Let's go to the hop! (Aww baby) Let's go to the hop!!

Friday, January 27, 2012

What To Do?!


By some strange twist of fate, maybe the planets have aligned or something, but I am actually THROUGH my "To Do" list for the week AND we have nothing scheduled (no birthday parties, out-of-town trips, no house guests) for the weekend!  I don't thik this has happened since before Thanksgiving and while I'll admit that I am largely responsible for our busy 'social calendar' because I LOVE parties, visitors and vacations, I could really use a weekend off!

Now that's not to say I don't have plenty that I could be doing (like finishing my Valentine's chair covers for Sheep's classroom - stay tuned!) and many things I should be doing (like grabbing an extra workout or two) but I have nothing that I HAVE to do and no place that I HAVE to be.

Lovely!

Thursday, January 26, 2012

Rage Against the Machine

My embroidery machine that is - ha!

Speed surprised me with a new sewing/embroidery machine two Christmases go and I was thrilled!!  I had been coveting researching them for some time and desperately wanted to get my hands on one of my own before Sheep outgrew 'all things monogrammed,' if you know what I mean.  This was the Christmas before Snacks came on the scene, so I was in nesting overdrive that Christmas anyway.

Long story short, I ultimately bought a Viking Topaz 20 embroidery machine, which I am sure is a very good machine, but is certainly not the most popular brand around these parts.  In fact, I don't know anyone (other than the people at the Viking store in Joann's) that are embroidering on a Viking machine and when I purchased my machine, even the salesperson was learning about embroidering on them - grrr!  Needless to say, it means I am usually on my own trying to figure things out!

I do love being able to machine applique and embroidery - but it is almost always a frustrating experience for me.  It just seems like as soon as I solve one hiccup, a new one arrives to thwart me!  Whether its which needles to use, how to adjust a design, which stabilizer works best, why my thread keeps breaking or fraying - it's always something!  Sadly, I contribute to this frustration by always trying to create something that apparently either can't be done on my machine or with my current software.  At least I can admit it, right?!

The names on the art aprons for Sheep's birthday party stitched out so easily (thank you Lord) and so beautifully (thanks again!) that I was lulled into thinking that I was FINALLY getting the hang of it - AFTER TWO YEARS!!!  But my very next project, a baby shower gift, proved once again that I still have a lot to learn about the Viking Topaz 20 and 4D software - uugh!

Here are just a couple of today's problems AND my solutions, for those of you new to embroidery (I still consider myself new) or perhaps looking for tips to make your machine embroidery even better.  It seems to me that there is a real information void about 'how to' machine applique out there (which is very surprising to me actually), particularly using a Viking machine.  Thank goodness I have met some great gals that embroider who are always willing to share their experience with me.  I mean, Speed,  is always hopping on truck forums or motorcycle forums to find answers to his mechanical woes, but I haven't found a similar platform for my embroidery machine - so frustrating!

Problem # 1:  The burp cloths I purchased for embroidery are very loosely woven.  Yes,  I am aware that I could purchase other burp cloths, but now I have these and want to use them up before buying/trying a different brand.  Besides, they work fine as a burp cloth - they're just difficult to applique.  Mostly because the loose weave makes it almost impossible not to cut some of the threads on the burp cloth itself when you are trimming your applique.

My Solution:  I decided to lay down a layer of transparent, water-soluble film (buy it where you buy stabilizer.  Comes on a roll.) before even beginning my design.  Yes, it's now sandwiched between the burp cloth and the applique fabrics, but it should dissolve when washed and did keep me from accidentally snipping any of the fibers on the burp cloth itself - yay!


Problem #2:  I don't like to see the underside of the applique on the wrong side of the burpie.  In garments, I cover the underside with a thin, fusible mesh so that it's not scratchy for the wearer and it protects the stitching from accidentally being pulled or snagged.  But I don't want that mesh being seen on the back side of the burpie either.  Plus, it seems that when I grab for a burp cloth,  I don't have time to figure out which side to use.   Just sayin'.

My Solution:  OK.  So maybe I am a perfectionist, but still - I don't like exposed threads any more than I like raw edges or crooked seams - it's just how I was raised dammit :o)  I blame my mother . . . and she will smile when she reads this!  My solution for the last burp cloth I made was to actually 'line' it with a coordinating fabric, sewing three and a half sides with right sides together, then turning and top stitching over the opening.  It looked great, but it also took a lot of extra fabric.  I've also done a couple of burp cloths with fabric panels down the middle in the past, but I didn't embroider anything on them afterward for the same reason.  Today I combined the two ideas and simply cut a fabric panel to fit slightly wider than the width of my applique and applied it to the backside of the burp cloth using a zigzag stitch.  I used a coordinating thread for my bobbin so that you wouldn't really notice the stitching on the appliqued side.  I think they are my best idea for burp cloths yet!


Endless Slobber . . . Sometimes I crack myself up!!

Do you machine applique/embroider?  Do you own a Viking machine and/or have you used 4D software?  Even if you don't, I would love to hear about your tips and tricks for a perfect applique.  Maybe we'll start a forum ourveryownselves!

Tuesday, January 24, 2012

Sweetheart Cookies

Nothin' says lovin' like homemade treats this Valentine's Day and these cookies are one of my family's favorites! They are a cross between a sugar cookie and a shortbread cookie and they are oh so yummy and PINK!!! I have never tasted another recipe the same as this one and believe me, I have looked!   Last February my beloved Sweetheart Cookie recipe went missing and I spent hours trying to replicate them using other recipes I found on line - FAIL!  Luckily I came across it over Christmas when I was hosting my 12 Days of Christmas Cookies . . .

Oh how I love thee Sweetheart Cookies!

2 packages strawberry Jello (3 oz. each)
3/4 butter
1 egg
2 C flour
1 tsp. baking powder

Beat Jello and butter until light and fluffy. Add egg and beat well. Stir in dry ingredients to make a stiff dough. Refrigerate 1-2 hours until dough is very stiff. Roll out onto well floured board and cut with heart-shaped cookie cutters. Bake at 375 degrees for 8-10 minutes.

*Make sure you use regular Jello, NOT sugar-free because the Jello is substituting for the sugar in this recipe.

br />


Sunday, January 22, 2012

Every Child is an Artist!

Ho Hum.

Christmas is over and put away for another year.  So what's a crafty girl to do - but plan a party?!!!

This weekend we hosted Sheep's birthday party  . . . AND IT WAS SO MUCH FUN!!  (Yes, that's me yelling about it in blog-speak!)  Since she has many boy friends (NOT boyfriends mind you, let's be clear on THAT) and her favorite boy in the world (her cousin Max) to consider, we had to think of something to do that both girls and boys would enjoy.  And since my little girl has obviously gotten her arts and crafts gene from ME (makes my heart leap) we couldn't think of anything more fun than an ART PARTY!!

And it was some serious fun!!

I'm tellin' you, if you are looking for an awesome party theme, and aren't afraid to get a little messy, this is THE party for you!

Sheep and I handmade invitations two weeks ago, but we've been Pinteresting collecting ideas since before Thanksgiving, so I will attempt to link our inspiration sites for you as much as possible.  We used cardstock we had on hand, a circle punch and some pop dots to create the paint palette.  Then added a small paint brush from our stash (I tend to buy arts and crafts supplies in bulk) to each of palettes.  The information about the party was printed on cardstock and glued to the back side.  Since we were running out of time, the finished invited were a bit bulky AND it was raining the day they were set to be mailed, I opted to hand deliver them instead so they wouldn't arrive a ruined, wet mess - but you could certainly mail these if you wanted to!  I cut and Sheep glued and I think they came out GREAT!!!


And let me just say that this whole entire thing would not have been possible without the aid of my BFF and her daughter (a million thanks as usual), who helped us 'test drive' all the projects in advance and just generally save the day when my idea to completion ratio reaches unacceptable levels and I begin to panic!

We ultimately decided on 5 art stations, including:


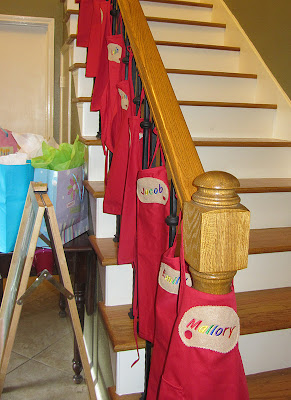
In preparation for the mess party, I decided to make aprons for each of the kids to wear.  I was lucky enough to grab them for half-off at Hobby Lobby during Christmas and grabbed a remnant of felt at Joann's for the applique.  I simply cut down the paint palette template I used for the invitation to fit the bib of the apron and sewed it on the aprons.  Then I used my embroidery machine to add each child's name in rainbow colors to look like paint on the palette!  So stinkin' cute!!  And they cost less than 3 dollars each for a party favor they will be able to keep and use for many moons!

To make Sheep's apron a little more special (she is the birthday girl after all), I found an apron with a ruffle and used pinking shears to cut out her paint palette.  Doesn't she look adorable?!

She wasn't the only one decked out for the party either.  All of my 'help' wore mustaches (oui, oui) that my sister had sent as a stocking stuffer this Christmas, so they were free!!


We didn't want the party-goes to feel left out though, so we drew mustaches on their fingers so we could all be french painters together - OUI! OUI!

Sheep and I had visions of a layered rainbow cake like the one seen here to continue the rainbow art theme of her party, but with so many kiddos and helpers and parents to feed, I was afraid that a layered round cake wouldn't easily cut into enough pieces.

Never fear!  Pinterest is here!!

Instead of layers, we simply divided and colored the batter using paste food coloring and then poured it into our 9 X 13 pan for a marbled rainbow cake that looked like a piece of art itself!!  A generous layer of buttercream frosting made it simple irresistible!

No.  Seriously.  It was irresistible.  Just ask Katie, who once again managed to devour (thankfully only a portion of) the cake!!  Ugh!!  Not again!!  Well, it was too late Friday night when I discovered it to much other than trim the corners and cover them with some leftover icing.  But a quick trip to the store Saturday morning for Skittles to scatter around the cake distracted (almost) everyone from the now unusual shape and decoration.  It's a good thing she has friends in low (short) places . . . .


It looked really amazing when it was cut, and tasted every bit as good, so if you're interested in trying yourself, I used the recipe here.

We 'decorated' the house by simply rolling up the rug and covering the furniture with canvas drop cloths we borrowed from our neighbors.  We covered the floor and tables, both inside and out, with a roll of painter's paper that cost about 10 bucks at home depot and secured everything with blue painter's tape.  We hung our samples up using leftover twine from another project and scattered some of Sheep's artwork on the mantle and around the house.  Voila - instant art studio!! And super easy cleanup afterwards too!

When it comes to winter birthday parties around here, the weather is really anybody's guess.  It could be 75 and sunny or 45 and raining - or any combination you can think of.  This weekend, it was warm, but cloudy and soupy with probably 98% humidity.  Scratch my original idea (seen here) to hang their art to dry out on the porch.  Nothing was going to dry outdoors in this weather and I wanted them to be able to take their art home.  Luckily, panic necessity is the mother of invention!  Or inspiration at least!  I was able to score some box lids from our local copy store (free) and used the tempera paint for the party to paint them in rainbow colors the night before.  Of course I had to move them indoors overnight to dry ha!  I printed out a quote I ran across while looking for something for the kids new bedroom and glued it to the inside of the box lids for a cheap and easy art display that they could take with them.  Clever me!  I think they came out pretty cute!


My BFF is a hoarder collector of 'things.'  All kinds of neat and wonderful things just screaming to be refinished, repurposed or recrafted in some way.  It is one of the 'things' I love most about her, even though it puts my craftaholic tendencies in overdrive when I visit!!  Needless to say, she is an AMAZING resource when it comes to parties.  And I think she may love my little Sheep almost as much as I do so she's not afraid to go all out for that girl!!  She supplied us with oodles of paint, nail polish, Sharpies and two old frames that she painted and used to take pictures for the party!

FABULOUS!!


The kids AND their parents LOVED having pictures made with the frames!  And the pics of Sheep with her friends will make great thank you cards as well.  Oh, did I mention she's also a great photorapher?  Like I said, this party would NOT have been possible without her!


The soupy mess of a morning started to clear off by the end of the party, so everyone joined in on the photo fun!


Happy Birthday (Party) Sheep!  We love you!


Todays Creative Blog