Pages

Showing posts with label party ideas. Show all posts

Thursday, February 27, 2014

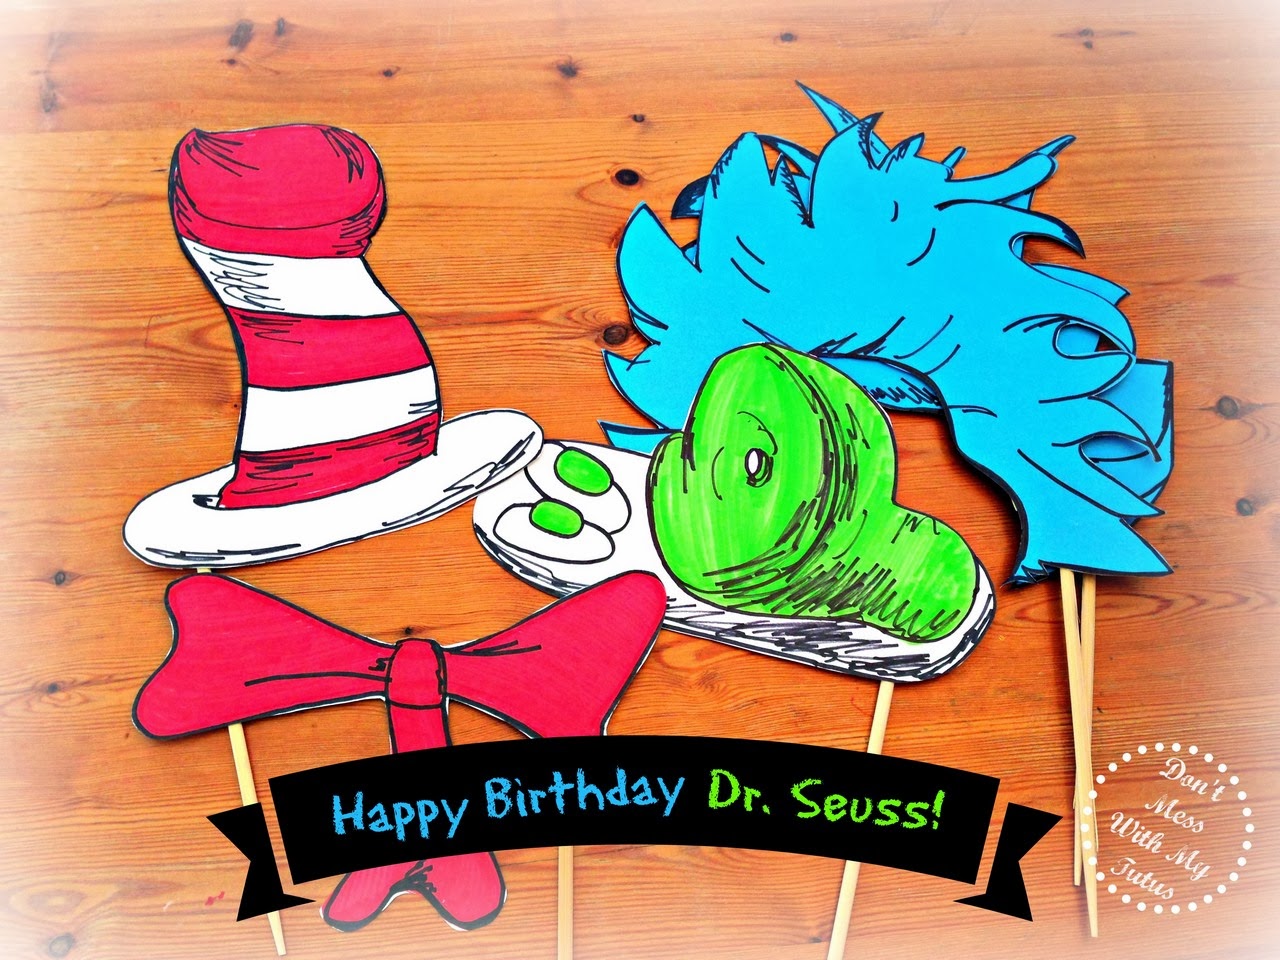
Dr. Seuss Photo Props!


Does your child's class celebrate Dr. Seuss' birthday?

If so, here's a quick and easy craft that's sure to add some fun to this special day!

I made these 'phun' photo props in about 30 minutes using nothing more than some cardstock, sharpies, scissors, glue and chopsticks!  And since you likely have most (if not all) of these supplies around your house, this project was not only quick and easy, it was also FREE!

I like that!

There are certainly lots of creative, crafty sellers on Etsy with downloadable photo props, but I decided to make my own, in part because I wanted my hair for Thing 1 and Thing 2 to be larger than a standard sheet of paper (8.5 X 11), and I figured I could freehand some crazy hair as well as the next person.  I also wanted to make some green eggs and ham for my own little Sam I Am (aka Snacks) and I didn't see any of those on Etsy.

I will also say that while these photo props may not be professional, they are what I call 'preschool perfect.'  In other words, they weren't made to last forever, but they are sturdy enough to get through a day of picture taking in pajamas - 'cause that's how we celebrate Dr. Seuss' birthday in these parts!

Hopefully I will have Here are a few pictures of my little guy using the props for you later this afternoon, but for now,  and here are a few tips for making your own 'preschool perfect' photo props!
  1. HAVE FUN!  That's what Dr. Seuss is all about!
  2. Don't stress if they aren't colored or cut perfectly - the kids will love them anyway!  Personally, the bit of white around some of the cutouts just adds to the cartoon-ish nature of the Dr. Seuss props in my opinion!
  3. If you're making something fairly tall or wide, double your cardstock to give it extra stability.  I did this by simply gluing two pieces together before cutting them out.
  4. Chopsticks are FREE and are the perfect length for kid-sized photo props.  We used chopsticks at Sheep's Valentine's Party, and I swiped the extras thinking I would make photo props later.  Who knew it would be so soon?!
  5. In addition, glue a small strip of cardstock over the chopstick after securing it to the prop to give it more surface area and keep it from separating from the prop so easily.
  6.  Make sure to alternate which side to attach your chopsticks to on the props.  For example, I attached the chopstick on the right side of the bow-tie and the left side of the hat so that the same child can hold both at once if they want to.

Happy Birthday Dr. Seuss!

Sharing this sassy project at some or all of these great parties: Under the Table and Dreaming, Totally Overflowing with Creativity, Three Mango Seeds, Classy Cutter, Serenity You, House of Hepworth, Skip to my Lou, LadyBug Blessings, Nap Time Creations, The Style Sisters, Polkadots on Pararde, Rae Gun Ramblings,Costal Charm, Not Just a Housewife, Domestically Speaking, The Shabby Creek Cottage, Sumos Sweet Stuff, The Gunny Sack, Gingersnap Crafts, Southern Lovely, Lil Luna, Someday Crafts, The NY Melrose Family, The DIY Dreamer, The Blackberry Vine, Homeworks, The Rustic Pig, Cornerstone Confessions, Kathe with an E, House on the Way, PJH Desgin, Glued to my Crafts, The Crafty Blog Stalker, Seven Alive, Made in a Day, Live Laugh and Love, A Creative Place, Have a Daily Cup of Mrs. Olson, Home and Gardens, It Happens In a Blink, I Gotta Create, Domestic Super Hero, All Pretty Things, Katie's Nesting Spot, 52 Mantels, Truly Lovely, Twinkle in the Eye, Happy Hour Projects, Six Sisters Stuff, Tutus and Tea Parties, Mop It Up Monday, Saturday Show and Tell, Moonlight and Mason Jars, The Scoop, Wow Us Wednesdays, Take-A-Look Tuesday, Share Your Stuff Tuesdays

Wednesday, June 5, 2013

Lemonade Cupcakes!

 
Are you ready for a taste of summer?
 
Well these tasty treats will certainly do the trick!
 
Friday was our last day of school {hooray!} and to celebrate we invited the whole class over for an end-of-year pool party!  It was two hours of total chaos FUN!  In addition to watermelon and lemonade, we needed something sweet, and cupcakes have been my go-to crowd-pleaser for a while.
 
The hands-down bestest cupcake recipe ever can be found at Recipegirl and I simply made a couple of changes to turn her White Wedding Cake Cupcakes into lemonade delights.  First, I omitted the vanilla.  Second, I substituted frozen lemonade concentrate for the water in the cupcake recipe and for part of the milk in the buttercream frosting.  I was able to use one 12-ounce can of Minute Maid for both.  Third, I added a few drops of yellow food coloring to both the batter and the icing just to jazz up the color a bit more.
 
 
After Frosting with a large star piping tip, we 'tarted up' our lemonade cupcakes with sprinkled yellow sanding sugar on top and a section of striped paper straw for decoration!  Incidentally, Target is now carrying these cute paper straws in their party section and I was able to cut them into thirds for the cupcakes - darling!
 
And delicious!
 
The best part about this recipe is that it makes 3 dozen cupcakes, so it really is fit for a crowd.  And everyone liked them so much that we will no doubt be making them again, all summer long!


Truly Lovely  

Sunday, May 26, 2013

Lo-Cost Cardboard Column Tutorial

 
As you know, I recently coordinated an Old South-themed 'Belles and Beaus Ball' for our Girl Scout service unit!  And one of the projects our committee came up with to help transform our event space (a large metal building that was once used as an airplane hangar) into a southern plantation for our soiree was a set of columns to flank the stage.
 
Now if you have ever shopped for columns or priced column rentals then you know that these babies can be very pricey and a rental would have to be returned.  Any way we sliced it, ready-made columns were just not going to be 'using our resources wisely,' so we had to come up with something else!
 
Luckily, I have a very dear friend in the construction business that I knew might be able to help and I was right!  Yippee!
 
He suggested I take a look at these:
 
 
These are cardboard concrete forms that are approximately (I emphasize it because it turned out to be quite important) 8" in diameter and 4' high.  Just for reference, a similar sized column around here would rent for about $25.00 each (ouch!) and they'd be ours for only one night!
 
 
The cardboard forms were a mere $7.00 each, so here's where I went with it:
 
 
Using inexpensive plastic pots for the top and the bottom, I was able to mimic the look of a roman column with the turned rim.  I envisioned screwing the pot rims to small wooden bases to make them more sturdy and allow us to fill/weight the bottoms of the columns with sand to prevent tipping.
 
And here's the mock-up at Home Depot, who was kind enough to donate all the supplies for this project (including the ferns on top), so it ended up being 'no-cost' columns for us!


As you can see from the first picture, we simply painted all the pieces white and them assembled them at the event center!  They were lightweight for transporting and have already been used again at our service unit bridging ceremony!
 
I mentioned earlier that the diameter of these cardboard forms was an issue - because when choosing your pot, the diameter of the column will determine how far down your pot will seat in the form.  it turns out that the two we originally had were not actually the same diameter, which would have made one of the finished columns noticeably taller than the other.  We solved the problem by exchanging one for another at a different store to get two that were closer in diameter, but afterwards I realized that it could have been solved by getting a smaller diameter pot instead and that might have been even easier.  I found the best plastic pots for this project at Dollar Tree because they ended up being very forgiving on the column diameter and had a larger rounded lip that looked better on the column than the one in the mock up in my opinion.  Also, the least expensive HD pot in the size and configuration that we needed was about $2.50 and the ones at Dollar Tree were obviously only a dollar!
 
These were a great addition to our 'Plantation Party' but could be put to use for lots of other things as well, so I'm really happy that they worked out!

Monday, May 20, 2013

Crepe Paper Magnolias


Aren't they beautiful?!
 
And honestly, you can't even tell they aren't the real thing - now how awesome is that?
 
We (I say we, but it was really me) had a need for inexpensive magnolias to incorporate into our centerpieces for the Belles and Beaus Ball last month and even on sale or using coupons, silk flowers were out of our budget.  Unfortunately for her Luckily, my good friend and partner-in-crime Kristi found a paper magnolia tutorial on Martha Stewart crafts that you can watch here.  And once I saw it, I knew that no other flower options would do for my 'Old South' themed soiree!
 
 
Finding the crepe paper was a bit of a challenge so I will save you the trouble of driving to all of your local craft stores, paper/scrapbook stores and florists because they just don't have it - okay?!  Go ahead and head on over to eBay where the lovely Michael from Italian Paper People will hook you up for a very reasonable price and with some free shipping too!
 
 
And you are going to love, love, love this paper!  It was so easy to work with and I can't wait to try it on some other projects!
 
Anyway, it comes on 8' rolls that are approximately 20" wide, so we had to do a lil' cipherin' to figure out how many flowers we would be able to squeeze out of our paper rolls for the tables.  We needed about 100 flowers to cover everything and we ended up using 4 rolls, including 3 rolls for petals and one partial roll for the flower centers.  We were also on a time table, so ordering more paper in advance of the dance wasn't an option.  Fortunately, with just a few modifications from the original tutorial, we were able to get the job done with magnolias to spare!
 
 
Martha's Modified Magnolia Tutorial
Supplies:
  • Italian crepe paper in yellow and creme,white or pink
  • Template for petals and stamens
  • 6" wired floral picks (Michael's)
  • Brown or green floral tape
  • Scissors
  • Scotch tape
Instructions: 
  1. Watch Martha's tutorial a couple of times.
  2. Don't freak out and look somewhere else - this is the best paper magnolia out there!
  3. Skip bleaching your paper and just buy the color you want.  Down here in Texas, I'd never seen pink magnolia blossoms before anyhoo!
  4. Use your rotary cutter and mat to make quick work of cutting your petals.  I was able to cut through about three thicknesses easily using these tools.
  5. Since I wasn't bleaching, I found that I was able to get a 5" petal out of a strip that was only 1.5" rather than 2", which gave me some extra paper for more petals.  Also, this paper is very forgiving, so a little less was no problem, especially for the smaller petalled flowers (see below).
  6. Don't be afraid to make flowers of different sizes.  I modified the 5" petal template to a 4" petal template so we were able to make more flowers with less paper.  We ended up with a mix of both 5" and 4" petalled flowers on our tables - beautiful!
  7. A tiny piece of scotch tape will hold your rolled paper stamen together while you add your petals so you can save your wire to wrap around the petals and stamen, securing them together.
  8. Nine petals seemed to look just a good as 12, which also meant more flowers and less to fiddle with trying to hold all together until you can get it wired.
  9. Floral tape is pretty inexpensive, so don't use it sparingly on these flowers.  It's a little tricky to get the hang of, but you will!
  10. We found that cutting and stretching lots of petals first, then assembling the flowers really sped up the process and I was able to enlist the help of my Brownie scout for this part, which is always more fun!
 
In addition to being beautiful, these crepe paper flowers were very durable as well and we ended up with most of them intact at the end of a very fun-filled evening!  All in all, they ended up costing us about 50 cents each, so it was well worth the effort!
 
Sharing this sassy idea at Under the Table and Dreaming, Totally Overflowing with Creativity, Three Mango Seeds, Classy Cutter, Serenity You, House of Hepworth, Skip to my Lou, LadyBug Blessings, Nap Time Creations, The Style Sisters, Polkadots on Pararde, Rae Gun Ramblings,Costal Charm, Not Just a Housewife, Domestically Speaking, The Shabby Creek Cottage, Sumos Sweet Stuff, The Gunny Sack, Gingersnap Crafts, Southern Lovely, Lil Luna, Someday Crafts, The NY Melrose Family, The DIY Dreamer, The Blackberry Vine, Homeworks, The Rustic Pig, Cornerstone Confessions, Kathe with an E, House on the Way, PJH Desgin, Glued to my Crafts, The Crafty Blog Stalker, Seven Alive, Made in a Day, Live Laugh and Love, A Creative Place, Have a Daily Cup of Mrs. Olson, Home and Gardens, It Happens In a Blink, I Gotta Create, Domestic Super Hero, All Pretty Things, Katie's Nesting Spot, 52 Mantels, Truly Lovely, Twinkle in the Eye, Happy Hour Projects, Six Sisters Stuff, Tutus and Tea Parties, Mop It Up Monday, Saturday Show and Tell, Moonlight and Mason Jars, The Scoop, Wow Us Wednesdays, Take-A-Look Tuesday

Friday, May 17, 2013

The Belles and Beaus Ball!


Does your Girl Scout troop or service unit participate or host any annual events?

The annual father-daughter dance has been a tradition in our Girl Scout Service Unit for 25 years, and what AMAZING fun we had this pulling it together this year!  In year's past, the party has always rotated between 4 basic themes: princess, country, disco and luau, but our committee decided to mix it up a bit this year, with an 'Old South' twist on the princess theme by hosting a 'Belles and Beaus Ball" for our dads and daughters instead.  When we chose the theme, we were very excited about it, but found there really wasn't much out there on Pinterest in idea-land to copy inspire us, so planning this Southern soiree turned out to be a real challenge!
 
So today I am sharing all our party planning secrets with you, in hopes that your next Southern-themed event will come together that much more easily!  And her's a quick pic of the night's hostesses with the mostesses - my co-leader, committee co-chair, partner-in-crime and amazing friend, along with our mini-me's at the ball!


The founder of Girl Scouts Juliette Gordon Lowe was born in Savannah, GA in the 1800's and lived at the Wayne-Gordon mansion as a child, so what better place to host a Belles and Beaus Ball than at the mansion itself?  I wish I could take credit for this brilliant idea, but it was one of our committee members who came up with this stroke of genius.  I just ran with it (wink, wink)!


For the focal point of our venue, we contacted the Juliette Gordon Low birthplace for high resolution images of the house and it's most famous resident, which they were only too happy to provide - for FREE!  And you girl scout moms out there know how we girl scouts like/need to hear that word!  From there, we created a focal point for our venue by having the image of the Wayne-Gordon House printed on four 3' by 10' panels of plain white copy paper, that we pieced carefully together and hung with Scotch brand removable mounting dots, since we weren't allowed to fasten anything to the walls.  I was really worried that they may not last the night, but I give them a resounding two-thumbs up!  We also made sure to arrange the tables so that nothing was blocking the poster and it could double as a photo op too!


  Although the picture was in color, the black and white copy was by far the least expensive printing option available for the scale of the print and gave it a real vintage feel as well.  The label across the top we simply cut from some donated (FREE!) poster paper and lettered using a Cricut and some clearance scrapbook paper.

 Scarlet?  Melanie?  Is that y'all!!


 We also printed out a picture of Juliette Gordon Low and placed it on an easel next to the registration table so she could 'welcome' guests to the ball!


 Fortunately, we received a couple of cash donations from local businesses, including Rhea Lana South Houston and Dentistry 4 Children, for the event (message me if you would like more information about how to do that), so we were able to purchase white (plastic) table cloths for the foundation of our tablescapes.  Then we layered borrowed (FREE!) burlap runners over the tablecloths and topped them with cut magnolia leaf clusters.  These were 8' tables and it took about 5 leaf clusters to make the arrangements.  We had borrowed (FREE!) mason jars and donated (FREE!) tea lights nestled into the leaves and then added crepe paper magnolias that we made ourselves for a fraction of cost of silk or other bought flowers! 


The paper magnolias were a Martha Stewart craft, but with a few modifications to her technique, we were able to whip out 98 magnolias - enough for 26 tables, the dessert table and the stage decorations as well.  Best of all, they turned out to be very durable paper flowers too, so I was able to incorporate them into another craft after the dance too!  I shared my 'Martha's Modified Magnolias' technique in another post, so check it out!


The cake table and registration tables were topped with quilts from home to bring some color into the room since we our centerpieces were neutral.  The colors in the quilts looked great against the taupe-colored walls and really brightened things up!   On the dessert table, which had been filled with donated deliciousness courtesy of Nothing Bundt Cakes,  we used a collection of borrowed (FREE!) hat boxes, serving trays, even a small wrought iron dress form to amp up the vintage feel!


Our last big 'project' for the event was a set of 4' white columns we managed to make for under $10 a piece.  We actually had all the materials for the columns donated (there's that word again - FREE!) by the awesome folks at Home Depot, who love supporting local children's organizations such as scouting!  Look for more on the inspiration and technique used to construct these columns in a revealing, 'tell-all' post coming to a sassy blog near you soon!


 The DJ was set-up on stage during the dance, which was part of the reason we chose to hang the house picture on another wall instead.  However, we did use the Cricut to letter a welcome banner for the back wall since it faced the entrance and was the first thing you see when you walk into the venue.  It also served as the stage for the dance instructor during a short dance lesson donated to our dads and daughters by Tanya Morland of the National League of Junior Cotillions!  She was an amazing instructor and the girls and their dads really enjoyed learning how to dance together!


In addition to the dance instruction, we offered portraits for our dads and daughters, courtesy of a girl scout mom!  I LOVE girl scout moms - what an amazing collection of talent and generosity!  This year's portraits were set up outside, using an antique chair and the park for the backdrop.  Beautiful spring weather made it a pleasant place to wait for pictures too!


The dance was a HUGE success, with lots of rave reviews from both daughters and dads, some  commenting that it even topped last year's dance! Now that's saying something, because last year was super-duper fun!  We even got a write-up in our local paper!  We also managed to raise money on this event (though that wasn't our goal), which has us considering changing the event to a fundraiser and maybe getting an older scout troop involved as the hostesses.  At any rate, it's an event with lots of possibilities and so much fun to be a part of that if your organization doesn't already have something like it, perhaps you could start one!

And I promise to post tutorials for the paper flowers and the columns soon - scout's  honor!

Sunday, April 7, 2013

'Operation Rhino' Birthday Party

 
Last week my sweet, adorable, funny, adventurous little man turned 'thwee' and to celebrate he asked for a rhino party.  Yes, a rhino party.  Which, he pronounces 'whino' and did get me wondering about my consumption habits - ha!  And while I KNOW that he will most likely only remember his third birthday party from the pictures he sees later on, so it didn't really matter to him what we did, Sheep was NOT letting me off the hook that easily!  He's a lucky little dude to have such an advocate and protector in his closest sibling . . .
 
 
Luckily, we have a wildlife park not too far from the house and (Yippee!) they do indeed have a rhino there named Pee Wee, so the bulk of this unusually-themed celebration came together pretty easily!  If your local and have never been to Bayou Wildlife Park, it's definitely worth the trip at least once, because there's tons of animals and the train ride through its 80 acres lets you get up close and personal too!
 
Still, a glance at a rhino from across a field wasn't going to cut it by itself, so off to Pinterest we went, only to realize (surprise, surprise) that there isn't a lot out there in the way of party ideas or paper goods for a rhino birthday party.  You can check out the things we found and liked on my Pinterest 'Birthday Fun' board though, and I will be adding a few of the creations below as well!
 
 
And as usual, I was working under some pretty serious time constraints, so ordering any of cute things we found was out of the question.  Whoever said necessity was the mother of invention obviously forgot about procrastination - ha!
 
Ultimately, I settled on a turquoise and orange color scheme for the party and used my superior tracing and scissor skills to construct the invitation - which turned out pretty stinkin' cute if I do say so myself!  Luckily, only 8 invitations went out, so it wasn't an overwhelming task and Sheep was happy to help with the glue and pop dots!  Anything for her 'bubby'!


Although Sheep campaigned for a rhino-shaped birthday cake, mommy vetoed that idea and settled on cupcakes with rhino toppers instead.  I simply swiped some rhino art off the web and modified it in PowerPoint (my favorite ghetto graphics tool) to fit into my punches.  I also made some number threes for the reverse side of the topper.  Everything was pieced together on popsicle sticks using glue dots and voila!
 
 
Again, since the guest list was small, I didn't have tons of these to make, which made this a very 'doable' idea - especially compared to constructing a rhino cake from scratch!  Of course we used our favorite cupcake recipe, along with some turquoise wrappers and orange-tinted frosting to keep with our color scheme!  They looked good enough to eat!
 
 
I had also seen an invitation that said something about 'having a ton of fun', which I thought was so cute and clever that I used it on the goody bags to say thanks to all our guests!
 
 
Neither helium-filled nor latex balloons are allowed at the wildlife park due to animal safety issues, so I needed to come up with something else to designate our tables during the party.  I remembered that it was pretty windy out there as well, so my centerpieces needed to be sturdy too!  Therefore, I decided to keep it simple, using a couple of small, mylar balloons and pinwheels in the orange and turquoise colors to make centerpieces in sand-filled beach pails.  Perfect!
 
 
Mission//assignments sent - check!
Cupcake soldiers made - check!
ICDs (Improvised Centerpiece Devices) made - check!
Goodie 'bombs' prepared - check!
Battle station determined - check!
 
The only thing left was a 'uniform' for my little soldier and preparations for 'Operation Rhino' would be complete!  I looked everywhere for a machine applique design of a rhino, but once again mommy was left to create a shirt on her own!  Luckily, I already had a rhino pattern from the invitations, which I simply enlarged, cut out of orange fabric prepped with double-sided fusible webbing, and ironed on a tiny, turquoise tee.  Then I adjusted the stitch length on my machine and sewed around the perimeter several times in a sort of messy way, just to give it a little more interest and keep it very boy-ish!  He was so happy to get it and wear it that it doesn't even matter to me whether or not he remembers it because I always will!
 
 
The kids had lots and lots of fun at the park of course!
 

 And we saw lots and lots of animals too!  Though Pee Wee was too far away to catch a good picture of him this trip.
 
 
I think Snacks and his pre-school buddy G-man enjoyed sharing the food between their buckets almost as much as feeding the animals!
 
 
In addition to the train ride, the kids enjoyed the petting zoo and a horseback ride, and a WILD time was had by all!
 
 
I love you more than I could ever have possibly imagined my little man and possibly more than you will ever realize - but maybe - just maybe - these memories from 'Operation Rhino' will give you some idea.  Happy Birthday Snacks!
 
Love, Mommy