Pages

Showing posts with label girl scouts. Show all posts

Monday, October 28, 2013

Itty Bitty Baby Hat Tutorial


I was all set to fill you in on my class goody bag idea today, but over the weekend my Girl Scouts and some of their moms spent time working on our service project, and it was just too special not to share!

Last Spring, my co-leader and I asked the girls to brainstorm ideas for a service project that we could do with a portion of the money we raised for our troop through cookie sales.  We told them to look around our community, talk to their parents and teachers and come back with some suggestions.  They originally settled on fleece blankets for residents at one of the local nursing homes, but after surveying the price of fleece, we knew our money wouldn't make very many adult-sized blankets, so we thought about blankets for babies in the hospital instead.


We are very blessed to live in an area where the vast majority of babies in our local community are born into families who can more than adequately provide for their little ones, so the NICU staff felt that although the blankets would be appreciated by the families, they weren't really needed.

And that got me thinking back to a very special set of parents and babies I used to work with before having my second child - families who have experienced a fetal or early infant loss.  For five years, I worked side-by-side with these families, helping coordinate the largest clinical research trial in the country (and perhaps the world) investigating the causes of stillbirth.  As a clinical research coordinator for the Stillbirth Collaborative Research Network, I had a chance to work with so many amazing couples and families who were unbelievably courageous in the face of such terrible and unexpected loss.  I knew these families were much more likely to need the blankets and hats my girls could make.


In our local hospital, like most hospitals, the memory boxes, blankets and other mementos given to the parents after a stillbirth or early infant loss are provided solely through donations.  Frequently these donations come straight from the nursing staff who care for these families during and after loss, so I knew that whatever we could help with be appreciated by the staff as well as the families.

It was challenging to discuss such a sad reality with my girl scouts, but I found that the girls and their parents had such open minds and loving hearts for these families.  After talking with them I also learned that one of our scouts had a twin that did not survive.  Several of our other girls already knew something about the NICU and special care nurseries because they or their siblings had been patients there themselves and had heard the stories of their births from their families.  It was awesome to witness their understanding and simple acceptance of something I thought might be a very foreign and possibly frightening matter.

And I am proud to say that my troop of 3rd graders already has such a heart for service!  By the end of our discussion, the girls had decided that they wanted to make blankets AND hats AND memory boxes for these babies and their families, so I set about figuring out a way to make that happen.
This 'Itty Bitty Baby Hat Tutorial' is the result!

Supplies:
Patterned knit fabric
Fabric glue
Scissors

We chose knit fabric for its stretchiness and the fact that it doesn't ravel, so it wouldn't need to be sewn or have the edges finished in any way.  And after confirming with the Perinatal Bereavement Coordinator at our local hospital that the majority of their fetal and infant losses occur before 26 weeks in pregnancy, we decided on sizes for our hats, using small oranges and limes as guides.


  1. Cut a width of fabric approximately 11" long.  Our fabric was 45" wide, so we simply cut our fabric widths into thirds (15") for our larger hats.  Our smaller hats were about 7" wide and we cut the length into quarters (about 11" long).
  2. Fold your swatch of fabric in half with right sides together the long way, to keep the length at 15".  Turn back the top side slightly and run a thin bead of fabric glue along the edge.  Fold top side back, gluing right sides together and forming a tube with the fabric.  Allow to dry 2-3 hours or overnight.
  3. Once the glue has dried, fold your tube of fabric in half long way again, bringing the folded edge of the fabric to the inside edge of the glued seam.  it will be slightly offset.
  4. Cut a triangle of fabric from the top edge of the folded tube to form a point.  We started our cuts about 3-4" down on the length, but you may have to play with your fabric to figure out how much you need to take out to make a clean knot.  Some of our fabrics were stretchier than others, so we adjusted as went went along.
  5. Turn your cut fabric tube right side out.  Now you have two options for forming the top knot of the hat.  You can either open up your tube, bringing the seamed edge to the folded edge to form two points on the sides or you can simply unfold so that the point is in the middle, with the seamed edge on one side and the folded edge is on the other.
  6. If your are tying the two points together, bring them to the center and tie in a knot.  This forms tiny 'ears' at the end of the knot.  The bunny ears seemed to be easier for some of my girls to tie and the stretchiness of the fabric seemed to make a difference as well.  Bunny ears worked better on the less stretchy knits.  Use a simple, single knot on itself if you leave the points together.
  7. Adjust your knot so that it leaves as much fabric as possible below the knot.  This will make the hats more adjustable and able to fit a larger range of babies.
  8. Fold about 3" of fabric back under to the inside of the hat.
  9. Turn up a cuff on the outside.  Your cuff now should have the right side of the fabric showing.
  10. Make as many as you can and present them to your local community hospital too!
We made about 36 of the 'large' hats and 23 of the 'small' hats using about 3 yards of fabric. We made these 'itty bitty baby hats' for the tiniest of babies, but you could certainly add some length and width and use the tutorial to make simple hats and receiving blankets for full-term babies as well.  The fabric glue says its washable after 48 hours, but if I were making these as a shower gift, I would probably sew my seam instead.  Otherwise, the rest can be done the same way!
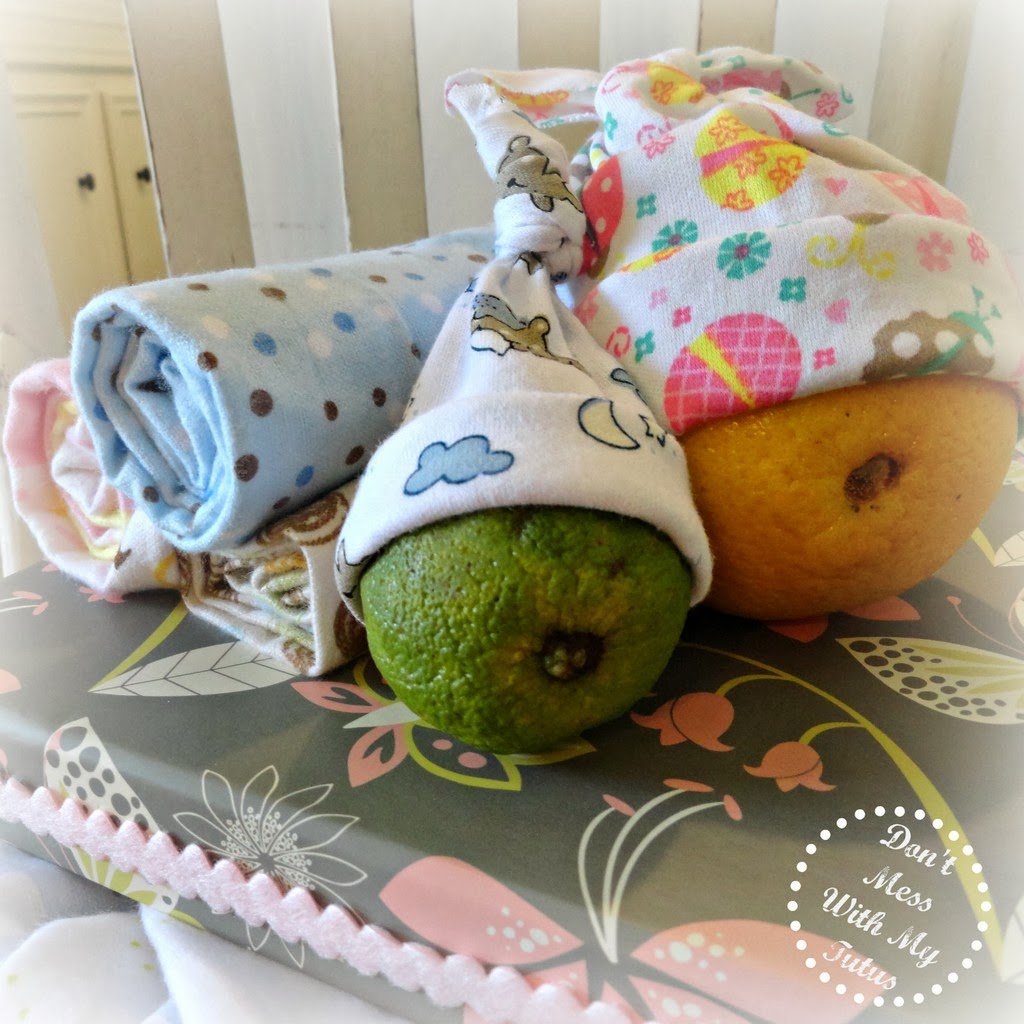

The girls also cut 18" square blankets from flannel (again because it doesn't ravel) and glued ribbon around the lids of 13 photo storage boxes to be used as memory boxes for these families.  The nurses typically bath and 'dress' the baby in a hat and blanket before presenting them to the parents, and these items will be placed in the memory box as a keepsake, along with pictures, footprints and other things, when the family leaves the hospital.

We will be putting everything together and plan on presenting it to the labor and delivery staff next month.  This has been a fun and rewarding service project already and I know it will mean even more to the girls when they present their handiwork to the hospital.  I am humbled by their compassion for families that hold a special place in my heart as well and honored to work with such a great group of girl scouts!

If you are interested in understanding more about stillbirth and infant loss and what you can do to help, visit First Candle, Now I Lay Me Down to Sleep and National Share.

Sharing this special project at some or all of these great parties: Under the Table and Dreaming, Totally Overflowing with Creativity, Three Mango Seeds, Classy Cutter, Serenity You, House of Hepworth, Skip to my Lou, LadyBug Blessings, Nap Time Creations, The Style Sisters, Polkadots on Pararde, Rae Gun Ramblings,Costal Charm, Not Just a Housewife, Domestically Speaking, The Shabby Creek Cottage, Sumos Sweet Stuff, The Gunny Sack, Gingersnap Crafts, Southern Lovely, Lil Luna, Someday Crafts, The NY Melrose Family, The DIY Dreamer, The Blackberry Vine, Homeworks, The Rustic Pig, Cornerstone Confessions, Kathe with an E, House on the Way, PJH Desgin, Glued to my Crafts, The Crafty Blog Stalker, Seven Alive, Made in a Day, Live Laugh and Love, A Creative Place, Have a Daily Cup of Mrs. Olson, Home and Gardens, It Happens In a Blink, I Gotta Create, Domestic Super Hero, All Pretty Things, Katie's Nesting Spot, 52 Mantels, Truly Lovely, Twinkle in the Eye, Happy Hour Projects, Six Sisters Stuff, Tutus and Tea Parties, Mop It Up Monday, Saturday Show and Tell, Moonlight and Mason Jars, The Scoop, Wow Us Wednesdays, Take-A-Look Tuesday

Sunday, August 18, 2013

Spend a Day with Chickadoo Suz!


Well summer is almost 'officially' over around here (though no one's told the weather -whew it's been HOT) and some kids have already started back, so we spent last week trying to squeeze in a few more adventures and make a few more memories before the first bell rings.

Which led us out to Manvel with some friends for a visit with Chickadoo Suz, owner and operator of My Chicken Diaries, and you can read all about her and how she became 'Chickadoo Suz' by heading here!


 Our adventure began with a greeting from Chickadoo Suz, who was dressed the part with her feathered headpiece and bedazzled boots!  Before we could go any further, everyone was asked to scrub their shoes to help keep germs out of the chicken coop!  Then we stepped into her garage-turned-classroom for an introduction to the rules on the farm - Safety, Respect, Choice and FUN!  We also spent time in the classroom learning about chickens and where they come from.


Then we headed out to see for ourselves what My Chicken Diaries is all about!


Turns out Chickadoo Suz could be keeping diaries on more than just chickens, because there were geese, ducks, turkeys and guineas too!  She's even got a donkey and a goat, though 'Billy' was making himself scarce during our visit.


We did get to meet Lenny though!  In fact, ALL the animals on the farm have names and somehow Suz keeps track of them all!


Sheep and Snacks both (hesitantly) held a young chicken, but they really enjoyed visiting and holding the newborn chicks!


This little fella was only one day old - so new that he didn't even have a name until we came along - now he goes by 'Maverick' because he seemed to have an independent, adventurous spirit already . . . not unlike the the little fella holding him as well!


We we lucky enough to have some cloud cover that morning, but toward the end of the tour, things had started really heating up, so we stopped in a shady spot for a swing . . .


 . . . and a chance to feed the chickens!

Suz has learned a lot about chickens since she moved out to Manvel and started My Chicken Diaries, and she was an expert at sharing her knowledge (and love) of the animals in an educational and entertaining way!  The kids and I had lots of questions and she patiently answered every. single. one. {Smile}  Accounting may have been her career, but teaching is definitely her vocation!

Then we headed back for some (bring your own) snacks and water before starting on a craft!  Chickadoo Suz has a wall FULL of recycled materials and donated supplies for making bookmarks, headbands and your very own chicken.  Sheep thought about a bookmark until Suz mentioned that everyone was welcome to make up a story about their very own chicken and tell it to the rest of the group.  Well, that got my little storyteller's attention and soon everybody wanted to make chickens.

After all, it is a chicken farm!


I didn't get a picture of Sheep telling her story because I had switched to video (duh!) by then, but they were both wonderful and I was one proud mama hen!


Sheep was even able to earn a Girl Scout 'Egg-ceptional Observations' Patch for her visit to the farm.  If you're interested in earning this patch for your scout or your troop, here's a link to the GSSJC requirements!


While we settled up, the kids relaxed in the shade on the swings.


Ahhh . . . Summer!

There is just no substitute for experiential learning in my opinion, and it seems to be in short supply in public school these days.  So if you're looking for something fun and educational to do with your kids, your class or your troop, check out My Chicken Diaries and say hello to Chickadoo Suz.

You'll be glad you did!


Sunday, May 26, 2013

Lo-Cost Cardboard Column Tutorial

 
As you know, I recently coordinated an Old South-themed 'Belles and Beaus Ball' for our Girl Scout service unit!  And one of the projects our committee came up with to help transform our event space (a large metal building that was once used as an airplane hangar) into a southern plantation for our soiree was a set of columns to flank the stage.
 
Now if you have ever shopped for columns or priced column rentals then you know that these babies can be very pricey and a rental would have to be returned.  Any way we sliced it, ready-made columns were just not going to be 'using our resources wisely,' so we had to come up with something else!
 
Luckily, I have a very dear friend in the construction business that I knew might be able to help and I was right!  Yippee!
 
He suggested I take a look at these:
 
 
These are cardboard concrete forms that are approximately (I emphasize it because it turned out to be quite important) 8" in diameter and 4' high.  Just for reference, a similar sized column around here would rent for about $25.00 each (ouch!) and they'd be ours for only one night!
 
 
The cardboard forms were a mere $7.00 each, so here's where I went with it:
 
 
Using inexpensive plastic pots for the top and the bottom, I was able to mimic the look of a roman column with the turned rim.  I envisioned screwing the pot rims to small wooden bases to make them more sturdy and allow us to fill/weight the bottoms of the columns with sand to prevent tipping.
 
And here's the mock-up at Home Depot, who was kind enough to donate all the supplies for this project (including the ferns on top), so it ended up being 'no-cost' columns for us!


As you can see from the first picture, we simply painted all the pieces white and them assembled them at the event center!  They were lightweight for transporting and have already been used again at our service unit bridging ceremony!
 
I mentioned earlier that the diameter of these cardboard forms was an issue - because when choosing your pot, the diameter of the column will determine how far down your pot will seat in the form.  it turns out that the two we originally had were not actually the same diameter, which would have made one of the finished columns noticeably taller than the other.  We solved the problem by exchanging one for another at a different store to get two that were closer in diameter, but afterwards I realized that it could have been solved by getting a smaller diameter pot instead and that might have been even easier.  I found the best plastic pots for this project at Dollar Tree because they ended up being very forgiving on the column diameter and had a larger rounded lip that looked better on the column than the one in the mock up in my opinion.  Also, the least expensive HD pot in the size and configuration that we needed was about $2.50 and the ones at Dollar Tree were obviously only a dollar!
 
These were a great addition to our 'Plantation Party' but could be put to use for lots of other things as well, so I'm really happy that they worked out!

Friday, May 17, 2013

The Belles and Beaus Ball!


Does your Girl Scout troop or service unit participate or host any annual events?

The annual father-daughter dance has been a tradition in our Girl Scout Service Unit for 25 years, and what AMAZING fun we had this pulling it together this year!  In year's past, the party has always rotated between 4 basic themes: princess, country, disco and luau, but our committee decided to mix it up a bit this year, with an 'Old South' twist on the princess theme by hosting a 'Belles and Beaus Ball" for our dads and daughters instead.  When we chose the theme, we were very excited about it, but found there really wasn't much out there on Pinterest in idea-land to copy inspire us, so planning this Southern soiree turned out to be a real challenge!
 
So today I am sharing all our party planning secrets with you, in hopes that your next Southern-themed event will come together that much more easily!  And her's a quick pic of the night's hostesses with the mostesses - my co-leader, committee co-chair, partner-in-crime and amazing friend, along with our mini-me's at the ball!


The founder of Girl Scouts Juliette Gordon Lowe was born in Savannah, GA in the 1800's and lived at the Wayne-Gordon mansion as a child, so what better place to host a Belles and Beaus Ball than at the mansion itself?  I wish I could take credit for this brilliant idea, but it was one of our committee members who came up with this stroke of genius.  I just ran with it (wink, wink)!


For the focal point of our venue, we contacted the Juliette Gordon Low birthplace for high resolution images of the house and it's most famous resident, which they were only too happy to provide - for FREE!  And you girl scout moms out there know how we girl scouts like/need to hear that word!  From there, we created a focal point for our venue by having the image of the Wayne-Gordon House printed on four 3' by 10' panels of plain white copy paper, that we pieced carefully together and hung with Scotch brand removable mounting dots, since we weren't allowed to fasten anything to the walls.  I was really worried that they may not last the night, but I give them a resounding two-thumbs up!  We also made sure to arrange the tables so that nothing was blocking the poster and it could double as a photo op too!


  Although the picture was in color, the black and white copy was by far the least expensive printing option available for the scale of the print and gave it a real vintage feel as well.  The label across the top we simply cut from some donated (FREE!) poster paper and lettered using a Cricut and some clearance scrapbook paper.

 Scarlet?  Melanie?  Is that y'all!!


 We also printed out a picture of Juliette Gordon Low and placed it on an easel next to the registration table so she could 'welcome' guests to the ball!


 Fortunately, we received a couple of cash donations from local businesses, including Rhea Lana South Houston and Dentistry 4 Children, for the event (message me if you would like more information about how to do that), so we were able to purchase white (plastic) table cloths for the foundation of our tablescapes.  Then we layered borrowed (FREE!) burlap runners over the tablecloths and topped them with cut magnolia leaf clusters.  These were 8' tables and it took about 5 leaf clusters to make the arrangements.  We had borrowed (FREE!) mason jars and donated (FREE!) tea lights nestled into the leaves and then added crepe paper magnolias that we made ourselves for a fraction of cost of silk or other bought flowers! 


The paper magnolias were a Martha Stewart craft, but with a few modifications to her technique, we were able to whip out 98 magnolias - enough for 26 tables, the dessert table and the stage decorations as well.  Best of all, they turned out to be very durable paper flowers too, so I was able to incorporate them into another craft after the dance too!  I shared my 'Martha's Modified Magnolias' technique in another post, so check it out!


The cake table and registration tables were topped with quilts from home to bring some color into the room since we our centerpieces were neutral.  The colors in the quilts looked great against the taupe-colored walls and really brightened things up!   On the dessert table, which had been filled with donated deliciousness courtesy of Nothing Bundt Cakes,  we used a collection of borrowed (FREE!) hat boxes, serving trays, even a small wrought iron dress form to amp up the vintage feel!


Our last big 'project' for the event was a set of 4' white columns we managed to make for under $10 a piece.  We actually had all the materials for the columns donated (there's that word again - FREE!) by the awesome folks at Home Depot, who love supporting local children's organizations such as scouting!  Look for more on the inspiration and technique used to construct these columns in a revealing, 'tell-all' post coming to a sassy blog near you soon!


 The DJ was set-up on stage during the dance, which was part of the reason we chose to hang the house picture on another wall instead.  However, we did use the Cricut to letter a welcome banner for the back wall since it faced the entrance and was the first thing you see when you walk into the venue.  It also served as the stage for the dance instructor during a short dance lesson donated to our dads and daughters by Tanya Morland of the National League of Junior Cotillions!  She was an amazing instructor and the girls and their dads really enjoyed learning how to dance together!


In addition to the dance instruction, we offered portraits for our dads and daughters, courtesy of a girl scout mom!  I LOVE girl scout moms - what an amazing collection of talent and generosity!  This year's portraits were set up outside, using an antique chair and the park for the backdrop.  Beautiful spring weather made it a pleasant place to wait for pictures too!


The dance was a HUGE success, with lots of rave reviews from both daughters and dads, some  commenting that it even topped last year's dance! Now that's saying something, because last year was super-duper fun!  We even got a write-up in our local paper!  We also managed to raise money on this event (though that wasn't our goal), which has us considering changing the event to a fundraiser and maybe getting an older scout troop involved as the hostesses.  At any rate, it's an event with lots of possibilities and so much fun to be a part of that if your organization doesn't already have something like it, perhaps you could start one!

And I promise to post tutorials for the paper flowers and the columns soon - scout's  honor!

Friday, March 15, 2013

'Shamrocks' Thin Mint Cookie Pops!

 
What are you doing with all your Girl Scout Cookies?
 
If you're like me, you're a sucker (Ha - Sucker!) for those little entrepreneurs in uniform - especially when one of them is yours!  Needless to say, we have lots of girl scout cookies on hand about now, so Sheep and I thought it might be fun to experiment with making some recipes that use girl scout cookies as a main ingredient!
 
St. Patty's Day is literally just around the corner, so we thought we'd better give this idea a try and quick!  I am happy to report that after only a some trial and error with the candy bark, we have a winner!
 
I wanted to call them "Leprechaun Balls" but Sheep suggested Shamrocks, so we went with that instead.  She didn't seem to find my name for these tasty treats all that funny.  Eight-year-olds . . .
 
'Shamrocks' Thin Mint Cookie Pops
 
1 box Girl Scout Thin Mint cookies, crushed
5 oz. (approximately 2/3 of block) cream cheese, softened
White candy bark
Green food color
Green sugar sprinkles
 
Mix crushed cookies and cream cheese together to dough-like consistency.  Form into 1" balls.  Melt candy bark according to instructions.  Add green food coloring to melted bark and stir to achieve a uniform color.  Dip cookie balls in melted bark and place on waxed paper to harden.  Alternately, roll cookie balls in green sugar and place on waxed paper.  Insert popsicle sticks if desired.  Enjoy!
 
I don't know about you, but we really struggled with the candy bark.  Not sure why. I just know that I personally have never used the stuff very successfully, despite my continued desire and numerous attempts.  Hence the alternate instructions using only green sugar.  Sheep actually liked the ones rolled in sugar better than the dipped ones because they weren't as sweet.  And I do have a picture of those too.  Somewhere . . . .{Sigh.}
 
 
We had actually abandoned the candy bark altogether, but went back to it one last time after we had gone with the sugar, so you can see some of the sugar sparkles in the bark.  It actually looks really pretty, but certainly not a necessary step.
 
In the end, our original idea worked and has been 'leprechaun' approved too!
 
 
The weather here has been lovely this week and with any luck, we'll be out on the boat on Sunday.
 
What are your plans for St. Patrick's Day?


Thursday, February 14, 2013

Texas Chocolate Crackles!

 
Did I mention that World Thinking Day is just around the corner?  It's an annual day for girl scouts and girl guides to celebrate the unique connection they have with girls all around the world through scouting.   How awesome is that?!  Our service unit commemorates the day with an 'Around the World' event that allows girl scouts to 'visit' other countries (hostessed by other troops) and learn a little about the geography, language, culture, food and scouting of course!
 
A small sample of food from your country is expected to be served at your booth.   Last year we had Mexico as our country and a local restaurant donated chips and Spanish rice, but the girls wanted to serve something sweet this year, so no chance to hit up Outback Steakhouse for something 'on he barbie' - ha!  We also had a couple of connections in 'the land down under' who were willing to send us some Girl Guide 'Biscuits' but the shipping turned out to be prohibitive.  So, after scouring several library books and more than a couple of websites, we settled on THESE delicious Australian confections!
 
 
Aussie Chocolate Crackles
(a.k.a. Chocolate Bubble Cakes)
  • Icing sugar -- 1 cup
  • Cocoa powder -- 1/2 to 2/3 cup
  • Rice bubbles -- 4 cups
  • Unsweetened coconut, dried and shredded -- 1 cup
  • Copha -- 10 ounces, or about 1 1/4 cups
  • Hundreds and Thousands
Sift together the icing sugar and cocoa powder into a large bowl. Stir in the rice bubbles and dried coconut.  Melt the coconut oil in a small saucepan over low flame. Stir the dry ingredients into coconut oil until well mixed.  Scoop small portions of the crackle mix into paper muffin cups.  Sprinkle with hundreds and thousands.  Chill in the refrigerator until firm and serve.

The girls and I had lots of fun figuring out what all the ingredients were here in the States, and I had to make a few adjustments after seeing the price of coconut oil, so here's the recipe again with our 'Texas substi-Two-tions'!  They are easy and fun to make so give 'em a go mate!


Texas Chocolate Crackles 
  • 1 C powdered sugar
  • 2/3 C cocoa (I used Hershey's Special Dark cocoa because it's what I had on hand)
  • 4 C Rice Krispies cereal
  • 1 1/4 C Butter-flavored Crisco
  • 1-2 tsp. coconut extract
  • Sprinkles for garnish
Add dry ingredients to a large bowl and toss together.   Heat Crisco in microwave for about 1 minute or until just melted.  Pour over dry ingredients.  Add coconut extract and mix until all cereal is well coated with chocolate.  Use small melon baller to scoop cereal into mounds and drop into mini-muffin cups.  Top with sprinkles and let cool completely.  Enjoy!

Makes 48 mini muffin treats


Even though World Thinking Day is February 22nd, we'll be celebrating this weekend - yum!
 
What does your troop or service unit for Thinking Day?