Pages

Showing posts with label tutorial. Show all posts

Thursday, February 13, 2014

Cupcake Valentines Box!


Well, it's been Valentine's central around here and I've been as busy as cupid himself getting everyone ready for the sweetest day of the year!

In case you didn't know . . . I HEART Valentine's Day!

And like most moms of school-age kiddos, we needed to make a box for Sheep's valentines at school.  She always comes up with something clever, usually centered around puppies, for her box and this year was no exception.  She wanted to make a cupcake valentine box and even had an idea of what she would use to make it - a flower pot on the bottom and an inverted bowl on top.

But mama thought she might try and use something a little less permanent since we don't keep these boxes (thank heavens) forever!  I decided to Google some ideas and see what others had done.  Google was actually very little help, but never fear - Pinterest is here!
 (I should have started there first)

There were literally tons of pins for Cupcake Valentines boxes, but many turned out to be nothing more than a picture, rather than a how to, so I decided to share with you how we got ours done.  Unfortunately, I didn't stop to take pictures along the way, but this project was so easy, you won't need them!


Supplies:
Empty, clean 1/2 gallon Blue Bell (or other round) Ice Cream Carton
Paper bowl with rim so it's able to rest on the top of the carton
Duct tape
2 pieces of scrapbook paper cut into 5" strips
Roll of 6" wide tulle
LOTS and LOTS of hot glue
Embellishments (we used heart confetti and foam stickers)

Instructions:
1.  Start by discarding the lid of the ice cream carton and inverting the bowl on top of the carton.
2.  Use several strips of duct tape on the outside and inside of the bowl to 'hinge' the lid to the carton.  Alternatively, you could tape it all the way around and cut a slit in the top of the bowl to insert the valentines.
3.  Accordion-fold your scrapbook paper strips, gluing the end of one strip to the beginning of the next, forming a circle at the end with all four.
4.  Apply hot glue to the outside of the carton and hold open your paper 'cupcake liner' wide enough to insert the carton through the circle.  This might take an extra set of hands.  Sheep helped!
5.  Push and hold the liner around the carton so the inside edges of the pleats become glued to the carton.
6.  Starting at the center of the bowl, unroll some length of tulle, apply hot glue to the bowl and scrunch the tulle onto the bowl, holding in place (ouch - that's HOT!) until it stays.
7.  Continue unrolling, gluing and scrunching tulle onto your bowl/lid until it is completely covered.
8.  Embellish with confetti, buttons, foam stickers, pom-poms, etc.  We used what we had on hand.  The cherry on top was made from two glittery ladybug foam stickers and a piece of brown ribbon sandwiched in between.  Once the ladybugs head was covered in glue and secured in the tulle it looked just like a cherry!

At this point you might consider robbing a bank or your favorite store as you will have no fingerprints left from the hot glue and will be untraceable - ha!

This project reminded me so much of my mom because I was always coming up with these great ideas that she was then supposed to somehow make happen.
And she did.
And so shall I!

Having been on the other side of it now for a couple of years with my own little creative, all I can say is, "Thanks Mom!"

And Happy Valentine's Day Y'all!

Sharing this sassy project at some or all of these great parties: Under the Table and Dreaming, Totally Overflowing with Creativity, Three Mango Seeds, Classy Cutter, Serenity You, House of Hepworth, Skip to my Lou, LadyBug Blessings, Nap Time Creations, The Style Sisters, Polkadots on Pararde, Rae Gun Ramblings,Costal Charm, Not Just a Housewife, Domestically Speaking, The Shabby Creek Cottage, Sumos Sweet Stuff, The Gunny Sack, Gingersnap Crafts, Southern Lovely, Lil Luna, Someday Crafts, The NY Melrose Family, The DIY Dreamer, The Blackberry Vine, Homeworks, The Rustic Pig, Cornerstone Confessions, Kathe with an E, House on the Way, PJH Desgin, Glued to my Crafts, The Crafty Blog Stalker, Seven Alive, Made in a Day, Live Laugh and Love, A Creative Place, Have a Daily Cup of Mrs. Olson, Home and Gardens, It Happens In a Blink, I Gotta Create, Domestic Super Hero, All Pretty Things, Katie's Nesting Spot, 52 Mantels, Truly Lovely, Twinkle in the Eye, Happy Hour Projects, Six Sisters Stuff, Tutus and Tea Parties, Mop It Up Monday, Saturday Show and Tell, Moonlight and Mason Jars, The Scoop, Wow Us Wednesdays, Take-A-Look Tuesday, Share Your Stuff Tuesdays

Monday, February 10, 2014

Valentine Infinity Scarf!


This super-simple infinity scarf in a valentine print fabric is like a hug for your neck!

I have had the idea to make my own infinity scarf for over a year.
I even bought some inexpensive winter scarves to give it a try, but never got around to it.
And then I ran across this super-cute valentine graphic fabric last week - two days before my annual girls weekend with some of my college besties - and was inspired!

We had something special to celebrate this year with our dear friend who has been battling breast cancer - and WINNING!!  I hadn't seen her in person since the whole ordeal began, but what better way to remind her that I'm rooting for her (even if it is long distance) than a pretty PINK scarf?!


She is just as beautiful (and fierce) as ever!!
I am so thankful for the time to reconnect with her, and all my friends.

There are literally tons of tutorials for making infinity scarves on the internet, but I used this one from Simplicity, with only a few adjustments of my own.

1.  I bought 60" fabric as recommended, but bought 2 yards and cut it lengthwise, instead of across, so my scarf would be longer than 60".
2.  I cut my fabric into thirds vertically, so I was able to make 3 scarves out of two yards of fabric, each approximately 10" wide when finished.
3.  I made sure to embroider my fabric before sewing up the seams, so that the underside of the monogram didn't show once it was completed.
4.  Since I had 7 of these 'hugs' to crank out in 24 hours (what can I say?), I skipped the hand-stitching and used fusible webbing to close my opening after turning the scarf right-side out.

I love, love, love how they turned out!
A beautiful friendship, valentines, breast cancer (without being too breast cancer-y)goody all rolled into one!
The girls loved them too!
Unfortunately, all our group pictures were taken on someone else's camera Saturday night, but trust me - we looked fabulous!


We'll all be wearing them on Thursday, and I'll be thinking of them every time I do.

Love y'all and Happy Valentine's Day!

Sharing this sassy project at some or all of these great parties: Under the Table and Dreaming, Totally Overflowing with Creativity, Three Mango Seeds, Classy Cutter, Serenity You, House of Hepworth, Skip to my Lou, LadyBug Blessings, Nap Time Creations, The Style Sisters, Polkadots on Pararde, Rae Gun Ramblings,Costal Charm, Not Just a Housewife, Domestically Speaking, The Shabby Creek Cottage, Sumos Sweet Stuff, The Gunny Sack, Gingersnap Crafts, Southern Lovely, Lil Luna, Someday Crafts, The NY Melrose Family, The DIY Dreamer, The Blackberry Vine, Homeworks, The Rustic Pig, Cornerstone Confessions, Kathe with an E, House on the Way, PJH Desgin, Glued to my Crafts, The Crafty Blog Stalker, Seven Alive, Made in a Day, Live Laugh and Love, A Creative Place, Have a Daily Cup of Mrs. Olson, Home and Gardens, It Happens In a Blink, I Gotta Create, Domestic Super Hero, All Pretty Things, Katie's Nesting Spot, 52 Mantels, Truly Lovely, Twinkle in the Eye, Happy Hour Projects, Six Sisters Stuff, Tutus and Tea Parties, Mop It Up Monday, Saturday Show and Tell, Moonlight and Mason Jars, The Scoop, Wow Us Wednesdays, Take-A-Look Tuesday, Share Your Stuff Tuesdays

Monday, October 28, 2013

Itty Bitty Baby Hat Tutorial


I was all set to fill you in on my class goody bag idea today, but over the weekend my Girl Scouts and some of their moms spent time working on our service project, and it was just too special not to share!

Last Spring, my co-leader and I asked the girls to brainstorm ideas for a service project that we could do with a portion of the money we raised for our troop through cookie sales.  We told them to look around our community, talk to their parents and teachers and come back with some suggestions.  They originally settled on fleece blankets for residents at one of the local nursing homes, but after surveying the price of fleece, we knew our money wouldn't make very many adult-sized blankets, so we thought about blankets for babies in the hospital instead.


We are very blessed to live in an area where the vast majority of babies in our local community are born into families who can more than adequately provide for their little ones, so the NICU staff felt that although the blankets would be appreciated by the families, they weren't really needed.

And that got me thinking back to a very special set of parents and babies I used to work with before having my second child - families who have experienced a fetal or early infant loss.  For five years, I worked side-by-side with these families, helping coordinate the largest clinical research trial in the country (and perhaps the world) investigating the causes of stillbirth.  As a clinical research coordinator for the Stillbirth Collaborative Research Network, I had a chance to work with so many amazing couples and families who were unbelievably courageous in the face of such terrible and unexpected loss.  I knew these families were much more likely to need the blankets and hats my girls could make.


In our local hospital, like most hospitals, the memory boxes, blankets and other mementos given to the parents after a stillbirth or early infant loss are provided solely through donations.  Frequently these donations come straight from the nursing staff who care for these families during and after loss, so I knew that whatever we could help with be appreciated by the staff as well as the families.

It was challenging to discuss such a sad reality with my girl scouts, but I found that the girls and their parents had such open minds and loving hearts for these families.  After talking with them I also learned that one of our scouts had a twin that did not survive.  Several of our other girls already knew something about the NICU and special care nurseries because they or their siblings had been patients there themselves and had heard the stories of their births from their families.  It was awesome to witness their understanding and simple acceptance of something I thought might be a very foreign and possibly frightening matter.

And I am proud to say that my troop of 3rd graders already has such a heart for service!  By the end of our discussion, the girls had decided that they wanted to make blankets AND hats AND memory boxes for these babies and their families, so I set about figuring out a way to make that happen.
This 'Itty Bitty Baby Hat Tutorial' is the result!

Supplies:
Patterned knit fabric
Fabric glue
Scissors

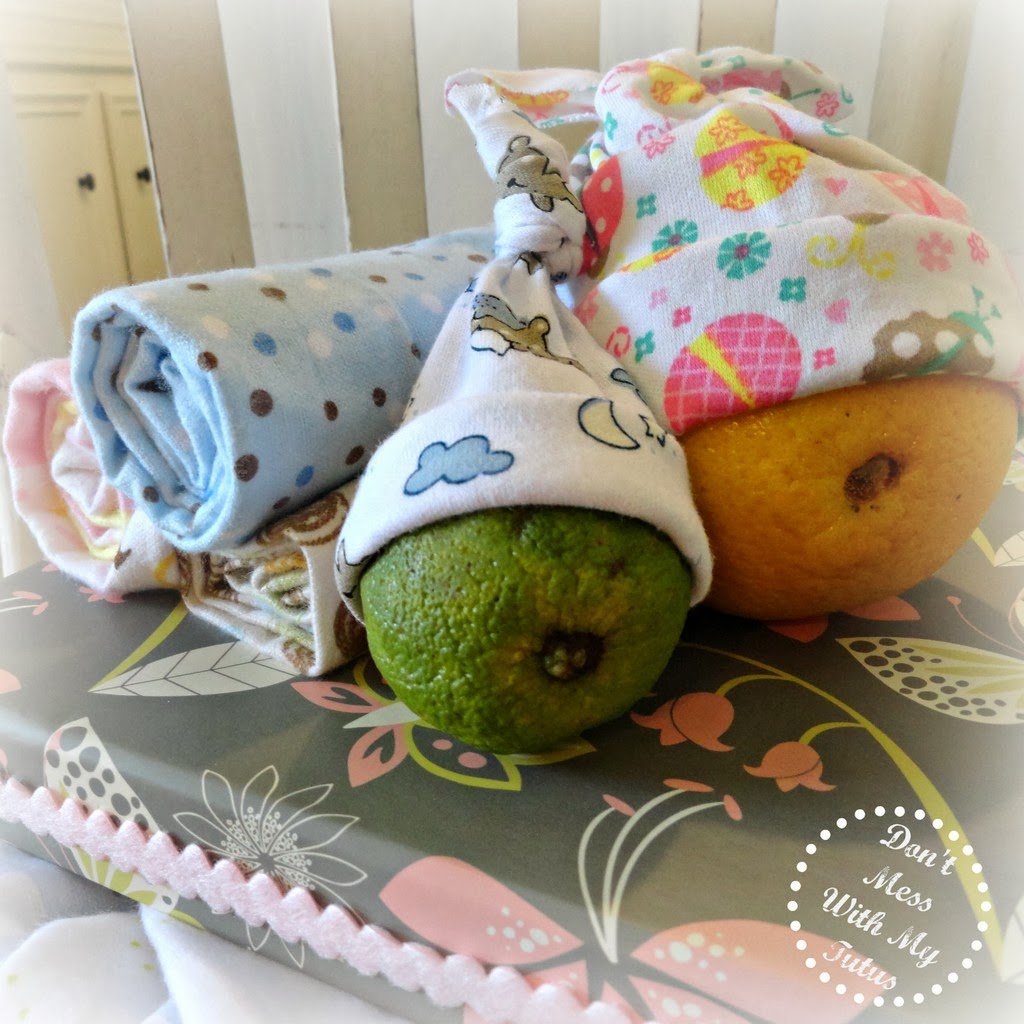
We chose knit fabric for its stretchiness and the fact that it doesn't ravel, so it wouldn't need to be sewn or have the edges finished in any way.  And after confirming with the Perinatal Bereavement Coordinator at our local hospital that the majority of their fetal and infant losses occur before 26 weeks in pregnancy, we decided on sizes for our hats, using small oranges and limes as guides.


  1. Cut a width of fabric approximately 11" long.  Our fabric was 45" wide, so we simply cut our fabric widths into thirds (15") for our larger hats.  Our smaller hats were about 7" wide and we cut the length into quarters (about 11" long).
  2. Fold your swatch of fabric in half with right sides together the long way, to keep the length at 15".  Turn back the top side slightly and run a thin bead of fabric glue along the edge.  Fold top side back, gluing right sides together and forming a tube with the fabric.  Allow to dry 2-3 hours or overnight.
  3. Once the glue has dried, fold your tube of fabric in half long way again, bringing the folded edge of the fabric to the inside edge of the glued seam.  it will be slightly offset.
  4. Cut a triangle of fabric from the top edge of the folded tube to form a point.  We started our cuts about 3-4" down on the length, but you may have to play with your fabric to figure out how much you need to take out to make a clean knot.  Some of our fabrics were stretchier than others, so we adjusted as went went along.
  5. Turn your cut fabric tube right side out.  Now you have two options for forming the top knot of the hat.  You can either open up your tube, bringing the seamed edge to the folded edge to form two points on the sides or you can simply unfold so that the point is in the middle, with the seamed edge on one side and the folded edge is on the other.
  6. If your are tying the two points together, bring them to the center and tie in a knot.  This forms tiny 'ears' at the end of the knot.  The bunny ears seemed to be easier for some of my girls to tie and the stretchiness of the fabric seemed to make a difference as well.  Bunny ears worked better on the less stretchy knits.  Use a simple, single knot on itself if you leave the points together.
  7. Adjust your knot so that it leaves as much fabric as possible below the knot.  This will make the hats more adjustable and able to fit a larger range of babies.
  8. Fold about 3" of fabric back under to the inside of the hat.
  9. Turn up a cuff on the outside.  Your cuff now should have the right side of the fabric showing.
  10. Make as many as you can and present them to your local community hospital too!
We made about 36 of the 'large' hats and 23 of the 'small' hats using about 3 yards of fabric. We made these 'itty bitty baby hats' for the tiniest of babies, but you could certainly add some length and width and use the tutorial to make simple hats and receiving blankets for full-term babies as well.  The fabric glue says its washable after 48 hours, but if I were making these as a shower gift, I would probably sew my seam instead.  Otherwise, the rest can be done the same way!

The girls also cut 18" square blankets from flannel (again because it doesn't ravel) and glued ribbon around the lids of 13 photo storage boxes to be used as memory boxes for these families.  The nurses typically bath and 'dress' the baby in a hat and blanket before presenting them to the parents, and these items will be placed in the memory box as a keepsake, along with pictures, footprints and other things, when the family leaves the hospital.

We will be putting everything together and plan on presenting it to the labor and delivery staff next month.  This has been a fun and rewarding service project already and I know it will mean even more to the girls when they present their handiwork to the hospital.  I am humbled by their compassion for families that hold a special place in my heart as well and honored to work with such a great group of girl scouts!

If you are interested in understanding more about stillbirth and infant loss and what you can do to help, visit First Candle, Now I Lay Me Down to Sleep and National Share.

Sharing this special project at some or all of these great parties: Under the Table and Dreaming, Totally Overflowing with Creativity, Three Mango Seeds, Classy Cutter, Serenity You, House of Hepworth, Skip to my Lou, LadyBug Blessings, Nap Time Creations, The Style Sisters, Polkadots on Pararde, Rae Gun Ramblings,Costal Charm, Not Just a Housewife, Domestically Speaking, The Shabby Creek Cottage, Sumos Sweet Stuff, The Gunny Sack, Gingersnap Crafts, Southern Lovely, Lil Luna, Someday Crafts, The NY Melrose Family, The DIY Dreamer, The Blackberry Vine, Homeworks, The Rustic Pig, Cornerstone Confessions, Kathe with an E, House on the Way, PJH Desgin, Glued to my Crafts, The Crafty Blog Stalker, Seven Alive, Made in a Day, Live Laugh and Love, A Creative Place, Have a Daily Cup of Mrs. Olson, Home and Gardens, It Happens In a Blink, I Gotta Create, Domestic Super Hero, All Pretty Things, Katie's Nesting Spot, 52 Mantels, Truly Lovely, Twinkle in the Eye, Happy Hour Projects, Six Sisters Stuff, Tutus and Tea Parties, Mop It Up Monday, Saturday Show and Tell, Moonlight and Mason Jars, The Scoop, Wow Us Wednesdays, Take-A-Look Tuesday

Monday, October 14, 2013

Dryer Vent Pumpkins!


My BFF was in town this weekend and you know when she's around there's going to be some crafting going on!  She brought this totally fabulous project with her, courtesy of some of her crafty relatives (I just wanna make sure I am giving credit where credit is due here!) and we went to work making a peck of our own!


Yes, that's the burlap candy corn bunting Sheep and I made a couple of years ago.  If you're interested, you can get all the details here, but let's get back to pumpkins, shall we?

Here's what you will need:
Dryer vent
Wire cutters
Scissors
Glue gun and/or flexible wire
Stems
Spray paint
BLING!


Dryer vents come in different sizes, but the standard vent will make approximately 7 medium pumpkins.  Our medium pumpkins measure about 9" in diameter.  We cut our dryer vents every 32 rings, using scissors to slice through the aluminum and wire cutters to snip the wire form.  They are very Slinky-esque, so just imagine cutting a Slinky every so often and you've got the idea.

I wired some together, threading a fine gauge wire through a large needle (needs to have a large eye) and just whip stitching it closed around the wires on both ends.  My BFF preferred the glue gun method, and although I think it might have burned her fingerprints off, it did seem to go faster, so I switched to glue too.  But take your pick, it will work either way.


Once your glue is dry, they are ready to paint!  We started with a can of bright orange and a can of harvest orange, but we quickly decided to raid the paint shelf and did some other fun colors as well!  The bright orange seems more Halloween-y to me while the fall orange seems like it would work well all the way through to Christmas, but having both is even better!


I started out pretty simple on my decorations, and tried to stick to decorations that I already had in my craft room - but we both knew it wouldn't last!


What can I say?  I am a chronic over-embellisher!
But aren't they adorable?!?!
I am sooo happy with how they turned out!


Most of the bright orange I decided looked best with Halloween decorations.  By this time, my BFF was getting upset with her pumpkin decorating skills and it was threatening to start raining again,so she decided to leave me to it and go paint the rest in hopes that we could make a little moo-lah for the holidays!


Simple or deluxe, I think they look great!  And I must say they are even cuter in person!


And I am working on more this afternoon!  Leave me a note and tell me which one is your favorite. I'd love to hear from you!

Sharing this sassy project at some or all of these great parties: Under the Table and Dreaming, Totally Overflowing with Creativity, Three Mango Seeds, Classy Cutter, Serenity You, House of Hepworth, Skip to my Lou, LadyBug Blessings, Nap Time Creations, The Style Sisters, Polkadots on Pararde, Rae Gun Ramblings,Costal Charm, Not Just a Housewife, Domestically Speaking, The Shabby Creek Cottage, Sumos Sweet Stuff, The Gunny Sack, Gingersnap Crafts, Southern Lovely, Lil Luna, Someday Crafts, The NY Melrose Family, The DIY Dreamer, The Blackberry Vine, Homeworks, The Rustic Pig, Cornerstone Confessions, Kathe with an E, House on the Way, PJH Desgin, Glued to my Crafts, The Crafty Blog Stalker, Seven Alive, Made in a Day, Live Laugh and Love, A Creative Place, Have a Daily Cup of Mrs. Olson, Home and Gardens, It Happens In a Blink, I Gotta Create, Domestic Super Hero, All Pretty Things, Katie's Nesting Spot, 52 Mantels, Truly Lovely, Twinkle in the Eye, Happy Hour Projects, Six Sisters Stuff, Tutus and Tea Parties, Mop It Up Monday, Saturday Show and Tell, Moonlight and Mason Jars, The Scoop, Wow Us Wednesdays, Take-A-Look Tuesday

If you enjoyed this pumpkin decorating idea, check out these other great Halloween idea posts!


Pumpkin Primpin'
Meet Mumpkin!

Wednesday, October 9, 2013

Witch's Feet Teacher Treats


I came across these cute little feet on Pinterest here and just knew I would be making these for Halloween someday - 'witch' turned out to be sooner rather than later because our teacher appreciation gift rotation at Snack's school started this month and I swiped October for myself!

Of course I did make a few changes from the original.  Mainly because I was scrolling through the idea on my phone at the scrapbook store and couldn't get the link to the tutorial to load {Groan} so I had to get creative on some of the particulars - but they turned out really well I think!

And once you get the hang of it, these go together pretty quickly.  So here's what you'll need:


The boots were made from a piece of 4" x 12" black cardstock, so you can get three boots from a single sheet of scrapbook paper.  I made my own template for these by simply drawing a boot, cutting it out and then flipping it over so that it would be a single boot wrapped around my Oreos.  Afterwards, I discovered that the link that wouldn't load eventually takes you to a printable template, so I didn't include mine here.  But this is a simple shape, so you could certainly do this yourself too!

Once you have all of your boots cut, assembly is pretty simple too!


1.  Start with your cut out boot wrap.
2.  Wrap (don't fold) your boot so that the fronts come together and hold in place.
3.  Punch two holes in your boot where laces might normally go.  Make sure to punch them fairly deeply into the boot so the holes don't tear through when you thread the ribbon.
4.  Thread a 11-12" piece of ribbon through the bottom two holes, going from outside to inside.
5.  Cross ribbon over inside boot and pull out top tow holes to lace up the boot.
6.  Tie a loop in your ribbon on the outside.  Fill loop with tulle or more ribbon if desired (I did of course!)
7.  Once you have laced up your boot, glue the toe of your boot together.  You will now have a hole at the back of the boot to slide in your sleeve of Oreos.


FYI - One package of Halloween Oreos will make three Witch's Feet Teacher Treats - one row per boot, so you can plan accordingly.  I also recommend buying extra cookies so your children flying monkeys have some to eat while you assemble them!

I tied tags (made with the die-cut machine at the scrapbook store) to the tops of the sleeves of Oreos that simply said "You're Spook-tacular!"  These went out to 23 teachers last week (Whew!) and my teacher appreciation committee duty is DONE!

I already had ribbon in my craft stash, so I only needed to buy paper for the boots and tags.  The most expensive part of this craft is definitely the Oreos. They worked out to about $2.50 per boot and the teachers loved them!  What a great way to say Thank You to some great ladies at a truly great school!

Let me know if you have any questions when you try them, and . . .


Sharing this sassy sussie at some or all of these great parties: Under the Table and Dreaming, Totally Overflowing with Creativity, Three Mango Seeds, Classy Cutter, Serenity You, House of Hepworth, Skip to my Lou, LadyBug Blessings, Nap Time Creations, The Style Sisters, Polkadots on Pararde, Rae Gun Ramblings,Costal Charm, Not Just a Housewife, Domestically Speaking, The Shabby Creek Cottage, Sumos Sweet Stuff, The Gunny Sack, Gingersnap Crafts, Southern Lovely, Lil Luna, Someday Crafts, The NY Melrose Family, The DIY Dreamer, The Blackberry Vine, Homeworks, The Rustic Pig, Cornerstone Confessions, Kathe with an E, House on the Way, PJH Desgin, Glued to my Crafts, The Crafty Blog Stalker, Seven Alive, Made in a Day, Live Laugh and Love, A Creative Place, Have a Daily Cup of Mrs. Olson, Home and Gardens, It Happens In a Blink, I Gotta Create, Domestic Super Hero, All Pretty Things, Katie's Nesting Spot, 52 Mantels, Truly Lovely, Twinkle in the Eye, Happy Hour Projects, Six Sisters Stuff, Tutus and Tea Parties, Mop It Up Monday, Saturday Show and Tell, Moonlight and Mason Jars, The Scoop, Wow Us Wednesdays, Take-A-Look Tuesday

Thursday, June 13, 2013

A Grand 'Old' Flag Project

 
We've done A LOT of fence building in the 10 years we have lived in this little corner of paradise (Texas), which has left me with a lot of old fence boards that I just couldn't bear to part with, just in case I found something wonderful to do with them.  It's one of the things Speed endures loves about me!  I swear!

Anyhoo, these particular fence boards have been waiting for their new destiny since Hurricane Ike blew through in 2008.  And needless to say, they were getting a little anxious!  Until last summer, when I spotted this amazing flag in the Pottery Barn catalog and knew it was time to get to work!

Painted American Flag 

So last year I figured out how many boards I would need and dug through my stash to find 8 that were even and relatively flat that I could piece together to make my flag form.  Eight seemed like the perfect number to get my overall dimensions right for a flag, even though I knew it was going to make 13 stripes a bit problematic, but we'll get to that soon enough!

For the construction, I simply took two other fence boards, cut to fit (by me) and screwed them into the boards on the back.  Incidentally, I did take pictures of this last year, but I haven't been able to find them.  No matter, it was super simple!
 
Now for most people, painting would be the easy part, but for some reason I spent way too long just trying to decide whether or not to put fifty stars on my flag.  So long, that one day I arrived home to discover my project moved off the porch and put back into 'storage.'   Well, for those of you with too many kids and too little craft space, you know what that can mean.  Putting an unfinished project away can be the kiss of death!  At at that point last year, July 4th had already come and gone without a finished flag, so I wasn't feeling any real pressure to finish it either.

My how time does fly . . . and another 4th is fast approaching.  It was past time to get this old girl finished!  So here's what I (finally!!) did:

1.  I taped off my blue section using Frog Tape.  LOVE this tape by the way.  It was the first time I'd used it and it really did prevent bleeding under the tape.  Highly recommend this stuff!


2.  Painted my blue section using a color sample of Behr paint in 'Signature Blue.' Super cheap way to get paint for projects like this!


3.  Used my 1" star punch and some cardstock to see about the stars.  Wasn't sold on the stars and wasn't at all sure how I was going to get them painted anyway, so used a Cricut to cut some larger stars from cardstock for a potential stencil.  Hmmmm.  Decisions, decisions.

 
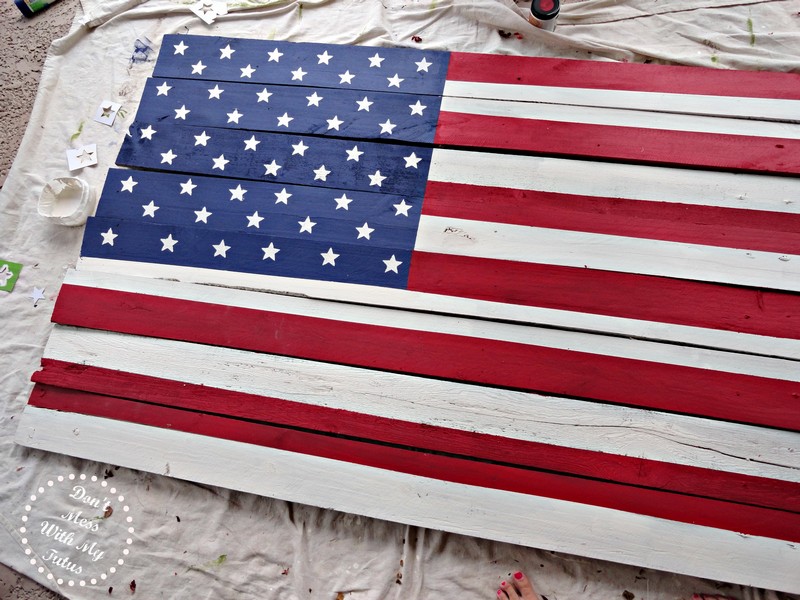
4.  Used the Frog Tape again to mask off first my white stripes and then my red stripes, allowing the paint to dry in between.  With eight boards, I simply couldn't make 13 stripes work, so I forced myself to settle on 12 and keep going.  Those of you who know me, this was a feat in itself!


5.  Ultimately, I just couldn't do it unless I went with the 50, so 50 it would have to be.  First, I experimented with cutting out a star from a sponge and seeing if I liked it enough to use for my flag because I really wasn't looking forward to painting 50 of those babies - nah!  Too sloppy for my taste.  Especially with my crisp lines on the stripes.  The barn red I used is actually Behr 'Geranium' by the way.


6.  The Frog Tape was working so well that I tried to cut a stencil out of it by sticking it to some slick card stock and using my punch to get some really sharp stars.  But after peeling it off the cardstock and trying to stick my stencil in a straight line on uneven fence boards, that was a no-go as well.  I still think it would work, just not for this project - ugh!


7.  Because I am a master re-purposer  (or is it repurposeur?!), I was able to use my tape covered cardstock as stencils instead.  Ultimately, a stencil and a small paintbrush seemed to work the best and didn't take me nearly as long as I was afraid it would, so don't be scared!


And here's my beauty, drying on the porch!  It occurred to me afterward that I already had a white Sharpie paint pen upstairs that probably would have worked even better, but it still looks pretty darn good to me!


My original plan was to distress the whole thing once it dried, but my sander seems to be MIA at the moment, so I will have to post an update when (and if - ha) that ever happens.  In the mean time, I already love, love love how it looks along the side of our garage, facing the pool.


Only five years and one baby later, my fence boards have found a new lease on life as 'Old' Glory and I must say they are lovin' it!

And I am too!


Sumo's Sweet Stuff
nap-time creations
 http://linda-coastalcharm.blogspot.com/