Pages

Showing posts with label repurposed. Show all posts

Thursday, June 13, 2013

A Grand 'Old' Flag Project

 
We've done A LOT of fence building in the 10 years we have lived in this little corner of paradise (Texas), which has left me with a lot of old fence boards that I just couldn't bear to part with, just in case I found something wonderful to do with them.  It's one of the things Speed endures loves about me!  I swear!

Anyhoo, these particular fence boards have been waiting for their new destiny since Hurricane Ike blew through in 2008.  And needless to say, they were getting a little anxious!  Until last summer, when I spotted this amazing flag in the Pottery Barn catalog and knew it was time to get to work!

Painted American Flag 

So last year I figured out how many boards I would need and dug through my stash to find 8 that were even and relatively flat that I could piece together to make my flag form.  Eight seemed like the perfect number to get my overall dimensions right for a flag, even though I knew it was going to make 13 stripes a bit problematic, but we'll get to that soon enough!

For the construction, I simply took two other fence boards, cut to fit (by me) and screwed them into the boards on the back.  Incidentally, I did take pictures of this last year, but I haven't been able to find them.  No matter, it was super simple!
 
Now for most people, painting would be the easy part, but for some reason I spent way too long just trying to decide whether or not to put fifty stars on my flag.  So long, that one day I arrived home to discover my project moved off the porch and put back into 'storage.'   Well, for those of you with too many kids and too little craft space, you know what that can mean.  Putting an unfinished project away can be the kiss of death!  At at that point last year, July 4th had already come and gone without a finished flag, so I wasn't feeling any real pressure to finish it either.

My how time does fly . . . and another 4th is fast approaching.  It was past time to get this old girl finished!  So here's what I (finally!!) did:

1.  I taped off my blue section using Frog Tape.  LOVE this tape by the way.  It was the first time I'd used it and it really did prevent bleeding under the tape.  Highly recommend this stuff!


2.  Painted my blue section using a color sample of Behr paint in 'Signature Blue.' Super cheap way to get paint for projects like this!


3.  Used my 1" star punch and some cardstock to see about the stars.  Wasn't sold on the stars and wasn't at all sure how I was going to get them painted anyway, so used a Cricut to cut some larger stars from cardstock for a potential stencil.  Hmmmm.  Decisions, decisions.

 
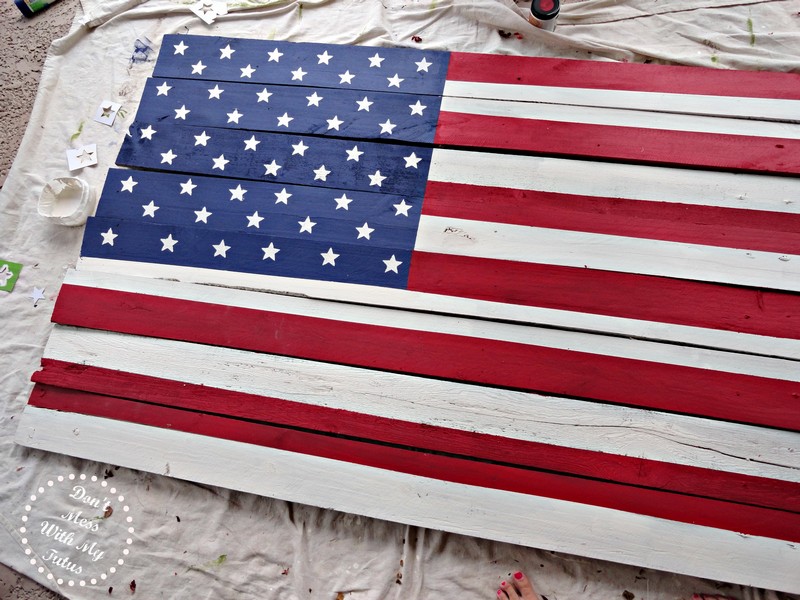
4.  Used the Frog Tape again to mask off first my white stripes and then my red stripes, allowing the paint to dry in between.  With eight boards, I simply couldn't make 13 stripes work, so I forced myself to settle on 12 and keep going.  Those of you who know me, this was a feat in itself!


5.  Ultimately, I just couldn't do it unless I went with the 50, so 50 it would have to be.  First, I experimented with cutting out a star from a sponge and seeing if I liked it enough to use for my flag because I really wasn't looking forward to painting 50 of those babies - nah!  Too sloppy for my taste.  Especially with my crisp lines on the stripes.  The barn red I used is actually Behr 'Geranium' by the way.


6.  The Frog Tape was working so well that I tried to cut a stencil out of it by sticking it to some slick card stock and using my punch to get some really sharp stars.  But after peeling it off the cardstock and trying to stick my stencil in a straight line on uneven fence boards, that was a no-go as well.  I still think it would work, just not for this project - ugh!


7.  Because I am a master re-purposer  (or is it repurposeur?!), I was able to use my tape covered cardstock as stencils instead.  Ultimately, a stencil and a small paintbrush seemed to work the best and didn't take me nearly as long as I was afraid it would, so don't be scared!


And here's my beauty, drying on the porch!  It occurred to me afterward that I already had a white Sharpie paint pen upstairs that probably would have worked even better, but it still looks pretty darn good to me!

My original plan was to distress the whole thing once it dried, but my sander seems to be MIA at the moment, so I will have to post an update when (and if - ha) that ever happens.  In the mean time, I already love, love love how it looks along the side of our garage, facing the pool.


Only five years and one baby later, my fence boards have found a new lease on life as 'Old' Glory and I must say they are lovin' it!

And I am too!


Sumo's Sweet Stuff
nap-time creations
 http://linda-coastalcharm.blogspot.com/

Friday, March 23, 2012

Window Pane to Picture Frame

The title has such a nice ring to it, don't you think!
Too bad I can't say the same about the rest of this project . . .


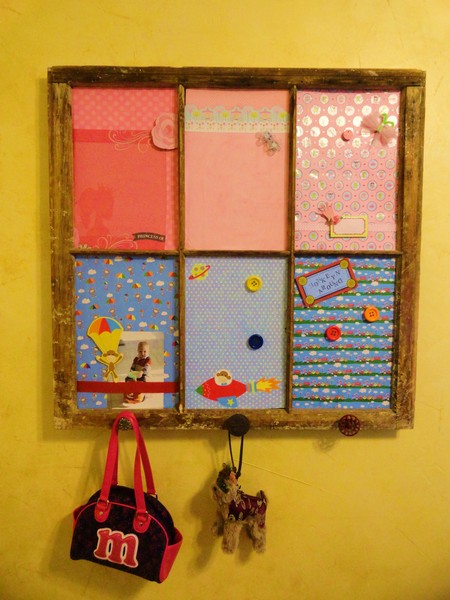
I spied this antique window pane in Canton back in my single lady 'daze' and knew it was just the piece my shabby chic little duplex in Cowtown needed!  Back  in my 'cabbage rose sofa' days (you know what I'm talkin' about!) it was used to display demitasse cups and saucers in my dining room.  When my job took me south on I-35, it hung above an antique pie safe and was adorned with paper roses.  Once Speed and I tied the knot and moved into our home, it decorated my kitchen and displayed antique linen hand towels (so stinkin' cute btw) Soon after though, it's presence was needed upstairs in our new little Sheep's bedroom, where my father's baby clothes would come to hang on satin hangers from it's panes.  This little 'Friday Find' has served me well over the years and it's a piece I have grown to love and cherish like part of my family!  So I knew that it needed to be incorporated into the JV squad's bedroom redo in some way, but how??

Sheep has long since outgrown the baby clothes on the window pane and was using it to hang tutus and fairy wings instead, but I have had my heart set on turning into a picture frame (even before Snacks came on the scene) so with the bedroom redo in progress, it was time to figure something out!

My idea was to cover pieces of tin cut to fit into the panes with fabric or paper so that I could use magnets to change the pictures.  Sounds easy enough, right??

Sooooo wrong!!!

My first trip to the big box hardware store (frown) got me back home with a roll of flashing - aluminum flashing - that WASN'T magnetic!  Too bad I didn't realize this until  I had already cut out the first piece so it couldn't be returned (frown).

On my trip back to attempt the return it hit me that we had a large piece of insulating foam core in the garage that I could use as my inserts instead!  My revised idea was to simply paint the pieces with 'magical' magnetic paint and then paper over them.  Even better right??  Because the foam core would just wedge into the panes without even needing top be tacked in somehow - yay!!

BOO!!

The Rustoleum Magnetic Paint was a complete bust in my opinion.  It doesn't work!  Let me repeat that - IT. DOESN'T. WORK!!  Too bad I didn't figure that out until I had already covered the pieces with scrapbook paper, which in itself was 2 trip ordeal!!


Despite my measuring and cutting out the foam core pieces the night before, it never dawned on me that the panes were larger than a 12 X 12 sheet of scrapbook paper . . . until I got home with them and tried to put them on - grrrr!


Back to the scrapbook store only to discover that not one, not two, but THREE of the papers I chose were the last sheet of that paper, which meant I had to come home and do some pretty crafty piecing together to even get my panes covered.  Sooooo disappointing when I tried to hang up my pictures with the cute little button and otherwise embellished magnets.  As you can see, the magnets stick, but they cannot hold up a photo.  Not even a sheet of notebook paper (insert sad face here)!!!

I even went surfing through blogland in an attempt to salvage this project somehow, some way and came across a bloggy sistah who had been thwarted by magnetic paint found ceramic magnets at Radio Shack that worked on job when regular magnets did not . . . But no, trip number FIVE for this project did not solve the problem.


With a soon-to-be-two year old sharing the room, I really don't want to use pushpins and they will make permanent holes in the paper (not to mention the pictures) anyway.  So, I am still searching for a solution.


I love the way the project looks, especially with the last minute addition of the door knobs across the bottom to add some always-needed storage in a shared space.  Too bad it can only hold one picture underneath the ribbon.
Any ideas?
I'd love to hear them!

Sharing this sassy project at Schoolhouse Scraps, Ladybird Ln., 

Monday, March 19, 2012

Coat Rack Reconfigured

I told you that we were busy little bees during Spring Break!   I had lots and lots on my "to do" list and my BFF drove into town with plenty of her own as well!  This coat rack redo was one of her 'Friday Finds' and I must say - it's BRILLIANT!!

Right now, my ribbon is stored in boxes and bins and none of it is easily accessible.  And that can be so frustrating when my creative juices are flowing!  It actually did spend 24 hours in organized heaven on this coat rack turned ribbon holder  (just long enough to shoot some pictures) but despite my begging and pleading, it headed back to Big D on Saturday (insert sad face here).


Oh well - it's given me something specific to shop for while I'm junkin' in jammies!  And if you have no idea what I'm talking about right now, you can see for yourself here!

My BFF is the original 'Damsel in Distressed' and will paint and sand anything that gets in comes her way!  For this project, she chose a bright pink paint from Sherwin Williams called Raspberry Parfait - isn't it yummy?!


Prior to sanding and painting, we bought inexpensive wooden dowel rods that would accommodate the spools of ribbon and cut them a couple inches longer than the width of the rack.  Oh, and don't forget to bring a spool with you when you go to pick out your dowel rods.  This step is important.  Don't ask me how I know - just trust me!  Then we used a level to mark where we wanted our rods to go on either side.  A few holes later, and we were ready to paint!


She preps and distresses with an electric hand sander.  It gives all of her projects a rough and rustic sort of feel - very shabby chic!  She also uses flat paint on her projects, though I personally prefer a finish that has a little more sheen to it - either satin or eggshell.  I have also been reading all over blogland about Annie Sloan chalk paints, but haven't seen them anywhere to try them yet.  What do you prefer?  And if you've used Annie Sloan's paint and/or wax, I'd love for you to leave me a comment or send me an email about why you like them so much - or don't for that matter!

In the mean time,  I cannot wait to find a coat rack of my own!!
Happy Hunting Y'all!

Friday, March 9, 2012

My Friday Find

With Spring in the air around these parts, garage sale signs have started popping up like wildflowers!  I imagine that I am not unlike many of you, because when I see a yard full of someone else's 'junk,' I just can't resist pulling over to take a look-see!  Maybe it's the voyeur in me, but I just love to see what other people are throwing away.

I'm serious!

You know you do too {grin}.

It was raining this morning so I talked myself out of junking around town as planned.  And so I departed to drop Sheep off at school in my favorite Christmas jj's.  (Don't judge!)  But instead of heading straight home afterward, I remembered that there was actually an advertised garage sale close by and there's some pretty swanky spreads in the neighborhood it was listed in.  Now most people don't seem to bother with advertising these days, so I figured they must have LOTS to unload . . . and all I would be doing is driving by.

You can already tell where this is going, can't you??  So I'm not going to bother you with the details of my adventure 'junkin' in jammies,' but let's just say it was almost worth it - ha!  You'll have to wait to see what I found!

In the mean time, this 'Friday Find' began life a certificate or diploma frame, complete with a blue suede mat (Go Mustangs!).  The price was right and I have been itching to try some distressing techniques I learned about from Leanne over at Because I Think I Can.  So I swiped it up along with some of it's orphaned brothers and sisters (in case my first attempt went haywire) and got to work!


This project also gave me a chance to try my hand at Picasa as a more advanced photo editing option than what I've been using and in just a few minutes, I had a cute little snapshot to add to my frame turned forget-me-not!


I think it turned out Ggggreat!!  And I love the springy colors in this retro fabric find from Joanne's.  Best of all, sticking to the white frame means I can easily change fabrics with the seasons!  It's fits perfectly on the little wall next to the door and will hopefully help me keep this crazy,busy life of ours in some kind of order!


If you noticed the note scrawled on the board, it's a shameless plug for our upcoming crafty playdate in Houston!!  You can get all the details here or just shoot me an e-mail - I'd love to meet you face-to-face!


Happy Friday Y'all!

Sharing my sass at Polkadots on Parade, Ladybird Ln. and Savvy Southern Style