Pages

Showing posts with label decorating. Show all posts

Wednesday, April 23, 2014

Carrot Door Planter


I hope everyone had a blessed Easter - I know we did!  We had the chance to celebrate with family on both sides, prep for Easter with our friends, join in not one but TWO local Easter egg hunts and celebrate Jesus' resurrection with our church family and family on Sunday back at our house.

Since we were hosting the family Easter lunch and egg hunt here, Speed and I have spent  the last two weeks trying to get the house and yard in shape for Spring, which hasn't left me much time for anything else.  But I did manage to squeeze in a project I had planned on completing last year!  And as you can see, I'm still late to party posting Easter decor after the event. {Oh well.}

And I'm proud to say that the potted plant I used in this cute carrot planter has been alive since last Spring and still looks great I might add - so there!


I've seen these deco-mesh carrots several places, and it seems that people have used lots of different things for their base, but I really wanted mine to be able to hold an actual plant, so it took some savvy shopping to get the parts assembled.  I ended up using a small collapsible easel from Michael's for by carrot, which allowed me to invert it and wedge a small plastic planter into the triangle it made.  Otherwise, it's constructed like any other deco-mesh decor, by simply securing loops of the mesh to the planter at intervals until you're happy with it.  I used orange pipe cleaners to accomplish this and it worked great!

Used a Command hook to hang on my glass front door and voila!  Super easy, super cute and only about $12 for the whole project so super-cheap too!  So pin it for next year - you'll be glad you did!

Happy Easter!  Happy Spring!

Monday, March 18, 2013

Easy Easter Cloche


This is a re-post of an Easter project from last year, but with so many awesome, new bloggy friends, I thought I might share this quick and easy idea again! Sheep and I spent some time doing a few new projects during Spring Break last week, but we also started pulling out our Easter decorations from last year and this is one of my favorites. You might even have everything you need to complete this project at home already! So, what are you waiting for . . . hippity, hop to it!
___________________________________________________________

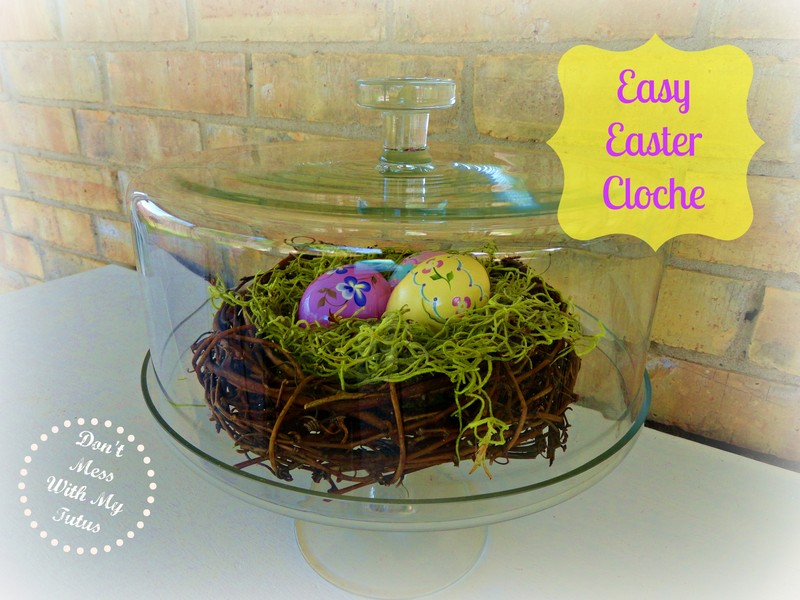
With all the other activities going on this month, Easter has really sort of hopped up on me - ha! But I managed to locate some of my decorations over the weekend and make a couple of new things too!  I don't have a real cloche, but I've seen lots of cute ideas using them, including nests, and decided one of my glass cake stands would work just as well for this project!

As usual, I put my own spin on it, by simply buying a small grapevine wreath and filling it with Spanish moss to use as my nest. I just love the springy color of this moss so I will be finding more uses for it!


The wooden eggs nestled inside were hand painted by my cousin many years ago and I just love them! Aren't they exquisite? She is a true artist! I have several more, but only three would fit in my tiny taste of Easter, so the others are up on my mantle in baskets - out of Snacks' reach! It will be nice when he's a little older and things can 'come back down,' but for now Easter will have to stay under glass!


I have a few uncompleted Easter projects from last year as well, including a new wreath for my door. Hopefully (or should I say Hop-fully?), I will get these wrapped up this week. What are you up to for Easter this year?

Sunday, December 16, 2012

Seeing Santa Photo Display

The best Christmas gift I have ever received came two weeks early one year, and I could not wait to get her picture taken with Santa.  Crazy, I know.  But I'm telling you, if there had been a Santa at the hospital, I probably would have stood in line to have it done before we even left!  I just love seeing Santa and wanted to make sure it was a part of my child's (now childrens') Christmas traditions too!  So each year we go and stand in line to whisper our heart's desire into his ear  . . . and I use the photos to decorate around the house.  But with eight years of memories under our belts, it was getting harder to find a place for all of them!

As I was heading into the kitchen to exchange our beach pics on the kitchen window ledge for Santa pics I looked up had an AH-HA moment!


Now over the years I have tried sprucing up that space between the cabinets and the ceiling with various things, including wooden word art and decorative plates to name a few, but nothing seems to stick.  But it looked like it might be time to try again . . .


Ta-da!!

I keep my eyes open for red frames year-round, though they haven't all made it in to one just yet.  What can I say, just about everything in my house is a 'work in progress' {smile}.


These our two of my favorite Santa pics.  I love her expression in the first one and the two-year old pic is priceless!!
 

Not bad, but it still needed something.  It's a long space after all.  It was about that time that I started wishing I had asked Santa for a Silhouette and some vinyl while we were there.  But lookie what I found the very next day while I was out and about!

 
Yippee!
 
The perfect wall art for my Seeing Santa display!  And it was already half-off so it was only a dollar!
I was standing on a stool to take this close-up and from this angle you can catch a glimpse of my 'solution' to the problem of the reservoir made by the crown molding on the cabinetry.  I need something to fill in that space so the pictures would have something to rest on.  I cut an old pool floatie in half and wedged it into the gap - now that's using my noodle!! 
(Sometimes I crack myself up!)
 
 
Shooting toward the window made it hard to get a really nice picture of the finished product (and I probably could have straightened up a bit too - ha), but I love the way it came out!  And there's plenty of room to grow!  Hopefully my 'repositionable' word art will be 'reusable' as well.  But just in case, I ran back and bought another one for next year!
 
Merry Christmas Y'all!
 

Friday, October 26, 2012

Foam-tastic Cupcake Toppers!

 
Why not trick out your Halloween treats with these Cah-YOU-t cupcake toppers?!
 
 
They're so easy (and cheap!!) that anyone can do them -
no printing, no punching, no nothin' required!
 
Well, that's not totally true . . .
you will need some toothpicks and some foam holiday craft stickers, but THAT'S IT!!
 
 
I grabbed this package of 110 stickers with a 40% coupon a few weeks back and will have plenty-o-toppers for many Halloweens to come!
 
 
Simply peel back the paper (partially), add your toothpick, and re-stick the paper backing!  I used two toothpicks on the cats - one on each leg - rather than one in the middle, so you wouldn't see them.
 
 
These over-sized toppers make such a bold and FUN statement atop my Halloween cupcakes that they are sure to be hit at the school carnival's Cake Walk tomorrow!  I am not-so-secretly hoping to win these beauties back for myownself {Grin} because I love, love, love this recipe!  Though it never happens, a girl can dream, right?!
 
 
We have Fall Festivals and Halloween carnivals on just about every corner in our town this weekend and the weather has (finally) cooled off, so it should be a GREAT weekend to enjoy them all!  I hope you and your family are doing something fun this weekend too!
 

Tuesday, October 23, 2012

Skirted Wine Stems!

 
Aaaa-ooooooooooh!!

Can you tell that I am excited about Halloween?!
 

It kicks off the Holiday Season for me and I just love it - especially with Sheep and Snacks around to enjoy it with!  But every now and then, mama needs to howl at the moon {grin}, so I invited some friends over for a Girl's Night Out, complete with food, WINE and shopping - so fun!!


Imagine that - a "31 Party" with a Halloween theme  - am I clever, or what?!

So in addition to a few frightful foods, I decided to spruce up my wine glasses for the occasion as well.  I saw these clever Pumpkin Wine Stem Labels by Shannon at SMC by Design and for some reason it got me thinking about how I might do these more easily by simply using an orange cupcake liner for the base instead of card stock.


I couldn't find any orange liners while I was out and didn't have all day to shop, but I did come across these liners with a spider web design.  Anyhoo, one thing led to another, and before I knew it, I had these cute little numbers instead!


Aren't they adorable!!
 

And the best part is that you could literally do this easily and inexpensively for almost any occasion!

I snagged these wine glasses at Wal-Mart BTW, in a boxed set (easy storage) that came out to only $1 per glass!  Perfect for party at the house with wall-to-wall tile (mine) and a bunch of moms getting silly!  They're not as nice as my 'good' wine stems, but there won't be any tears shed if something happens to them either.  Just sayin'!


I had already purchased the spider rings for some other fun Halloween projects and had plenty more than I needed, so a simple snip was all it took to add these babies to the glasses for some more spooky fun!


I decided they would also make great holders for name tags too.  All that took was some card stock, a hole punch and a Sharpie to add the names!  Easy, and important when all your stems start to look the same!


Some kept their tags on the rim, which worked great!


I moved mine down to the stem.


I just love how simple and cute these came out!


Cheers  . . . and Happy Halloween Y'all!

 
Debbiedoo's

Monday, October 15, 2012

Fab Fall Mantle

October has already gotten away from me . . . it's half over and I'm still getting out my decorations!  I guess my birthday celebration in Round Top last week was a bigger bump in the road than I anticipated - but oh so worth the trip!  Can't wait to share with you all of my "fall haul," but this quick mantle I put together last week will have to do for today! 


I made the burlap wreath last year for my door outside, but I've also got an awesome Halloween wreath as well, so I decided not to wait and use it on the mantle now.


It will carry me through to December it looks so great! 
For instructions on how to make your own burlap awesomeness, go here!


I like to add seasonal pictures of the kids.  These two are some of my favorite from Halloweens past.


Sheep in a sheep costume - How CUTE is that?!
 
 
On the other side I added some candy corn in my hurricane glass for color and placed on a stack of old books for some variation in height.


The books came from Round Top (Warrenton actually) at my friend Winnie's, who always has rooms full of vintage to comb through.  most of these I bought just for the color of the covers since I was doing a fall mantle, though I must admit 'Man Alive: You're Half Dead!' seemed apropos for Halloween!


Finished off with a few small pumpkins and . . .  I think I like it!
And I hope you find some inspiration from it too!
 

Take a good look at this mantle though, because that big, bulky (weird) chunk of wood you see hanging over my fireplace won't be there much longer . . . . yippee!

Sharing this sassy project at Mop it Up Mondays, Debbie Doo's Newbie Party, Take-A-Look Tuesday, Wow Us Wednesdays, Cowgirl Up, Whimsy Wednesdays, Show and Share, Overflowing with Creativity, Creative Me, Made You Look

Sunday, December 11, 2011

Small Town Christmas Parade

Just about everyone's probably been to a parade - but have you ever been IN a parade??  Well, I grew up in a big city and we went to lots and lots of parades growing up.  And I have lived on the Gulf Coast for my whole entire life, so Mardi Gras parades are also a yearly event.  But, I had never, ever BEEN in a parade - until last night!!

And it was so FUN!!

My girl scout partner in crime co-leader and I agreed that our town's annual Christmas parade would be something fun for our little daisies to do and when we called about entering and found out it was FREE - well, we took it as a sign that it was meant to be!!

Who knew it would be so much WORK to find a trailer, and oh yeah, you need a generator and lights and decorations and so on and so forth - AAACK!!  After I spilled the beans to the girls (Grrr - I know better than that!!  What was I thinking?!), I decided I had better google parade floats to find out what I was now in charge of - DOUBLE AAACK!!  Had I finally bitten off more than I could chew?!!?!

Frankly, I was more than a little bit panicked!

Especially when a quick review of the budget gave us only $40 for our float!!  Girl scouts "use resources wisely" - it's the LAW!!  The Girl Scout Law anyway!!  Truth is, I hadn't really given a lot of thought to this verse before but I now understand it to mean - we're cheap!!

But Girl Scouts (and their fabulous moms!!) are nothing if not resourceful!  So we just put our pretty little heads together and put a call out to our friends and families and it all came together just fine!!  Better than fine actually!  See for yourself!


As you can see, we decided to dress the girls as presents and lined the trailer with wrapped HEB boxes (free!) and donated lights (free!).  We had a mom with an extra Christmas tree (free!) and decorated our tree with empty girl scout cookie boxes (also free!).  We threw blankets down for the girls to sit on and covered them with a roll of felt that I already had (free!).  A very kind friend of mine loaned us her lowboy trailer and inverter (free!) and we 'borrowed' the battery off our camper (free!) to run the lights and karaoke machine we used to play our music.  One of our daisy scouts already had the karaoke machine and Christmas CDs as well (free and free!).  About the only thing we had to pay for was wrapping paper and duct tape and even some of that ended up being donated!


Saturday night it was clear and COLD for a change and all the girls had a FANTASTIC time!!


Speed pulled the trailer and Snacks spent most of the time eating goldfish (ha!) and generally enjoying the girls and chaos!!  He's such a little trooper himself!


The parade may have been my gift to them, but they are each a present to me as well.  I enjoy being their leader more than I can put into words and feel so blessed to be able to be involved in Sheep's life in this way.


It may not have been Macy's, but it was DARLING!!  A memory Sheep and I will always share!! And it's one of the many things I appreciate about life in our small town!!


Who knows - we might even have won something in the contest! I didn't realize there was a contest until we passed the judges booth - but it's got me thinking about next year already!!


Merry Christmas y'all!