Pages

Thursday, October 25, 2012

Ghostly Greetings!

 
Who will be welcoming your guests and goblins next week?
 
Why not treat them to a Ghooooostly Greeeeeeeting this Halloween?!
 
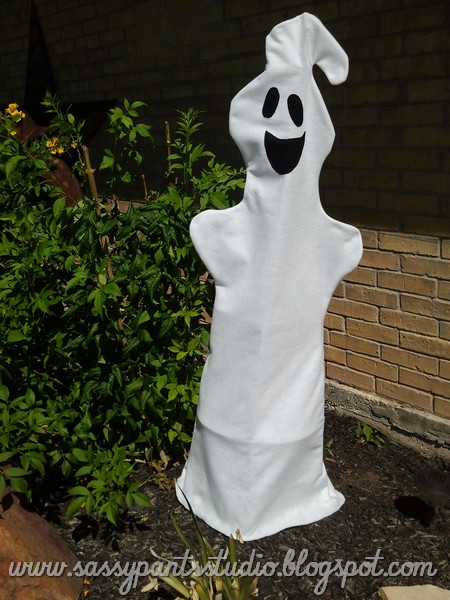
I ran across these cute tomato cage covers at a Fall Festival last year and KNEW I was going to need (at least) one of my very own!  Luckily, my mad Internet skills led me straight to an awesome source at Desert Saints Magazine that has complete instructions, so head on over if you're interested in whipping one of these up for yourself!
 
 
The instructions were very easy to follow and the whole project cost me less than $10 to BOO-t!
I used a blanket stitch to apply the mouth and eyes, but you can't really appreciate it like I thought you might, so I wouldn't bother!  You could certainly glue this entire project as well, but I think sewing will end up being more durable over the long run.
 
 
Here he is lit up at night - I chose to use a small spotlight, but I've seen other sites that have used white Christmas lights underneath, so whatever you have handy!
 
 
This project also whipped up quickly - under an hour, so you've still got plenty of time to knock one or BOO! of these out before the trick-or-treaters arrive!
 
Happy Halloween Y'all!
 

Tuesday, October 23, 2012

Skirted Wine Stems!

 
Aaaa-ooooooooooh!!

Can you tell that I am excited about Halloween?!
 

It kicks off the Holiday Season for me and I just love it - especially with Sheep and Snacks around to enjoy it with!  But every now and then, mama needs to howl at the moon {grin}, so I invited some friends over for a Girl's Night Out, complete with food, WINE and shopping - so fun!!


Imagine that - a "31 Party" with a Halloween theme  - am I clever, or what?!

So in addition to a few frightful foods, I decided to spruce up my wine glasses for the occasion as well.  I saw these clever Pumpkin Wine Stem Labels by Shannon at SMC by Design and for some reason it got me thinking about how I might do these more easily by simply using an orange cupcake liner for the base instead of card stock.


I couldn't find any orange liners while I was out and didn't have all day to shop, but I did come across these liners with a spider web design.  Anyhoo, one thing led to another, and before I knew it, I had these cute little numbers instead!


Aren't they adorable!!
 

And the best part is that you could literally do this easily and inexpensively for almost any occasion!

I snagged these wine glasses at Wal-Mart BTW, in a boxed set (easy storage) that came out to only $1 per glass!  Perfect for party at the house with wall-to-wall tile (mine) and a bunch of moms getting silly!  They're not as nice as my 'good' wine stems, but there won't be any tears shed if something happens to them either.  Just sayin'!


I had already purchased the spider rings for some other fun Halloween projects and had plenty more than I needed, so a simple snip was all it took to add these babies to the glasses for some more spooky fun!


I decided they would also make great holders for name tags too.  All that took was some card stock, a hole punch and a Sharpie to add the names!  Easy, and important when all your stems start to look the same!


Some kept their tags on the rim, which worked great!


I moved mine down to the stem.


I just love how simple and cute these came out!


Cheers  . . . and Happy Halloween Y'all!

 
Debbiedoo's

Monday, October 22, 2012

Burlap Candycorn Bunting!


This is another fast, fun Halloween craft you can do with your kiddos.
 

And unlike the paper plate bunting (which is also way cute and fun to do with your kids BTW), this burlap swag will last for years to come! 


We simply cut triangle pennants from burlap and painted them using tempera paint.  I did this project last year with Sheep and it was very simple for her to do.  I just love the vibrant colors of the candy corn!


The paint will bleed through to the back side, but we simply waited a few minutes for the front side to dry and them flipped them over and painted the backs.  And the bleed-through actually made it very easy to see where to put the colors on the reverse side.  The paint also seals the cut edges of the burlap and keeps them from fraying - BONUS!!


I used a simple zig-zag stitch to attach the triangles to the jute, but you could hot glue them or punch holes across the top if you don't (or won't - ha!) sew!


Depending on where you plan on hanging your bunting, you might want to do some measuring beforehand to figure out how long you want your swag and then work backwards to figure out how many/what size you want to make your triangles.  I'm a visual person, so the simplest way I have found to do this is just to swag a string across so you can actually see how far down you want it to hang, mark it, then measure your string!  Don't forget to add some length on the ends for tying!

Last year we used it out on our porch for a pumpkin painting party.


But it looks great on the fence as well.  This year it's actually ended up on the banister and it looks cute there too!

 
Happy Halloween Y'all!!

Monday, October 15, 2012

Fab Fall Mantle

October has already gotten away from me . . . it's half over and I'm still getting out my decorations!  I guess my birthday celebration in Round Top last week was a bigger bump in the road than I anticipated - but oh so worth the trip!  Can't wait to share with you all of my "fall haul," but this quick mantle I put together last week will have to do for today! 


I made the burlap wreath last year for my door outside, but I've also got an awesome Halloween wreath as well, so I decided not to wait and use it on the mantle now.


It will carry me through to December it looks so great! 
For instructions on how to make your own burlap awesomeness, go here!


I like to add seasonal pictures of the kids.  These two are some of my favorite from Halloweens past.


Sheep in a sheep costume - How CUTE is that?!
 
 
On the other side I added some candy corn in my hurricane glass for color and placed on a stack of old books for some variation in height.


The books came from Round Top (Warrenton actually) at my friend Winnie's, who always has rooms full of vintage to comb through.  most of these I bought just for the color of the covers since I was doing a fall mantle, though I must admit 'Man Alive: You're Half Dead!' seemed apropos for Halloween!


Finished off with a few small pumpkins and . . .  I think I like it!
And I hope you find some inspiration from it too!
 

Take a good look at this mantle though, because that big, bulky (weird) chunk of wood you see hanging over my fireplace won't be there much longer . . . . yippee!

Sharing this sassy project at Mop it Up Mondays, Debbie Doo's Newbie Party, Take-A-Look Tuesday, Wow Us Wednesdays, Cowgirl Up, Whimsy Wednesdays, Show and Share, Overflowing with Creativity, Creative Me, Made You Look

Monday, October 1, 2012

Spooky Halloween Bunting

It's so easy, it's SCARY!!
And pretty darn cute too!!


I came up with this idea one Saturday afternoon when I heard those dreaded words that make every mom want to SCREAM . . . . "I'm bored!"  Sheep got lucky - usually I hand her a dustrag!
 
 
To make your own 'Spooky Halloween Bunting', you'll need the following supplies, that you probably already have on hand, but if not, can be purchased at your local dollar store!
 
Medum weight paper plates
Tempra paint
Construction paper
Assorted pipe cleaners
Googly eyes (or buttons)
Yarn, string or jute
Hole punch
Glue
 
 
Turn over your plates and paint the backside (usually it's white, even if the plates have a pattern to them).  While you're waiting for them to dry, use your imagination to cut out ears, legs, eyes, and mouths for your creepy creatures.
 
 
We accordion-folded our spider's legs for more interest and curled pipe cleaners around pencils (you could also use your finger) for some of our embellishments!  Once the paint is dry, attach everything with glue or staples.  Sheep used her markers to add even more decorations to some of our ghouls!


Our Spooky Halloween Bunting included:  Pumpkins, Witches, Ghosts, Devils and Spiders but I'm sure you could think of even more creepy creatures to add!  This was a great way to spend an afternoon and Sheep (who was 5 at the time) was able to do most of it on her own - so it's definitely been kid-tested and approved!
 
Once you've got your Halloween haunts looking the way you want them to, simply punch a hole at the top and string them onto some yarn!  It took 13 (don, don, don) to run the length of our staircase and you can see about how far apart we placed them.
 
They held up pretty well too.  I kept them with the other Halloween decorations after the first year, used them outside on our porch last year AND in her classroom too before thowing them away!  So, it's looks like it might be time for another round this year, and with Snacks getting in on the action, who knows what kind of spooky spiritswe'll come up with this year!
 
Stay tuned for more fun holiday ideas and Happy Halloween Y'all!
 

Wednesday, September 26, 2012

Game Day Goodness!

 
Sport came home this weekend.  He's the youngest on our 'Varsity Squad' and just started college about three hours away.  In honor of his visit, we thought we'd entice him over celebrate with a cookout and a football game!  It was a good weekend for football.  My beloved Aggies 'beat the HELL outta' S. C. State and the Texans reminded Peyton Manning that he ain't what he used to be!

Sport had initially planned on bringing his roommate and the rest of the Varsity Squad was going to be home as well, so we decided to try our hand at beef ribs . . . and they tasted GREAT!!!

MEEEEEAT!!

Gram brought baked beans and I whipped up some potatoes that are soooo yummy I thought I'd share the recipe with you!  This might have even come off the back of the package at some point, but I've forgotten who taught me how to make these.  Let's just say we've been enjoying these babies for a looong time {SMILE} and I know you will too!


Ranch House Roasted Potatoes

1 sack of new potatoes (small red potatoes), rinsed and quartered
vegetable oil
1 packet of Ranch Dressing mix

Preheat oven to 400 degrees.  Line large cookie sheet with foil for easier clean-up.  Spread quartered potatoes across pan.  Drizzle with vegetable oil.  Sprinkle entire package of Ranch dressing mix over potatoes and toss to coat thoroughly.  Place in oven to roast for about 1 hour.  You can stir them up about half way through for more even roasting.  Mmmm, mmmm good!


So good, in fact, that I don't have a picture of them once they came out of the oven!  Here's one of the 'before' pictures, so you can get the idea!


We rounded it off with a big batch of chocolate chip cookies and some lemonade - and that's how game day is DONE!


Although we cooked for a crowd and would loved to have met everyone's friends, it was awfully nice (and rare these days) to have a day to enjoy our party of five all by themselves.  It's great to watch how they all interact, despite the age gaps.  These are precious moments and I am so blessed to have them!

Because we all know that it seems like only a moment before this:
 
Future backmail picture of Snacks - hee, hee!
Grows up into this!
 
Isn't he handsome?!

Wednesday, September 19, 2012

Meet Mumpkin!

Well, it's definitely that time of year again . . . And I am excited!!  Some of my most favorite holidays (including my birthday!!!) are just around the corner and I. CAN'T. WAIT!!  To kick things off,  I thought I would share a quick and easy Halloween craft with you that I actually posted on a friend's blog (before I resurrected my own . . . does that make this a Zombie blog?!?!) last year.  A few of you may have seen this before over at Randee's Organized Chaos, but for those of you who haven't - enjoy!!
____________________________________________________
 
I don't know where yall live, but where we call home it's hot! Yes, it's true.  Halloween is frequently a warm-weather holiday for us! Which makes decorating with carved pumpkins almost impossible! In addition to to being hard to carve in the first place, they are generally a soupy, swarming mess only a few days later. Frustrating! When my daughter was born, it quickly became apparent that she was both creative (yay) and clutsy (oops) - just like her mom! And that gave me one more reason to stick with pumpkin decorating ideas that do not involve a knife! So for the past few years, we've simply painted them, but this year we decided it was time to try something new. It was so easy and fun (and SAFE) that I wanted to share!


Make Your Own Mumpkin!

1. We picked a medium to large pumpkin, but mini mumpkins would be cute too!

2. Cut gauze fabric into 2-3 inch strips and set aside. We used a half-yard of gauze. You could also buy rolls of gauze and save a step, but the fabric is much cheaper.

3. Cut out felt eyes and mouth in any shape you want.

4. Thin regular white glue with water and pour into a flat container. TIP*** We wash and save our styrofoam meat trays - and use them for all kinds of crafts!

5. Use a large brush to coat the pumpkin in a thin layer of glue.

6. Position eyes and mouth where you want them.

7. Begin wrapping your pumpkin in gauze strips, using additional glue to secure ends. We just painted right over the gauxe with the glue and it will stiffen as it dries.

8. Keep wrapping until your pumpkin becomes a mumpkin and you're done!
This whole project took about 15 minutes to complete from start to finish and Sheep did most of the work! It's a great craft for kids and best of all - no fruit flies!
 

For even more sassy pumpkin ideas head on over here!