Pages

Monday, October 1, 2012

Spooky Halloween Bunting

It's so easy, it's SCARY!!
And pretty darn cute too!!


I came up with this idea one Saturday afternoon when I heard those dreaded words that make every mom want to SCREAM . . . . "I'm bored!"  Sheep got lucky - usually I hand her a dustrag!
 
 
To make your own 'Spooky Halloween Bunting', you'll need the following supplies, that you probably already have on hand, but if not, can be purchased at your local dollar store!
 
Medum weight paper plates
Tempra paint
Construction paper
Assorted pipe cleaners
Googly eyes (or buttons)
Yarn, string or jute
Hole punch
Glue
 
 
Turn over your plates and paint the backside (usually it's white, even if the plates have a pattern to them).  While you're waiting for them to dry, use your imagination to cut out ears, legs, eyes, and mouths for your creepy creatures.
 
 
We accordion-folded our spider's legs for more interest and curled pipe cleaners around pencils (you could also use your finger) for some of our embellishments!  Once the paint is dry, attach everything with glue or staples.  Sheep used her markers to add even more decorations to some of our ghouls!


Our Spooky Halloween Bunting included:  Pumpkins, Witches, Ghosts, Devils and Spiders but I'm sure you could think of even more creepy creatures to add!  This was a great way to spend an afternoon and Sheep (who was 5 at the time) was able to do most of it on her own - so it's definitely been kid-tested and approved!
 
Once you've got your Halloween haunts looking the way you want them to, simply punch a hole at the top and string them onto some yarn!  It took 13 (don, don, don) to run the length of our staircase and you can see about how far apart we placed them.
 
They held up pretty well too.  I kept them with the other Halloween decorations after the first year, used them outside on our porch last year AND in her classroom too before thowing them away!  So, it's looks like it might be time for another round this year, and with Snacks getting in on the action, who knows what kind of spooky spiritswe'll come up with this year!
 
Stay tuned for more fun holiday ideas and Happy Halloween Y'all!
 

Wednesday, September 26, 2012

Game Day Goodness!

 
Sport came home this weekend.  He's the youngest on our 'Varsity Squad' and just started college about three hours away.  In honor of his visit, we thought we'd entice him over celebrate with a cookout and a football game!  It was a good weekend for football.  My beloved Aggies 'beat the HELL outta' S. C. State and the Texans reminded Peyton Manning that he ain't what he used to be!

Sport had initially planned on bringing his roommate and the rest of the Varsity Squad was going to be home as well, so we decided to try our hand at beef ribs . . . and they tasted GREAT!!!

MEEEEEAT!!

Gram brought baked beans and I whipped up some potatoes that are soooo yummy I thought I'd share the recipe with you!  This might have even come off the back of the package at some point, but I've forgotten who taught me how to make these.  Let's just say we've been enjoying these babies for a looong time {SMILE} and I know you will too!


Ranch House Roasted Potatoes

1 sack of new potatoes (small red potatoes), rinsed and quartered
vegetable oil
1 packet of Ranch Dressing mix

Preheat oven to 400 degrees.  Line large cookie sheet with foil for easier clean-up.  Spread quartered potatoes across pan.  Drizzle with vegetable oil.  Sprinkle entire package of Ranch dressing mix over potatoes and toss to coat thoroughly.  Place in oven to roast for about 1 hour.  You can stir them up about half way through for more even roasting.  Mmmm, mmmm good!


So good, in fact, that I don't have a picture of them once they came out of the oven!  Here's one of the 'before' pictures, so you can get the idea!


We rounded it off with a big batch of chocolate chip cookies and some lemonade - and that's how game day is DONE!


Although we cooked for a crowd and would loved to have met everyone's friends, it was awfully nice (and rare these days) to have a day to enjoy our party of five all by themselves.  It's great to watch how they all interact, despite the age gaps.  These are precious moments and I am so blessed to have them!

Because we all know that it seems like only a moment before this:
 
Future backmail picture of Snacks - hee, hee!
Grows up into this!
 
Isn't he handsome?!

Wednesday, September 19, 2012

Meet Mumpkin!

Well, it's definitely that time of year again . . . And I am excited!!  Some of my most favorite holidays (including my birthday!!!) are just around the corner and I. CAN'T. WAIT!!  To kick things off,  I thought I would share a quick and easy Halloween craft with you that I actually posted on a friend's blog (before I resurrected my own . . . does that make this a Zombie blog?!?!) last year.  A few of you may have seen this before over at Randee's Organized Chaos, but for those of you who haven't - enjoy!!
____________________________________________________
 
I don't know where yall live, but where we call home it's hot! Yes, it's true.  Halloween is frequently a warm-weather holiday for us! Which makes decorating with carved pumpkins almost impossible! In addition to to being hard to carve in the first place, they are generally a soupy, swarming mess only a few days later. Frustrating! When my daughter was born, it quickly became apparent that she was both creative (yay) and clutsy (oops) - just like her mom! And that gave me one more reason to stick with pumpkin decorating ideas that do not involve a knife! So for the past few years, we've simply painted them, but this year we decided it was time to try something new. It was so easy and fun (and SAFE) that I wanted to share!


Make Your Own Mumpkin!

1. We picked a medium to large pumpkin, but mini mumpkins would be cute too!

2. Cut gauze fabric into 2-3 inch strips and set aside. We used a half-yard of gauze. You could also buy rolls of gauze and save a step, but the fabric is much cheaper.

3. Cut out felt eyes and mouth in any shape you want.

4. Thin regular white glue with water and pour into a flat container. TIP*** We wash and save our styrofoam meat trays - and use them for all kinds of crafts!

5. Use a large brush to coat the pumpkin in a thin layer of glue.

6. Position eyes and mouth where you want them.

7. Begin wrapping your pumpkin in gauze strips, using additional glue to secure ends. We just painted right over the gauxe with the glue and it will stiffen as it dries.

8. Keep wrapping until your pumpkin becomes a mumpkin and you're done!
This whole project took about 15 minutes to complete from start to finish and Sheep did most of the work! It's a great craft for kids and best of all - no fruit flies!
 

For even more sassy pumpkin ideas head on over here!

Wednesday, September 12, 2012

Easy Bookshelf . . . Literally!

 
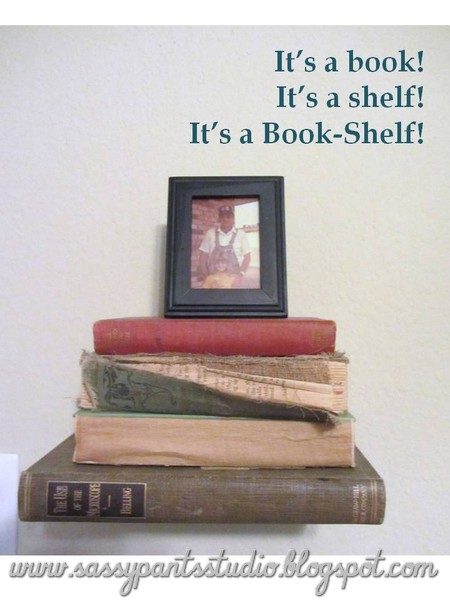
It's a book!  It's a shelf!  It's a Book-Shelf!

As Sheep would say, "Get it?" . . . Sometimes I crack myself UP!!

My best friend and I ran across this clever idea at Winnie's Antiques in Warrenton, during the best antiques show in Texas!!  Incidentally, it's going to be here again in just a few short weeks and you can read all about it AND our adventure here!  Anyway, my bestie is truly a 'get 'er done' kind of gal, so she headed back to Big D and whipped one up almost as soon as she walked in the door!

All you need is a metal bookend and some screws to attach it to the wall.


Bend the inner support done so that it's parallel with the bottom and slide on your largest book, positioning the inner support in between the pages so that it's hidden.


Stack a few more books on top (but don't make it too heavy), add a snapshot or other small memento (that's her and her daddy by the way) and voila!


Doesn't it look great as part of her antique sewing table vignette?!!


I think it's a unique and interesting way to showcase your antique or other special books, and this idea is so simple, you could probably get it done before the bus gets here.  Oh wait, that's me!
 
Make it a great one y'all!
 
Sharing this sassy idea at It's Overflowing, Mop it Up Monday, Wow Us Wednesdays, Cowgirl Up!, Whimsy Wednesdays, Debbie Doo's

Monday, September 10, 2012

There's A Lot To Do . . .

 . . . When You're Two!

It really is an AMAZING age!

Just imagine if you were asked today to grow 2-3 inches (while gaining only 10 pounds- ha!) and at least two teeth in the next twelve months.  You'll also be asked to completely change your sleeping habits, method of drinking, method of pottying, your method of being comforted and most likely your method of communicating as well.  Most of us would simply say, "No thank you."  And more than a few of us might consider it downright impossible! 

It's no wonder they call it 'The Terrible Twos.'

So, like most two-year-olds embarking on the transition from babyhood to kid-dom, Snacks has been quite busy over the summer:

Learning to use the potty,


Saying goodbye to his morning nap,
 
 
AND to his most beloved companion
 

BINKY {sniff}
 
 
All in preparation for his first day of 'school!'
It's a MDO program near our home that he attends 4 hours a day, 3 days a week this year.
 
Believe it or not that's a smile these days!
 
He LOVED his first day!!
 
 
No tears at all when I dropped him off and all smiles when I picked him up!
The next two days were a little rougher, but we'll see how he does tomorrow. 
I am so excited to see him growing and expanding his horizons, even though the house is awfully quiet without my little man. . . I guess it's mom's turn for a {SNIFF}

Monday, August 27, 2012

New (School) Year's Resolutions


Yeah, yeah.  We all make New Year's Resolutions.  Which have most likely fallen by the wayside at this point - Let's be honest.  But since I have become a mom of school-aged kiddos, I find myself focusing much more on School Year's Resolutions instead.  Like the January promises, this end-of-summer swearing (and I'm not talking about the 4-letter word kind) is aimed at making 'our' lives run more smoothly and seem more balanced, though of course this only happens if I can actually stick to them - Rats!!  There's always a catch isn't there?

Well, today is 'our' first day back-to-school and in an effort to keep myself accountable, I am putting my New (School) Year's Resolutions down on paper, virtual paper anyway . . .

1.  I will manage our evenings and mornings in such a way that we make the bus!  And that was my big 2nd grader above, boarding said bus this morning, so we're off to a good start - Yay!!  Where does the time go . . . .

2.  I will use my 4 hours, 3 days-a-week of pre-school for Snacks (my big boy!!) to clean house and to prepare for Girl Scouts and CCE in advance, so that afternoons can be spent focused on my kiddos instead of scrambling to complete lesson plans and prepare activities.  This one should be possible . . .

3.  I will get up, shower and get 'dressed' each morning, regardless of whether or not I have plans outside the house that day!  I will focus more on my appearance in an effort to be 'Cute Mom On-the-Go,' thus enabling me to run up to school for lunch with Sheep on a whim, etc.  Get ready people!

4.  I will make sure that I get in at least three days of boot camp each week, even if it means giving up something else to make it happen!  This can only be good for everyone in my house!

5.  I will not commit myself to any more volunteer activities than what I have already committed to this year so that my (unpaid, Speed reminds me!) commitments do not take time away from my family!

6.  I will have dinner either prepped or planned for my mother-in-law on girl scout nights, so that we're not scrambling to figure out what we're eating at 7 o' clock, making unhealthy choices and abandoning our evening routine once a week!

7.  We will start each school day with prayer.

OK - I'm sure that's more than enough . . .  Do you make new school year's resolutions?  I'd love to hear what they are.  Leave me a comment and let me know!

I hope everyone has a GREAT first day back and a wonderful school year!

Sharing this sassy story at Mop it Up Monday, Overflowing with Creativity

Saturday, August 25, 2012

Recent Reads

Summer vacation provided  us some much needed down time and for me, there's no better way to relax than with a great book!  Speed bought me an e-reader for Christmas - nothing fancy, but boy is it dangerous for a bookworm like me!  It's just a leetle too easy to click the "Buy" button and grab the next great read without feeling like you've even spent any money and before you know it, you've got quite a tab racked up.  It's also easy for me to forget about dinner, the dishes, the laundry (the children) once I'm into a book, so I really do have to pace myself.  During the school year, I'm usually so overwhelmed committed that reading is relegated to a few chapters before bed as a reward for a day well-done (Yes, it's true.  I have to coax myself into housework by dangling a book, but whatever works, right?!). But summer had me (and the kids) indulging all day - and it was divine!

And yes, I read the Fifty Shades Thrill-ogy ('Suburban Porn' my friend called it, even as she was recommending it to me - ha), but frankly they ended up being nothing more than a 21st Century Harlequin Romance IMHO and I've never been into those.  So here are some alternatives I recommend for your nightstand instead!


Gone Girl: A Novel
Gone Girl

Definitely no fairy tale ending to this story about love and marriage here, but I TOTALLY agree with the reviewer who called this book "un-put-downable!"  Cleverly told from two different points-of view, this book is full of characters you will hate and admire at the same time.  I don't want to give anything away, but it will either make you sleep with one eye open or have you handing it to your spouse as a cautionary tale.  All I can say is GO. READ. THIS. BOOK!!


 My background as a genetic counselor probably drew me to this book, but you don't need a medical degree to understand or enjoy it!  In addition to an intriguing story about the life of twins and medical missionaries, this novel introduced me to an era in world history that was previously unknown to me.  The descriptions of life in Ethiopia and of the country itself were simply captivating and the insight into the life of the foreign medical student I found compelling.  Vargese left me wanting to know more, about many things, after reading this book.


The Kitchen House: A Novel
The Kitchen House
I love stories about the antebellum South and this novel did not disappoint!  It's a sweeping, Gone With The Wind-type novel about a young Irish girl, orphaned on her trip to America and left to grow up as an indentured servant (a white slave) on a Virginia palntation.  This novel was a very fresh take on an old topic.  It also brought to focus aspects of agrarian life that i had not really considered before.  I thought the ending washastily done, but perhaps that's because I really wanted to stick around a while longer with these characters and was sad to see it end.  In some ways it reminded me of A Tree Grows in Brooklyn, another of my all-time favorite reads.
 
Heading Out to Wonderful
 
I really enjoyed the first book I read by this author, A Reliable Wife, so I was pleased to find he had something else to offer!  This book doesn't have as many twists and turns, but is every bit as good of an examination of human nature and the things we do for love.  I'm always intrigued by what I call a 'Man's Love Story' because the male perspective on realtionships is foreign and entertaining to me at the same time.  Goolrick also does a fantastic job of grounding this novel in a powerful sense of place, with great descriptions of both the geography and its inhabitants.


The Light Between Oceans: A Novel
The Light Between Oceans
I just finished this book and it was simply wonderful.  Set in Australia  after World War I (seems like all I ever see these days are books set in and around WWII, so that in itself was refreshing), this book delves into the world of one couple's love, loss, sin and redemption.  As a mother, this book broke my heart and made me squeeze my kiddos a little bit tighter when I put them to bed last night.  Perhaps it was just my own back-to-school, letting go jitters, but I was completely swept up in the emotions of these characters . . . and enjoyed every minute of it!


What have you been reading lately?  I'd love to hear your recommendations!
 

Wednesday, August 22, 2012

Stenciled Burlap Wall Art Tutorial

Back in the Spring, when I was 'Junkin' in Jammies', I practically stole acquired some great old frames that I had no idea what I would do with, but knew that I could not pass up!  One of them turned into a sassy little message board for my kitchen and a much larger one I set aside for a back porch art project.  And there it sat, through June, July and most of August, while the kids and I busied ourselves with all things summer!  Truth is, I knew I wanted to do something on burlap, but I was a little stumped about what I wanted it to say.  But with summer coming to an end and our back-to-school prep in full swing - it hit me!


Voila!

The PERFECT wall art for our favorite summertime destination:  our own backyard!

This project was quick, easy and fun to do - so here's how ya get 'er done!

Supplies:

Frame of your choice
(I chose plastic since it was going outdoors!)
Craft paint - pick your color
Small brush
Burlap
Thin piece of wood cut to fit
(You can have that done at your local home improvement store if
you can't slow Speed your husband down long enough to do it
and they'll do it for free!)
 Spray adhesive
Poster board
Craft knife
Paint pen (optional)

For the Frame:

Remove any inserts in the frame and cover your work area to paint.  This happens to be my dining room table - ha!


Using a small brush and craft paint, apply a small amount of paint to your brush and brush across frame.  I use recycled meat trays for easy, disposable paint trays.


This 'dry brush' technique allows some of the color underneath to show through.  This technique works well on frames with lots of molded detail.  I considered painting another color underneath first, but I liked the gold.


Let dry completely before inserting your art!

For the Insert:

Lay your burlap out with your wood that has been cut to fit on top and trim burlap close to the edges of the wood.  Spray wood with adhesive and then cover with burlap, working from the center out to smooth out any wrinkles as you go.  It took more adhesive than I thought it would . . .


For the Stencil:

This might be another 'ghetto graphics' tutorial, but it worked for me without a lot of headache (but a fair amount of hand-ache) by the time I was done.  There are plenty of other stenciling techniques out there, but this made the most sense to me for some reason.

First decide on your phrase and font style.
Then print them out on your computer using your word processing program.


Geesh - Looks like someone needs a pedi!
Anyhoo, once you like the size and layout, grab your poster board.
I simply affixed my lettering to the poster board with good old-fashioned Scotch tape.


Looks good!  Now cut through the letters and the poster board using your craft knife.
I did this on a self-healing cutting mat, but if you don't have that, make sure you put something underneath so you don't ruin your surface while cutting!


Make sure you save the 'insides' on your letters for stenciling!


Does anyone else have to work in these conditions?!


Once you've completed your stencil, remove the paper and lay it out over the burlap covered insert and start to paint!


After seeing the positive ravings about Sharpie paint pens, I decided to buy (invest) in a package of them and let me just say - "I'm hooked!" 


They really do work great and made this job easy-peasy without having to worry
about bleed through since my stencil wasn't vinyl, etc.  Yay!!


Almost finished!!


Paint might have done a 'darker' job, but I'm certain it wouldn't have been as clean.


Now, just insert your burlap-covered, fabulously-embellished , one-of-a-kind wall art
into your beautiful 'new' frame and along with the last taste of summer . . .


ENJOY!!

It's Overflowing