Pages

Tuesday, April 16, 2013

Where is Your Happy Place?

 
Where is your happy place?
 
Sometimes that question can be really hard to answer.  But not for me when April rolls around, because it's springtime in Texas y'all and it just doesn't get any better than this!
We took a road trip this weekend, just to get out of town, breathe some fresh air and enjoy a little football, Aggie-style - Whoop!
 
That's right, I said a little football!
 
  We loaded up the B team and headed out 290 toward God's Country (Aggieland) on Saturday morning to watch the Texas A & M football spring scrimmage at Kyle Field.  I don't know why exactly, but when I make that turn on to Highway 6, I swear I can feel the air shift and see the grass getting just a little bit greener.  And the closer I get to College Station, the more I feel the stress of day-to-day hurry melting away and the relaxation that only comes from heading home wrapping its arms around me.  Deep breath in - ahhhh!
 
Tickets for the game were only 5 bucks for grown-ups, the kids were FREE and my Aggies were guaranteed a win - now that's a happy place to be!  Over 45,000 others felt the same way because the parking lots and stadium were packed!  Speed, who is only an Aggie by marriage, was practically speechless over all the hoopla around a scrimmage and a chance to see Johnny Football Heisman Manziel before September, but I was simply proud of our Aggie Spirit once again.  Gig 'em!
 
 
We headed up early so we could spend some time brainwashing showing the B team around campus and eat lunch with Sport, who drove in from San Marcos to meet us.  After a 2 hour car ride, it was good for the littles to get a chance to run around before we asked them to sit still again anyway.  I showed them the Century Oak in the middle of campus, one of the oldest and prettiest trees in Texas!  Tradition says that couples who walk under the tree will eventually marry and marriages after a proposal made underneath its branches will last forever!  I'm not sure about all that, but it does seem like a magical place.
 
 
We met up with my brother and his family for the game, so the kids had a chance to YELL for the home team while hanging out with their cousins.  They have such a special relationship and it's fun to imagine them on campus together one day.  Especially since we live across town from each other and life keeps us from spending nearaly as much time together as they'd like.  Watching the two of them reminds me of my brother and myself 'back in the day' at it does make me very happy!
 
 
Afterwards, we headed back toward home, stopping to participate in another time-honored, Texas tradition - bluebonnet pics!  They're here for such a short time each year, which makes their appearance as a herald of spring that much more special and gives you the feeling that it's something worth capturing!
 
 
It's already a little late in the season for bluebonnets this far south, but we managed to find a field of them and piled out to enjoy God's handiwork!  The weather was perfect and the field was just begging to be explored . . . So they did!  It didn't take Snacks any time at all to find something to climb on.


And honestly, he'd follow her anywhere.  He LOVES his 'sissy' and she loves her 'bubby' right back!  When I watch the two of them together, my heart leaps and I can't help but smile.  Sibling love can be so amazing, but sometimes fleeting.  I pray a lot about their relationship because I see the confidence and curiosity they gain from facing life together and I want that for them always!
 
 
On our way back through town, we were lucky enough to hook up with some friends for dinner and drinks al fresco at Cedar Creek - the perfect ending to a perfect day!
 
 
Still single at 33, this amazing life I lead now I once didn't think possible.  God has blessed me in so many ways, but most especially with my wonderful husband and children.  And I am forever grateful for the love he has given me through these incredible people that I am blessed to call my family.  In the words of Jack Johnson, "It's always better when we're together."
 
And this is my happy place!


Sunday, April 7, 2013

'Operation Rhino' Birthday Party

 
Last week my sweet, adorable, funny, adventurous little man turned 'thwee' and to celebrate he asked for a rhino party.  Yes, a rhino party.  Which, he pronounces 'whino' and did get me wondering about my consumption habits - ha!  And while I KNOW that he will most likely only remember his third birthday party from the pictures he sees later on, so it didn't really matter to him what we did, Sheep was NOT letting me off the hook that easily!  He's a lucky little dude to have such an advocate and protector in his closest sibling . . .
 
 
Luckily, we have a wildlife park not too far from the house and (Yippee!) they do indeed have a rhino there named Pee Wee, so the bulk of this unusually-themed celebration came together pretty easily!  If your local and have never been to Bayou Wildlife Park, it's definitely worth the trip at least once, because there's tons of animals and the train ride through its 80 acres lets you get up close and personal too!
 
Still, a glance at a rhino from across a field wasn't going to cut it by itself, so off to Pinterest we went, only to realize (surprise, surprise) that there isn't a lot out there in the way of party ideas or paper goods for a rhino birthday party.  You can check out the things we found and liked on my Pinterest 'Birthday Fun' board though, and I will be adding a few of the creations below as well!
 
 
And as usual, I was working under some pretty serious time constraints, so ordering any of cute things we found was out of the question.  Whoever said necessity was the mother of invention obviously forgot about procrastination - ha!
 
Ultimately, I settled on a turquoise and orange color scheme for the party and used my superior tracing and scissor skills to construct the invitation - which turned out pretty stinkin' cute if I do say so myself!  Luckily, only 8 invitations went out, so it wasn't an overwhelming task and Sheep was happy to help with the glue and pop dots!  Anything for her 'bubby'!


Although Sheep campaigned for a rhino-shaped birthday cake, mommy vetoed that idea and settled on cupcakes with rhino toppers instead.  I simply swiped some rhino art off the web and modified it in PowerPoint (my favorite ghetto graphics tool) to fit into my punches.  I also made some number threes for the reverse side of the topper.  Everything was pieced together on popsicle sticks using glue dots and voila!
 
 
Again, since the guest list was small, I didn't have tons of these to make, which made this a very 'doable' idea - especially compared to constructing a rhino cake from scratch!  Of course we used our favorite cupcake recipe, along with some turquoise wrappers and orange-tinted frosting to keep with our color scheme!  They looked good enough to eat!
 
 
I had also seen an invitation that said something about 'having a ton of fun', which I thought was so cute and clever that I used it on the goody bags to say thanks to all our guests!
 
 
Neither helium-filled nor latex balloons are allowed at the wildlife park due to animal safety issues, so I needed to come up with something else to designate our tables during the party.  I remembered that it was pretty windy out there as well, so my centerpieces needed to be sturdy too!  Therefore, I decided to keep it simple, using a couple of small, mylar balloons and pinwheels in the orange and turquoise colors to make centerpieces in sand-filled beach pails.  Perfect!
 
 
Mission//assignments sent - check!
Cupcake soldiers made - check!
ICDs (Improvised Centerpiece Devices) made - check!
Goodie 'bombs' prepared - check!
Battle station determined - check!
 
The only thing left was a 'uniform' for my little soldier and preparations for 'Operation Rhino' would be complete!  I looked everywhere for a machine applique design of a rhino, but once again mommy was left to create a shirt on her own!  Luckily, I already had a rhino pattern from the invitations, which I simply enlarged, cut out of orange fabric prepped with double-sided fusible webbing, and ironed on a tiny, turquoise tee.  Then I adjusted the stitch length on my machine and sewed around the perimeter several times in a sort of messy way, just to give it a little more interest and keep it very boy-ish!  He was so happy to get it and wear it that it doesn't even matter to me whether or not he remembers it because I always will!
 
 
The kids had lots and lots of fun at the park of course!
 

 And we saw lots and lots of animals too!  Though Pee Wee was too far away to catch a good picture of him this trip.
 
 
I think Snacks and his pre-school buddy G-man enjoyed sharing the food between their buckets almost as much as feeding the animals!
 
 
In addition to the train ride, the kids enjoyed the petting zoo and a horseback ride, and a WILD time was had by all!
 
 
I love you more than I could ever have possibly imagined my little man and possibly more than you will ever realize - but maybe - just maybe - these memories from 'Operation Rhino' will give you some idea.  Happy Birthday Snacks!
 
Love, Mommy


Wednesday, March 27, 2013

Toilet Paper Roll to Easter Treat Tutorial

 
Easter is just around the corner, but you've still got time to whip up some of these adorable treat boxes for classroom parties and baskets of course!  And they're so easy - even a rabbit can make them - ha!
 
Supplies
Toilet paper rolls
Orange acrylic or tempera paint
Clear nail polish or Mod Podge spray gloss
Green tissue paper
Glue
Staples
CANDY!
 
I had actually seen these made up as candy corn treat boxes last year at Halloween, but never had time to make them in the Fall.  And then I got to thinking, why not use that same shape to make carrots and Easter Bunnies instead?
 
 
I never actually got farther than painting the roll white for the bunny, but you can figure it out from the instructions below and I think they would be adorable as well!  Simply start by painting your rolls with tempera or acrylic paint.  I had tempera paint on hand, so that's what I used.
 
 
I would have stopped here, but the paint I had dried very dull and I wanted them to be shiny.  You could certainly spend a little and get glossy finish paint or try spray paint, but I decided to try clear nail polish instead.  Again, it was what I had on hand and since I'm usually crafting while supervising homework and starting dinner, I'm frequently left to 'make do'.  Hey, it was smelly, but it worked!
 
 
However, if you're going to be making lots of these, I would go ahead and grab the Mod Podge glossy finish spray - much faster and less smelly!  Once it's dry, you're ready to glue down one end.  I had Elmer's on hand, so i held it together with a clip for a minute or two before moving on to the next one, but tape runner or hot glue would make quick work of this if you're making in bulk for baskets or classrooms.
 
 
Now you're ready to fill 'em up!
 
 
Then grab your green tissue paper and make your carrot tops!  I made mine two different ways and liked them both.  On some I cut several squares out and fringed the ends.  On others, I pinched the squares in the middle the same way you would to stuff a gift bag.
 
 
Now the trick to making the carrot shape is to seal the roll on top by pinching it closed in the opposite direction from the bottom.  This gives you the triangle shape you need for the carrots and reminds me of the little cream packets they used to have at restaurants when I was a kid too - yum!  Since I'm not planning on these being reusable, I simply inserted my tissue paper tops and stapled closed.  The tissue paper seems to hide the staples just fine and they're easy to open as well!
 
 
We'll be passing these out tomorrow at the class party!  Aren't they cute?!


Happy Easter Y'all!


Monday, March 18, 2013

Easy Easter Cloche


This is a re-post of an Easter project from last year, but with so many awesome, new bloggy friends, I thought I might share this quick and easy idea again! Sheep and I spent some time doing a few new projects during Spring Break last week, but we also started pulling out our Easter decorations from last year and this is one of my favorites. You might even have everything you need to complete this project at home already! So, what are you waiting for . . . hippity, hop to it!
___________________________________________________________

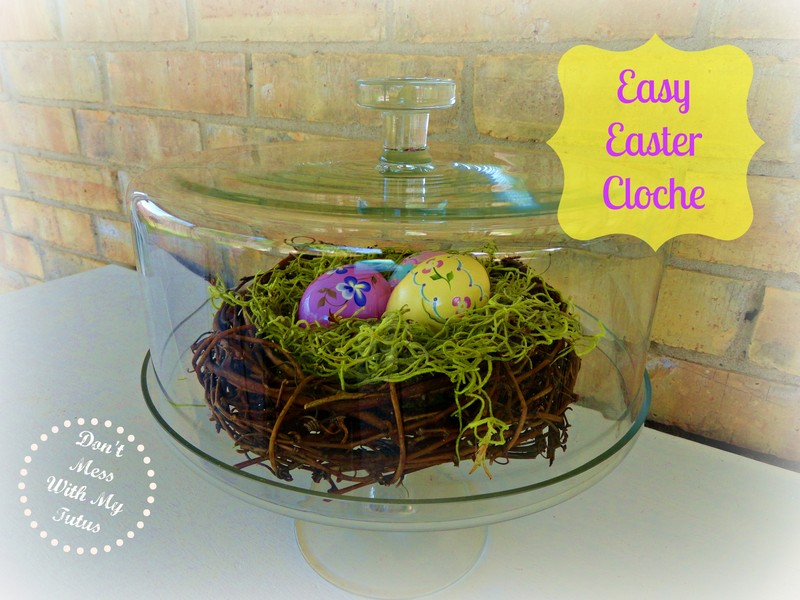
With all the other activities going on this month, Easter has really sort of hopped up on me - ha! But I managed to locate some of my decorations over the weekend and make a couple of new things too!  I don't have a real cloche, but I've seen lots of cute ideas using them, including nests, and decided one of my glass cake stands would work just as well for this project!

As usual, I put my own spin on it, by simply buying a small grapevine wreath and filling it with Spanish moss to use as my nest. I just love the springy color of this moss so I will be finding more uses for it!


The wooden eggs nestled inside were hand painted by my cousin many years ago and I just love them! Aren't they exquisite? She is a true artist! I have several more, but only three would fit in my tiny taste of Easter, so the others are up on my mantle in baskets - out of Snacks' reach! It will be nice when he's a little older and things can 'come back down,' but for now Easter will have to stay under glass!


I have a few uncompleted Easter projects from last year as well, including a new wreath for my door. Hopefully (or should I say Hop-fully?), I will get these wrapped up this week. What are you up to for Easter this year?

Friday, March 15, 2013

'Shamrocks' Thin Mint Cookie Pops!

 
What are you doing with all your Girl Scout Cookies?
 
If you're like me, you're a sucker (Ha - Sucker!) for those little entrepreneurs in uniform - especially when one of them is yours!  Needless to say, we have lots of girl scout cookies on hand about now, so Sheep and I thought it might be fun to experiment with making some recipes that use girl scout cookies as a main ingredient!
 
St. Patty's Day is literally just around the corner, so we thought we'd better give this idea a try and quick!  I am happy to report that after only a some trial and error with the candy bark, we have a winner!
 
I wanted to call them "Leprechaun Balls" but Sheep suggested Shamrocks, so we went with that instead.  She didn't seem to find my name for these tasty treats all that funny.  Eight-year-olds . . .
 
'Shamrocks' Thin Mint Cookie Pops
 
1 box Girl Scout Thin Mint cookies, crushed
5 oz. (approximately 2/3 of block) cream cheese, softened
White candy bark
Green food color
Green sugar sprinkles
 
Mix crushed cookies and cream cheese together to dough-like consistency.  Form into 1" balls.  Melt candy bark according to instructions.  Add green food coloring to melted bark and stir to achieve a uniform color.  Dip cookie balls in melted bark and place on waxed paper to harden.  Alternately, roll cookie balls in green sugar and place on waxed paper.  Insert popsicle sticks if desired.  Enjoy!
 
I don't know about you, but we really struggled with the candy bark.  Not sure why. I just know that I personally have never used the stuff very successfully, despite my continued desire and numerous attempts.  Hence the alternate instructions using only green sugar.  Sheep actually liked the ones rolled in sugar better than the dipped ones because they weren't as sweet.  And I do have a picture of those too.  Somewhere . . . .{Sigh.}
 
 
We had actually abandoned the candy bark altogether, but went back to it one last time after we had gone with the sugar, so you can see some of the sugar sparkles in the bark.  It actually looks really pretty, but certainly not a necessary step.
 
In the end, our original idea worked and has been 'leprechaun' approved too!
 
 
The weather here has been lovely this week and with any luck, we'll be out on the boat on Sunday.
 
What are your plans for St. Patrick's Day?


Thursday, March 14, 2013

Bake a Blue Ribbon in Honor of Pi(e) Day!

 
Well, I'm sure you've heard by now that it's National Pi(e) Day and what better way to celebrate than with something yummy!  I am on my way out the door to grab ingredients for Sheep's FAVORITE pie now, but thought I would share some pie recipes from a few of my past posts before I did!
 
Clockwise, from top left:
and a
 
Although the last one's not a pie you can eat, the results of this recipe are even sweeter, so be sure and check it out!
 
Happy Pi(e) Day!


Tuesday, March 12, 2013

Make Your Own American Girl Doll Chairs

 
This was a quick and easy solution to the 'chair dilemma' that was presented to me by the birthday girl when she decided she wanted to play musical chairs with the dolls during her American Girl Doll Sleepover.  We were expecting 12 (Yes, 12!!) American Girl Dolls and their 8-year-olds to be in attendance, so I needed to come up with chairs for the evening that would be inexpensive as well as adorable.
 
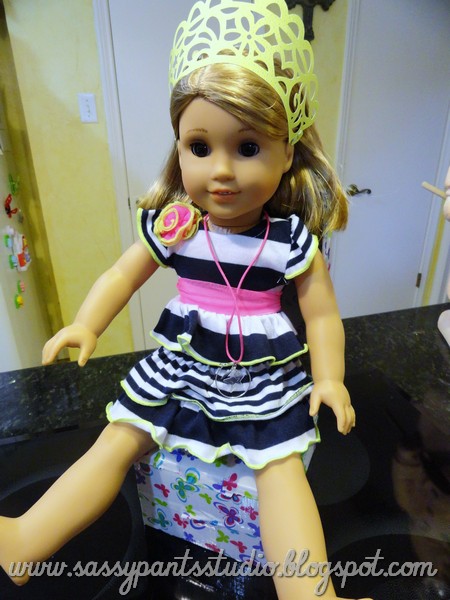
Thankfully, I had just bought a new pair of shoes (yay, me!) and was inspired by the box, which I thought could easily be converted into a chair.  And, with nothing more than a kitchen knife to cut the bottom and some colorful duct tape to piece it together, it was!
 
 
Alas, I was able to get the rest of the boxes FREE from a local shoe store (Thanks DSW!), so mommy didn't need to shop for more shoes (Awwww).  Though it didn't stop a pair from jumping in my basket while I was collecting the stash of boxes one afternoon.  They were 75% off and oh sooo stinkin' cute!  But I digress . . .
 
 
Anyway, I found that the box chairs worked best when cut a little more than half-way, because you lose some of the length for the seat once it's inserted into the lid.  Also, because of the expense of the duct tape (the most expensive part of this project BTW), I actually ended up trading some of the larger shoe boxes that were given to me with some of the narrower boxes in my closet already, just to save tape.  Using the narrower (sandal) boxes, I was able to get about 2 and 1/2 boxes covered per roll using the patterned tape - there's less per roll on the patterned tape, so keep that in mind when you're calculating how much you'll need!


Although I originally thought these might be simple enough to enlist the birthday girl for some help, duct tape turned out to be more challenging for her than I planned, so give yourself a little time if you're planning on making a dozen lke I did!  I chose to insert the cut end into the box lid to give it lots of stability and to make it easier to cover, but you might be able to have the cut end facing out as well.  I liked the look of the solid chair though, don't you?
 
 
And here they are, all lined up and ready to be played with!
The dolls and their girls just LOVED them!!
 
 
While we got our craft on, the dolls had their own 'Meet-N-Greet!'
 
  
Most of the dolls sat in their own chairs for cupcakes!  Then the girls used them to set up a theater for the dolls while they watched an American Girl Doll movie themselves.  So creative!
 

Before the end of the night, these chairs had been used for a spa and waiting room as well.
And don't forget musical chairs!


Along with the jewelry they crafted and the cupcake wrappers we repurposed into doll tiaras, these sturdy little shoebox chairs made great party favors for all our guests!