Pages

Wednesday, April 4, 2012

Everybody's gotta get away sometime . . . .

 . . . and that sometime is TOMORROW!!! 

I can't wait!! 

I am soooo ready to get the  {bleeep} outta dodge and there's nothing like a little change in latitude to really relax my attitude!  A little drinkin', a little dancin' and a whole bunch a junkin'!!  I have been so wrapped up in doing for others these last few months, that doing for myself has really taken a backseat.  And if you don't believe me, just ask my scale - I've got the pounds to prove it - though I have lost 2 this week in preparation for my 'Soul Vacation.'  Yay me!!  Not as much as I 'd hoped, but at least it's movement in the right direction.

Part of my preparation also included making some knock-off cowboy hats that I saw at the livestock show that were retailing for an un-BEE-lievable $75!!!!  Captive audience I guess!


Anyway, my $10 hat from Walgreen's (you never know what you're gonna find there!), a $5 pendant from Hobby Lobby (purchased with the ever-lovin' 40% off coupon of course!) and some scrap fabric was all it took to make this little beauty and shopping must have for Round Top!  After all, the Texas sun gets pretty hot!  And it's pretty stinkin' cute if you ask me!  Maybe even cuter than the inspiration!


I've rounded up a few other 'essentials' for the road as well.  Notice, there are no diapers or wipies in this picture - AMAZING!!  Oh, I know I'm gonna miss that squeezy, little guy and his 'sissy' while I'm gone, but right now I'm even looking forward to that!


So here's a little music for the road!  Carry on!!!


My Paint Chip Project


I have been seeing paint chip projects all over blogland recently and decided to try my own for Easter - although I must admit that I was feeling more than a bit guilty swiping all those paint chips knowing full well that I had no intention of painting anything in my house either Green Acres or any shade from Kumquat to Desert Sunrise.  I mean, does anyone in blogland consider the downstream consumer cost of swiping paint chips for their so-called 'free' decorating projects?  Not saying I didn't follow my friends off the proverbial cliff, just sayin' maybe I shouldn't have . . . .

And I must admit that this sassy little carrot bunting is pretty cute!  Even though the rest of my Easter mantle is nothing more than a hot mess!  I bought that darling, yellow PEEP cutout over a month ago and it's been sitting on my mantle since then.  It was supposed to be inspiring me.  Oh well - there's always next year, right?!


This project was 'super cinchy' (as Sheep would say) and went together quickly as well.  And quick is good when it's T-5 days until Peter 'Chocolatail' (as Snacks says) arrives!

Once I made the template for the carrot, Sheep traced and I cut and it only took about 15 minutes working together!  And I have enough cut out for a second bunting as well.  I love, love, love thinking up projects that we can do together!  Memories in the making I pray.

The carrot tops were just fringed paint chip squares that were then rolled and flattened.  I haven't seen anyone piecing paint chips together though (have you???), so I had to use my noodle for this part.  I was initially going to use colored staples just 'cause they're fun, but I didn't have any/forgot to go get some for a few days, so I resorted to what I had on hand and used my trusty sewing machine instead.  You could certainly use staples or glue if that's what you have handy.


I also used some leftover ribbon to string them together, but jute twine would have looked just as cute.  Since the coat rack left all my ribbon has returned to it's sad state of disorder and I couldn't find the jute, so ribbon it is!

This project was quick, easy and 'free' . . . but the irony of Easter decorations from 'stolen' paint chips has not escaped me.  So, how about 10 Hail Marys and a quart of paint and we'll call it even?!?!

Happy Easter Y'all!

Sharing this sassy project with School House Scraps, Savvy Southern Style, Randees Organized Chaos, Cowgirl Up, The Shabby Creek Cottage

Tuesday, April 3, 2012

Easter Under Glass


With all the other activities going on this month, Easter has really sort of hopped up on me - ha!  But I managed to locate some of my decorations over the weekend and make a couple of new things too!  I wish I could remember where I saw this, so if you remember seeing the nest with eggs in a coverd cake stand, please let me know so i can give credit where credit is due!

As usual, I put my own spin on it, by simply buying a small grapevine wreath and filling it with Spanish moss to use as my nest.  I just love the springy color of this moss so I will be finding more uses for it!


The wooden eggs nestled inside were hand painted by my cousin many years ago and I just love them!  Aren't they exquisite?  She is a true artist!  I have several more, but only three would fit in my tiny taste of Easter, so the others are up on my mantle in baskets - out of Snacks' reach!  It will be nice when he's a little older and things can 'come back down,' but for now Easter will have to stay under glass!


Sunday, April 1, 2012

Sassy Sunday Bloghop # 9 and SURPRISE Giveaway!

Howdy Y'all!

It's another bee-U-tee-FULL Spring morning here in Texas - and that's no April Foolin'!  It really has been unseasonably warm this Spring - so much so that if I don't throw my kids into the very next patch of bluebonnets I see, it's going to be too late for pictures this year - ack!!  Guess I will add that to my 'to do' list too!

We've just been busy around here, and there's been no time to slow down.  That's why I am so excited, because this week me and two of my besties are going to get a chance to do just that - Antiques Week has hit Texas and WE ARE THERE come Thursday!  Yee-Haw!!

What is Antiques Weekend you ask?  only THE LARGEST Antique/flea market/garage sale event you can imagine!!  It's miles and miles of warehouse and roadside vendors, that converge on the little towns of Warrenton and Round Top, TX twice a year.

It. Is. Awesome!!!!!!!!

You can read all about it on the Junk Gypsy Co. Roadside Ramblins' website.  They are two Aggie girls (Whoop!) who quit their day jobs to scour the country for things us do-it-yourselfers can't live without!  And they are the official hostesses of The Junk-O-Rama Prom on Thursday night!!

{squeal!}
That's right!!  We're gonna be there too!

And I am SOOOO ready for my 'soul vacation!'
So, for this week's giveaway, I am going to SURPRISE one lucky linky with something special from Antiques Week!  I can't wait to go shopping for you!  Because the truth is my own house is FULL.  I'm talkin' gotta-move-something-out-to-get-something-in full!  Still, I have a few things I'm looking for this week (wink), but mostly I am just looking forward . . . . to a little time away, a little time with grown-ups friends, a little time to unwind underneath that big starry, Texas sky!

Deep breath - ahhhhhhhh!
We has So MANY great links this week - it was amazing and FUN (!!) to see what everyone out there is up to and Randee and I appreciate each and every link!
So much Spring awesomeness this week, like this flower wreath made from coffee filters by Steph at Crafting in the Rain!!  She even included the how-to in her post, so go check it out!


I'm embarrassed to admit that I gained 8 POUNDS over the holidays that I have only recently gotten mad enough to do something about (Grrrr), so this low carb dessert from Joy's Jots, Shots and Whatnots caught my eye!  Sounds delicious, doesn't it?!


In addition to our 'regular' requests (only originals, no repeats, no promotions for businesses/other parties/etsy stores, follow your hostesses Dammit!), my 'new' rule this week is that you must have a backlink to the Sassy Sunday Blog Hop on your post to be eligible for the SURPRISE!  We really do want to share the fun with everyone and we appreciate your help speading the word!  We had almost double the links this week, so keep up the good work!!  We love you!

Now show me what 'cha got . . . and I promise to post some pics from the road this week, so you can see all the fabulousness and start making plans for your own road trip this Fall!

I'll even meet 'cha there!

Thursday, March 29, 2012

Before and After

Before . . . .


 . . . and AFTER!!


I can't believe my BABY GIRL got braces today!!  Sniff.

Wednesday, March 28, 2012

All Aboard!

The Dinosaur Train!!

A few weeks ago, I mentioned that Snacks (the cutest boy in the world) had a birthday coming up this month and that his FAVORITE show right now is Dinosaur Train, so I was looking for some inspiration for his party.  It's a really cute show and arguable has THE BEST theme song of all the kids shows on TV right now!  If you haven't seen it, you can check it out at PBSkids!

I looked around Pinterest (of course) and found lots of dinosaur cakes and train cakes, but nothing that was Dinosaur Train, so I had to come up with my own CRAZY creative plan!  And despite a few hitches along the way (stay tuned!), it went great and everyone had a great time - most importantly, the birthday boy!!


It's such nice weather right now, and hasn't gotten too hot yet for an outdoor party, so I decided to turn our porch into "Pteranadon Station" and have activities in the house and yard, just like the stops on the train!


Guests were directed to the train station with a note on my chalkboard sign by the door and some dinosaur tracks stenciled in the grass and on the driveway.


I grabbed some leftover spray paint from my Valentine's KISS project for the yard and Sheep was able to use the stencil and some chalk for the driveway.  She LOVES prepping for parties almost as much as I do (Looks like dad, acts like me I always say!) and she did a fantastic job!!


She also helped me with the signage for the Dinosaur Nursery.  Notice anything amiss??  Wish I could say that was her misspelling, but it was mom's!  I guess a Master's degree just isn't what it used to be - ha!

We shopped all of our local party stores for Dinosaur Train party supplies, but ended up having to order plates and napkins online.  I also took a coloring page from PBSkids that had buddy on it and traced the image of buddy onto a sheet of paper, enlarged it and copied it with the words "Birthday Buddy" to make a template for the Triassic T-Shirt Craft!


For this craft, I used the tutorial from Lil Blue Boo and a bottle of Citra-Solv to transfer the image onto t-shirts for the kids to color.  This was not as simple as it looked, but I ultimately got it to work and I'm intrigued enough to try again on some other projects, so stay tuned!!!  We used Crayola fabric markers to color the t-shirts - so much fun and a great party favor too!


The Jurassic Jumping Ground presented another one of the 'wrinkles' in this party plan.  I had asked a good friend of mine if I could borrow her bounce house and she happily agreed.  I had been to her daughter's carnival birthday and seen a HUGE bounce house there so in my mind, that's what I was borrowing.  When she told me I could pick it up in my CR-V, I should have realized there was a 'little' problem.  But I was so busy with the other party plans, that I didn't blow it up until Saturday afternoon about 2 hours before the party - only to discover then that it was TOO SMALL for the older siblings to use without potentially damaging it!!  Ackk!!


Speed saved the day by finding a 'full-sized' bounce house that could be delivered in time for the party!  And the little ones had fun in the borrowed bounce house as well!  I do love him!!!


He also 'fixed' my Dinosaur Nursery that, after an afternoon of weeding, tilling, prepping and adding 10 bags of sand, wasn't nearly ready to hide eggs!  It was a stroke of genius though and so easy to do with Easter just around the corner! 


Sheep and I filled eggs with candy and small dinosaur figurines from the dollar store and then buried them our vegetable garden-turned-sandbox for the kids to dig and find!  I purchased small sand pails with shovels from the dollar store (along with some dinosaur stickers) for this activity so the kids could take home their loot in their buckets!


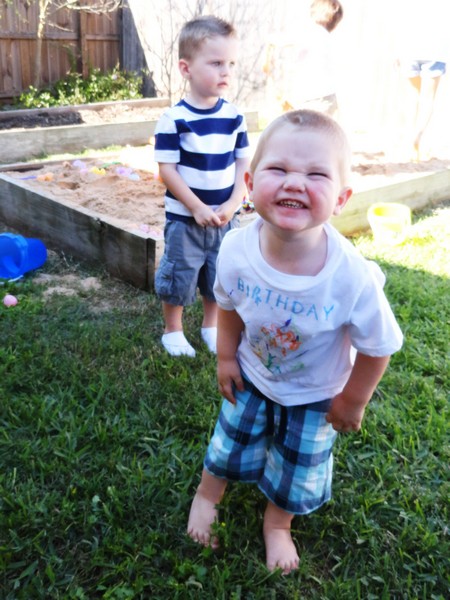
All of the kids LOVED this activity and spent the rest of the party in the sandbox - so much easier than a pinata at this age!


Best of all, Snacks and Sheep have a 'new' sandbox to play in for the summer!


I saw TONS of train cakes on Pinterest, most of which were much better attempts than mine turned out to be, but at least it tasted good!  And two-year-olds are notoriously good at overlooking the decorations in favor of candy!!  In this case, Skittles leftover from Sheep's Art Party did the trick!  And it worked with the Dinosaur Train figurines I got for our own little 'Buddy's' birthday!


Burgers, babies, beautiful weather (don't forget beer) and bouncing until the sun went down . . .


Birthday fun for everyone!!


Happy Birthday Snacks!
Mommy and Daddy love you more than words can describe!


Sassy Sunday Blog Hop # 8

Oops!

It's not Sunday is it?!

I know we're half-way through the week, but I just couldn't muster the energy it was going to take to blog before today.  Have you ever had a weekend like that?  Last weekend definitely was for me.  I spent ALL DANG DAY in the yard on Thursday and Friday prepping for Snacks' birthday party - which was SO AWESOME - despite a few hitches.  But more on that later.

Let's get on with hop, as there's still two more days to link up and maybe even get featured!  A big thanks to all of you who party with us each week, sharing such great projects and making blogland a fun place to stop and shop!  You always inspire me!

Last week we had a really GREAT giveaway from
Dedra at Prettiful Designs! It is a $10 digital gift certificate!!
I hope that everyone popped over to say "HI!" to her!!

The winner with the MOST VIEWS was
Kate over at A Creative Cookie with her GIANT Tulle Bow!
 
 
CONGRATULATIONS!!!!!!
 
Now I want to feature a couple of projects that really caught my eye this week!!
 
First was the FAUX WALLPAPER over at
How awesome is this?? Can't find the perfect wallpaper...NO PROBLEM!!
 
 
Second was Rhonda's Easter Glass Block
Super simple, yet CUTE!!!

 
This week there were some SUPER DUPER posts full of information!!! If you did not get to look at them, you should go back and take a look!!
 
You know the rules!


Friday, March 23, 2012

Window Pane to Picture Frame

The title has such a nice ring to it, don't you think!
Too bad I can't say the same about the rest of this project . . .


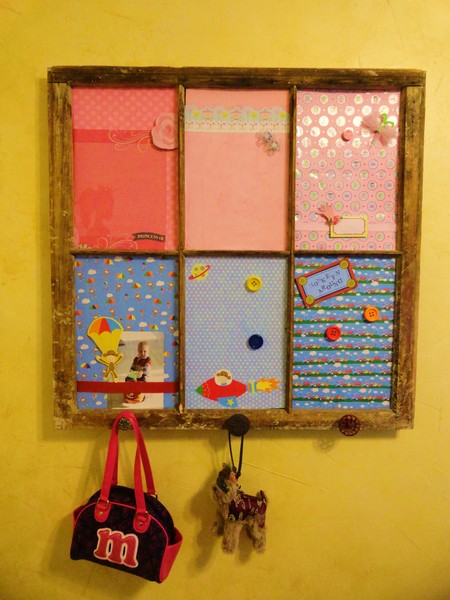
I spied this antique window pane in Canton back in my single lady 'daze' and knew it was just the piece my shabby chic little duplex in Cowtown needed!  Back  in my 'cabbage rose sofa' days (you know what I'm talkin' about!) it was used to display demitasse cups and saucers in my dining room.  When my job took me south on I-35, it hung above an antique pie safe and was adorned with paper roses.  Once Speed and I tied the knot and moved into our home, it decorated my kitchen and displayed antique linen hand towels (so stinkin' cute btw) Soon after though, it's presence was needed upstairs in our new little Sheep's bedroom, where my father's baby clothes would come to hang on satin hangers from it's panes.  This little 'Friday Find' has served me well over the years and it's a piece I have grown to love and cherish like part of my family!  So I knew that it needed to be incorporated into the JV squad's bedroom redo in some way, but how??

Sheep has long since outgrown the baby clothes on the window pane and was using it to hang tutus and fairy wings instead, but I have had my heart set on turning into a picture frame (even before Snacks came on the scene) so with the bedroom redo in progress, it was time to figure something out!

My idea was to cover pieces of tin cut to fit into the panes with fabric or paper so that I could use magnets to change the pictures.  Sounds easy enough, right??

Sooooo wrong!!!

My first trip to the big box hardware store (frown) got me back home with a roll of flashing - aluminum flashing - that WASN'T magnetic!  Too bad I didn't realize this until  I had already cut out the first piece so it couldn't be returned (frown).

On my trip back to attempt the return it hit me that we had a large piece of insulating foam core in the garage that I could use as my inserts instead!  My revised idea was to simply paint the pieces with 'magical' magnetic paint and then paper over them.  Even better right??  Because the foam core would just wedge into the panes without even needing top be tacked in somehow - yay!!

BOO!!

The Rustoleum Magnetic Paint was a complete bust in my opinion.  It doesn't work!  Let me repeat that - IT. DOESN'T. WORK!!  Too bad I didn't figure that out until I had already covered the pieces with scrapbook paper, which in itself was 2 trip ordeal!!


Despite my measuring and cutting out the foam core pieces the night before, it never dawned on me that the panes were larger than a 12 X 12 sheet of scrapbook paper . . . until I got home with them and tried to put them on - grrrr!


Back to the scrapbook store only to discover that not one, not two, but THREE of the papers I chose were the last sheet of that paper, which meant I had to come home and do some pretty crafty piecing together to even get my panes covered.  Sooooo disappointing when I tried to hang up my pictures with the cute little button and otherwise embellished magnets.  As you can see, the magnets stick, but they cannot hold up a photo.  Not even a sheet of notebook paper (insert sad face here)!!!

I even went surfing through blogland in an attempt to salvage this project somehow, some way and came across a bloggy sistah who had been thwarted by magnetic paint found ceramic magnets at Radio Shack that worked on job when regular magnets did not . . . But no, trip number FIVE for this project did not solve the problem.


With a soon-to-be-two year old sharing the room, I really don't want to use pushpins and they will make permanent holes in the paper (not to mention the pictures) anyway.  So, I am still searching for a solution.


I love the way the project looks, especially with the last minute addition of the door knobs across the bottom to add some always-needed storage in a shared space.  Too bad it can only hold one picture underneath the ribbon.
Any ideas?
I'd love to hear them!

Sharing this sassy project at Schoolhouse Scraps, Ladybird Ln., 

Wednesday, March 21, 2012

Easter Bunny Pie!

Hippity Hoppity - Easter's on it's way!

And what to do with all those Chocolate bunnies come Monday?
Make Easter Bunny Pie of course!


If I remember correctly, this recipe was 'discoverd' by my sister-in-law on the back of the Carrot Patch Pete Easter Bunny left in her basket one year - by the Easter Bunny himself of course!  And this pie is so yummy, it's become an Easter tradition around here.  In fact, we usually don't wait for the bunnies to appear in the baskets to make it and just grab a bunny or two at the grocery store instead so we can enjoy this pie on Easter Sunday!

Easter Bunny Pie

1 6 oz. milk chocolate bunny
18 large marshmallows, cut in half
1/4 C milk
16 oz. unsweetened whipping cream
1 graham cracker pie crust
Set aside left ear for garnish (If you can . . . Snacks was 'helping' in the kitchen so that poor ear didn't have a chance). 
'This is for me, right mom?"

Break remaining bunny into small pieces.  Melt bunny and marshmallows together.  Add milk and stir until smooth.  Let cool completely.  Meanwhile, whip cream until stiff peaks form.  Fold into cooled chocolate mixture.  Spoon into crust and chill until firm (usually 2-3 hours). Garnish with chocolate shavings from the ear.


Now if you look closely, you can tell that I've made at least one change to this recipe - I used a flaky pastry crust rather than a graham cracker crust.  Mostly because I didn't have any graham crackers handy yesterday, but also because I wanted to see if the pastry crusts that I had in the freezer from my strawberry icebox pie a few weeks back really held up when you thawed then later.

It worked beautifully!  And I promised to share the recipe if I decided it was a keeper, and I think it is, so here you go!

Flaky Pastry

5 C flour
2 C shortening
1 Tablespoon brown sugar
1 Tablespoon vinegar
1/4 teaspoon baking powder
1 egg, beaten
1 1/2 teaspoons salt
Water

Sift dry ingredients together.  Cut shortening into dry ingredients until mixture is the consistency of course meal.  Combine vinegar and egg and add enough water to make 1 Cup of liquid.  Add liquid to dry ingredients and mix until dough forms a ball.  Divide dough and pat out with hands into desired shape on waxed paper.  Smooth with rolling pin.  For a baked shell, prick with fork and cook at 450 degrees for 12-15 minutes.  Dough will keep several months in freezer tightly wrapped.  Yields 5or 6 9" crusts.

I made a couple of other changes as well.  I used a mixture of dark and milk chocolate bunnies because I wanted to amp up the chocolate taste and I prefer dark chocolate.  I also added a teaspoon of Mexican vanilla to my filling as well - just 'cause.  It's what I do!

Hoppy Easter Y'all!

Sharing this sassy recipe at Savvy Southern Style, Delightful Order, Somewhat Simple, The Brambleberry Cottage, Glue Talks and Stuff & Nonsense, Serendipity & Spice