Voila!
The PERFECT wall art for our favorite summertime destination: our own backyard!
This project was quick, easy and fun to do - so here's how ya get 'er done!
Supplies:
Frame of your choice
(I chose plastic since it was going outdoors!)
Craft paint - pick your color
Small brush
Burlap
Thin piece of wood cut to fit
(You can have that done at your local home improvement store if
you can't slow Speed your husband down long enough to do it
and they'll do it for free!)
Spray adhesive
Poster board
Craft knife
Paint pen (optional)
For the Frame:
Remove any inserts in the frame and cover your work area to paint. This happens to be my dining room table - ha!
Using a small brush and craft paint, apply a small amount of paint to your brush and brush across frame. I use recycled meat trays for easy, disposable paint trays.
This 'dry brush' technique allows some of the color underneath to show through. This technique works well on frames with lots of molded detail. I considered painting another color underneath first, but I liked the gold.
Let dry completely before inserting your art!
For the Insert:
Lay your burlap out with your wood that has been cut to fit on top and trim burlap close to the edges of the wood. Spray wood with adhesive and then cover with burlap, working from the center out to smooth out any wrinkles as you go. It took more adhesive than I thought it would . . .
For the Stencil:
This might be another 'ghetto graphics' tutorial, but it worked for me without a lot of headache (but a fair amount of hand-ache) by the time I was done. There are plenty of other stenciling techniques out there, but this made the most sense to me for some reason.
First decide on your phrase and font style.
Then print them out on your computer using your word processing program.
Geesh - Looks like someone needs a pedi!
Anyhoo, once you like the size and layout, grab your poster board.
I simply affixed my lettering to the poster board with good old-fashioned Scotch tape.
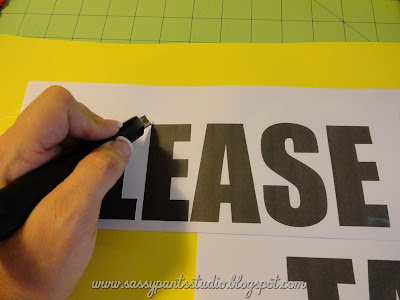
Looks good! Now cut through the letters and the poster board using your craft knife.
I did this on a self-healing cutting mat, but if you don't have that, make sure you put something underneath so you don't ruin your surface while cutting!
Make sure you save the 'insides' on your letters for stenciling!
Does anyone else have to work in these conditions?!
Once you've completed your stencil, remove the paper and lay it out over the burlap covered insert and start to paint!
After seeing the positive ravings about Sharpie paint pens, I decided to buy (invest) in a package of them and let me just say - "I'm hooked!"
They really do work great and made this job easy-peasy without having to worry
about bleed through since my stencil wasn't vinyl, etc. Yay!!
Almost finished!!
Paint might have done a 'darker' job, but I'm certain it wouldn't have been as clean.
Now, just insert your burlap-covered, fabulously-embellished , one-of-a-kind wall art
into your beautiful 'new' frame and along with the last taste of summer . . .
ENJOY!!
Sharing this sassy project at Mop it Up Mondays, Debbie Doo's Newbie Party, Wow Us Wednesdays, Cowgirl Up, Whimsy Wednesdays, Show and Share, Overflowing with Creativity


So cute! Love your assistant! Thank you for sharing. Visiting from Southern Lovely. Would love it if you would share this at my Make it Pretty Monday party at The Dedicated House. http://thededicatedhouse.blogspot.com/2012/08/make-it-pretty-monday-week-11.html Hope to see you at the bash! Toodles, Kathryn @TheDedicatedHouse
ReplyDeleteAnd thank you for stopping by! Will do!
DeleteCheers Kathryn!
Love your burlap wall art Jennifer! I used a vinyl wall decal {little tricky to get the vinyl to stick to burlap} but I cut out my own stencils for my outdoor pallet art piece...and it is soooooo time consuming. But worth the end result, right?! Hope you'll visit again :~)
ReplyDeleteThanks Jen - I've seen so many different ways to stencil, but I ended up just sticking with what i knew! It was tedious and I'm going to try something using contact paper and a cricut next time, but I didn't want to start on something so big!
DeleteI as laughing when I read the word Art for your stencil masterpiece. But after seeing the monkey on your back I'm ready to bow to you ahahahah. He's precious. Mine are all grown up so when I'm into this they pass and roll their eyes and think "here she goes again". My husband is the one hanging around giving the "why don't you buy a already made" support.
ReplyDeleteYour work of art looks absolutely fun and happy inducing. Mission accomplished! Congratulations.
I'm going to get a bunch done this year while he's at pre-school three hours a day, three days a week - but I'm gonna miss him something fierce!! My sweet little monkey boy! Thanks for stopping by!
ReplyDeleteLOVE!~ I Love how you used a sharpie for this! Great project. Thanks for sharing with the newbie with a twist party.
ReplyDeleteThanks so much and thanks for hostessing your great party each week! I actually used a Sharpie PAINT PEN - works SOOOOO much better than the old school paint pens I've always used in the past. Check them out!!
DeleteThis is great!! Love me some burlap!!
ReplyDeleteThanks for sharing at Show & Share! Featuring you in tomorrow's party!
Love it! I'm totally impressed! Featuring you at It's Overflowing on Saturday. XO, Aimee
ReplyDelete