Pages

Friday, December 21, 2012

He's Got This


It has been one week since a horrible tragedy took place at an elementary school in a small town that could have been my own.  I considered myself lucky that I was busy working on Christmas orders that day, and didn't even hear about the event until late in the afternoon.  Right then and there I decided to NOT give life to this most unthinkable act of violence by reading about it or hearing about it if possible.    Past experience has taught me that I cannot undo the terrible and frightening images that are invariably left in my mind if I even take a peek.  I find they are haunting.

But despite my best efforts, I have been forced into conversation about Newtown, Connecticut.  And so, the door has been opened and it cannot be closed.  Which leads me to wonder, if I am so strongly affected by this story, how are those parents, those children, those teachers, those first responders - those survivors, either in the school or related to the deceased, supposed to go on, for I truly cannot imagine.  My heart aches for them.

I spent most of the day on Tuesday, anxious and upset, and cried several times for the innocents that were lost last week.  And it's taken me a while to process things.  But I discovered that I was also grieving for my own lost innocence with this painful reminder that sin knows no boundaries.  Though plenty would categorize him as evil rather than a sinner, I am struggling with questions about the lost soul that committed this crime against . . . Who?  His parents?  A community?  All of us?  And as I look into the smiling eyes of my two-year-old son I am left wondering how you get from here . . . to there?

This same question harassed me for months after reading the novel 19 Minutes by Jodi Picoult when Sheep was in kindergarten.  If you haven't read this book, I would recommend it, but know that it is as unsettling as everything I have since watched and heard about the events last Friday.  The tragedy in Newtown has reawakened those questions, those fears, all the anxiety I experienced after reading her fictional novel about a school shooting and the events that led the killer to commit his final act of violence.

And I want to know if/how we as a nation, as a community, but mostly as individuals could do something different so that these children, who are often bullied but probably all marginalized, might feel connected to the people around them.  Could feel loved, accepted, supported by more than just their parents.  I think about how many people have loved and encouraged my children over the years - and if you were to add it up, you too might find that it extends so far beyond you that it is truly a miracle.  But ALL children need to feel that.  In fact, don't we all, even us grown-ups, want to feel that?

I read a quote from one of his classmates that said he didn't recall the shooter ever being bullied in school.  But I can't help but reflect on the difference between 'not bullied' and 'being included.'  One is a lack of action.  The other requires action, and often lots of courage and patience and love as well.  We are all busy.  And now we are all afraid.  But that shouldn't stop us from remembering Jesus' two great commandments - to love God with all your heart and to love your neighbor as yourself.  Are we watching for those little souls that might need an extra hug or kind word from us?  Are we seeking them out?


After a day of tears and heartache (for I cannot process this information with my head, only my heart), soul-searching and prayer (LOTS of prayer) I snuggled down with my kiddos to enjoy a Charlie Brown Christmas Special, hoping to just take my mind off of things for a bit.  Still wondering how I, much less they, move on from here, God reached through my television and spoke to me.

"And the angel said unto them Fear not: for, behold, I bring you good tidings of great joy, which shall be to all people."

Turns out the angel of the Lord looks a lot like Linus Van Pelt, but I'll take it.  And I hope you will too, because He's got this.  As crazy awful as this whole thing is, He's got this.  My continued prayers go out to all those involved in Newtown, Connecticut.  May you find peace and comfort in the arms of the Lord.

Jennifer
 

Thursday, December 20, 2012

Homemade Paper Straw


Here's a quick and inexpensive (free!!) way to make packing straw for holiday gifts - use paper bags!

When it came time to package my Buttery Citrus Curd for teacher gifts, I knew I had some gift boxes from last year, but I could only find two bags of paper straw to use around the jars and fruit.  After trips to more than a few stores,  I finally found some, but it was $4.00 per bag and I was going to need at least 8 bags given their size.  What a shame to save money on the gift only to spend the difference (and then some) on the packaging!


But, necessity is the mother of invention as they say, and while wandering yet another store looking for the shredded paper straw, I started thinking about what else I might use.  Then it hit me - I could probably grab a few paper bags from my local grocer or liquor store ('Tis the season) and use those instead!!


I decided against wrapping paper because while cheap, I already had the two bags of natural colored straw at home and I was hooked on the look.  DO you ever get like that?  Anyway, I'm sure it would work and the colors might look really neat all blended together.

All I did to get this look was . . .

 CUT!
 

SHRED!


VOILA!


Instant paper packing straw!


Just add your goodies (and a fabulous bow) and you're all set! 

This looks like something from a Henry & David catalogue!
 
 
And couldn't we all use a little more of THAT this close to Christmas?
 
Merry Christmas Y'all!
 
Sharing this Sassy Idea @ Sunday Showcase, Mop It Up Mondays, Meet Me Monday, Made by You Monday, Debbie Doo's Newbie Party, What's In the Gunny Sack, Take-A-Look Tuesday, Tuesday Tutorial, Wow Us Wednesdays, Cowgirl Up, Whimsy Wednesdays, Pin It Wednesday, Show and Share, Overflowing with Creativity, Creative Me, Made U Look, It's a Hodgepodge Friday, Saturday Show & Tell

Wednesday, December 19, 2012

How to Wrap Presents Like a Pro: Part Three: The Dillard's Bow


Christmas cards are mailed, class treats are baked, teacher gifts are made and presents are bought.  So about all that's left to is the wrapping!  We've got a Christmas party tonight, so most of it will have to wait until tomorrow, but i try to get everything wrapped before the kids get out for the holiday  - it's just surpris-ier that way! {Smile}

So today I am going to let you in on another secret of the pros - how to make 'The Dillard's Bow."  Yes ladies and gentlemen (fellas, even you can wrap like a pro if you follow along), most of the major department stores have a 'signature' wrapping style and they really are all different!  And the Dillard's bow is my favorite!  In fact, it was MY signature wrap until I switched to pom-poms two years ago!


So let's get started!

The biggest 'secret' to making this bow successfully is not to use any tape!  Grab a handheld stapler to attach your ribbons instead, and it's worth a little bit extra to get a good one.  BTW, the one you see pictured is NOT a good one!  I recommend something bigger, but it's all I could find . . .


Stapling your cross ribbons allows you to slip things under them since they aren't taped down and the staple keeps them securely together while you're working!  In this picture, you can see (kinda) both cross ribbons stapled and a short piece of ribbon slipped diagonally underneath.  This will become the center of your bow.
 
 
Now you want to make your bow by wrapping ribbon over on itself from side to side to form two loops on each side with two tails or ends, both on the same side of the bow.  This did not show up well in any of the photos I took (probably because it requires two hands - ha), so I drew a diagram for you instead.  Once you do it, you will see how very simple it is and easy to adjust the size as well.


Once you have formed your loops, you will want to pinch-pleat the body of the bow together so that the center is small.  If your stapler is good (bigger than mine), then you can secure this pleat with a staple and make it even easier to work with.


Now place your pleated bow on top of the mess in the middle and begin to tie your center in place.  Do not cinch it tight just yet . . . .


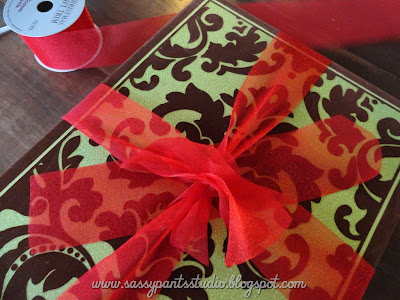
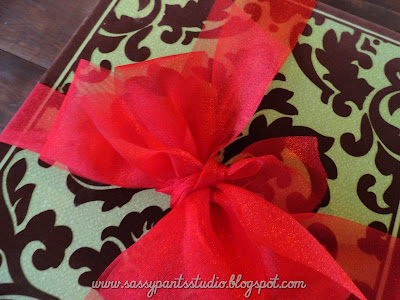
Once it is tied loosely, carefully pull the top of your center ribbon around to the bottom underneath and then pull the ends tight to secure the bow.  This is the second 'secret' to the Dillard's Bow, because by inverting the top and bottom of the center ribbon, you move the looped section to the back of the ribbon, leaving a clean center on top - perfection!


Isn't it lovely?! 
And wouldn't you feel extra special getting something like this?
I know I would!
 
Happy Wrapping Y'all!
 

Monday, December 17, 2012

Buttery Citrus Curd


Winter means its citrus season here in Texas and I am lucky enough to live right next door to very large and very bountiful grapefruit tree.  {Yum.}  We easily get over one hundred grapefruit each year off that tree, and that's just picking the branches that hang over our side of the fence!


Pretty much everyone in my house likes grapefruit, so we eat it for breakfast and at dinner in salads as well.  We make our own juice (courtesy of the 'Nekked Chef') and have served it as a dessert.  But with a harvest this plentiful, I started looking around for other ways to use this delicious winter fruit.

Elegant Citrus Tart Recipe
photo courtesy of Southern Living magazine

Around the same time, Southern Living featured an amazing citrus tart on its cover that was made using orange curd and I decided to try it with grapefruit instead.  You can grab the original recipe here.  All I did was substitute the orange juice and zest for grapefruit instead, but otherwise stuck to the recipe.  And let me just tell you, it's delicious!  In fact, my mother-in-law and I made some of the orange curd as well just to try it and we liked the grapefruit much, much better!


After last year's drought, we had a bumper crop of oranges and lemons around our neighborhood as well, so we've made several batches of lemon curd this year too.  In fact, we've got so much in the fridge right now that I have scrapped the teacher gifts I had planned for a box of homegrown citrus and homemade lemon curd instead.


Not everyone is familiar with the smooth, velvety, buttery, tart-y goodness of curd, so I decided to add a label with recipe suggestions on the back of the jars.  For the front, I printed out labels with the name of this yummy, custard-like treat and a quick Christmas message too!


The fresh fruit and curd look good enough to eat nestled in a pretty box filled with paper straw.  I can't wait to show you so stick around!

In the mean time, it's important to note that curd must be refrigerated and used within a week, so it's best to make this in small batches.  Although all the ingredients are cooked (so it's probably safe to eat for longer than that) the custard starts to separate and it loses is smooth, buttery texture.  But chances are it won't be around that long!

Merry Citrus Y'all!
 

Sunday, December 16, 2012

Seeing Santa Photo Display

The best Christmas gift I have ever received came two weeks early one year, and I could not wait to get her picture taken with Santa.  Crazy, I know.  But I'm telling you, if there had been a Santa at the hospital, I probably would have stood in line to have it done before we even left!  I just love seeing Santa and wanted to make sure it was a part of my child's (now childrens') Christmas traditions too!  So each year we go and stand in line to whisper our heart's desire into his ear  . . . and I use the photos to decorate around the house.  But with eight years of memories under our belts, it was getting harder to find a place for all of them!

As I was heading into the kitchen to exchange our beach pics on the kitchen window ledge for Santa pics I looked up had an AH-HA moment!


Now over the years I have tried sprucing up that space between the cabinets and the ceiling with various things, including wooden word art and decorative plates to name a few, but nothing seems to stick.  But it looked like it might be time to try again . . .


Ta-da!!

I keep my eyes open for red frames year-round, though they haven't all made it in to one just yet.  What can I say, just about everything in my house is a 'work in progress' {smile}.


These our two of my favorite Santa pics.  I love her expression in the first one and the two-year old pic is priceless!!
 

Not bad, but it still needed something.  It's a long space after all.  It was about that time that I started wishing I had asked Santa for a Silhouette and some vinyl while we were there.  But lookie what I found the very next day while I was out and about!

 
Yippee!
 
The perfect wall art for my Seeing Santa display!  And it was already half-off so it was only a dollar!
I was standing on a stool to take this close-up and from this angle you can catch a glimpse of my 'solution' to the problem of the reservoir made by the crown molding on the cabinetry.  I need something to fill in that space so the pictures would have something to rest on.  I cut an old pool floatie in half and wedged it into the gap - now that's using my noodle!! 
(Sometimes I crack myself up!)
 
 
Shooting toward the window made it hard to get a really nice picture of the finished product (and I probably could have straightened up a bit too - ha), but I love the way it came out!  And there's plenty of room to grow!  Hopefully my 'repositionable' word art will be 'reusable' as well.  But just in case, I ran back and bought another one for next year!
 
Merry Christmas Y'all!
 

Tuesday, December 11, 2012

How to Wrap Presents Like a Pro: Part Two - The Perfect Pom-Pom!


Yesterday I began my 'mini-series' on how to wrap presents like a pro and shared with you some trade secrets from the big leagues (Macy's and Dillard's) that will make your papered boxes perfect!  Today we are moving on to embellishments, with a quick tutorial on my recent favorite - The Pom-Pom!


The key to a successful pom-pom bow is using a fabric that has some body to it so that it stands on it's own.  Though I actually prefer the heavier weight tulle sold by the bolt, the spooled tulle is so convenient (and is almost always on sale) that I have switched to using it instead.  The trade-off is that you will use a little more to get the same effect and you are limited by the width of tulle as to how big you can really make your pom-pom.  So, if you're wanting to perk up a large package, consider using the tulle on the bolt instead.  Otherwise, it works the same as below!

1.  Choose your tulle (it comes in tons of cute colors) and cut a piece long enough to tie around your package with a single loop.  Do not knot as it will make your pom-pom wiggly!


2.  Begin folding the tulle over on itsself to form a rectangle or square.  You will repeat this 8-10 times.  This was a small package, so i didn't use much length in my folds.


3.  Cut your folded tulle off your bolt.


4.  Now cut through the folded edges to make your individual rectangles.


5.  OK, now here's the secret to perfect pom-poms:  Fold your squares in half, and remove a small wedge from the ends opposite the fold.  This will take out most of the bulk out of the pom pom's middle, making it easier to cinch and fluff.  Trust me on this!


6.  Now it's time to unfold (you will have a wedge removed on both sides now) and pinch pleat together with your fingers.
 
 
7.  Pull your ribbon tulle around your package tight, placing pleated squares on top and securing in place with another loop of the tulle around the package.  No need to knot the lightweight tulle, it stays in place nicely with a single loop.  The heavy weight tulle will require a knot because it is much more springy!
 
 
8.  Now seperate your tulle layers, pulling them side to side as well as up to make your poof.
 
 
9.  Once all your layers are seperated, pull your poof upwards to trim your pom-pom to the desired size.  Be sure to include the long ends of your tulle around the package for the perfect pom-pom . . .
 
 
 . . . Every time!
 
 
Another quick wrapping tip, since we have a birthday as well as Christmas at our house and Christmas at relatives house each year, I use different colors of tulle to designate which packages go where!  Blue for birthday, red to mom's and white stays home, regardless of what paper it's wrapped in.  This makes it really easy to grab and load gifts on Christmas Eve, without having to stop and read tags, so there's less chance of leaving any behind.  It's so easy, even my brand-new, eight-year-old (sniff) can figure it out!
 
 
We're gearing up for a great Christmas and are enjoying the season already.  I hope this quick lesson on pom-poms help make your presents something extra special this year too!
 
Merry Christmas Y'all!
 
Sharing this Sassy Secret @ Sunday Showcase, Mop It Up Mondays, Meet Me Monday, Made by You Monday, Debbie Doo's Newbie Party, What's In the Gunny Sack, Take-A-Look Tuesday, Tuesday Tutorial, Wow Us Wednesdays, Cowgirl Up, Whimsy Wednesdays, Pin It Wednesday, Show and Share, Overflowing with Creativity, Creative Me, Made U Look, It's a Hodgepodge Friday, Saturday Show & Tell

Monday, December 10, 2012

How to Wrap Presents Like a Pro: Part One - The Package


Long before I was a bloggy mom with 2-5 children and 1-2 dogs and a small, home-based business, I worked as a professional.  Yes, as a genetic counselor, but also as a professional gift wrapper!  Through college and graduate school, I spent the Christmas season behind the counter at both Foley's (now Macy's) and Dillard's in the gift wrap section of Customer Service.  Let me just tell you, long hours, little pay and way too much Barbara Mandrel Christmas music - ha!

But I did learn a few things.  Now, you might be thinking that a gift wrap job would be easy to acquire, but much like genetic counseling (ha!) it actually required some schoolin' and a certification before I could commence with wrapping gifts for others!  Little did you know . . .

The good news for you is that I have decided to share this insider information with all of you so that you too can have professional-looking packages under your tree this year!

Like most projects, the key to success is having the right tools, so grab yourself a good pair of scissors, some medium to heavy weight paper (gridded works best) and some double sided tape and let's get started!

1.  To measure your paper length correctly, line one end of the box up with the end of the paper and 'flip' your box over 4 times to get the right length with just a bit extra for overlap.  Whenever possible, work horizontally across the paper, cutting the entire length across and then trimming if necessary, rather than working vertically (parallel) with the direction the paper unrolls.

2.  To measure your paper width correctly, pull the paper up on the short side, then cut along the opposite edge of the box.  This will give you just enough to make your folds on the sides, without having lots to trim.

3.  Once you have cut your paper, line it up so the straight edge (uncut) is even with one edge of the box.  Using the precut edges of the paper keeps things neat!


4.  Make sure you crease your paper at the box edges so that you get a nice, tight fit.  it also helps keep things in place while you are taping.


5.  Now put double-sided tape along the length of the paper and secure to form a clean edge.

6.  Always tuck your sides in first, rather than tucking the top down first.  This leaves the top and bottom edges free to meet in the middle, securing once again with double-sided tape.  Double-sided tape really is the professional gift wrappers secret!

 
7.  Now it's time to embellish, usually with a bow.  Fabric ribbon is another 'must have' for a professional finish and wired fabric ribbon works really well.  Personally, I like to use tulle for my embellishments because tulle pom-poms make such a statement and I believe that a well-wrapped gift makes the recipient feel extra special!


So, stay tuned for Part Two of 'How to Gift Wrap Like a Pro' and learn how to make pom-pom bows!
 
Merry Christmas Y'all!

Friday, December 7, 2012

Ready, Set, SWAPS!


As many of you know, I've got a Brownie in my house and this year our girl scout troop has taken the plunge and started camping!  We started back in October with a Mother-Daughter overnight hosted by our service unit, but last weekend was our first camping trip without moms (Dun, Dun, Duuuuuun)!!

There was lots and lots to do to get ready and to tell you the truth I was more than a little nervous about taking 7 girls to the woods for the weekend with only one other chaperone, but it was wonderful!!  Thanks in no small part to the Host(ess) troops who came up with the cutest theme for a winter campout ever - CANDYLAND!!

Hats off to those girls because they put on a spectacular program, filled with crafts, archery, canoing and all the candy you could eat (and then some!!).  Girl Scout camps with a pre-set program of activities are called carousels and I would definitely recommend them as a "next step" in your camping progression, because it means all the troop camper (ME!) and chaperones need to take care of is food and sleeping arrangements!  And for our first time out without back-up, that was enough!

One of the things we did to get ready for our campout was make SWAPS!  SWAPS are either Special Whatchamacallits Affectionately Pinned Somewhere or Something Shared With A Pal - either way, they are something little to exchange with other girl scouts you meet at camp and elsewhere.  They usually have a pin so they can be worn and/or displayed while you're out and about!

Pinned Image


Swaps are fun,  but can also be somewhat of a challenge when you're asking little ones to do the work.  Luckily,  I found this idea on Pinterest and knew it was something my Brownies could tackle!  BTW, I have since checked out SWAPS-A-Lot and they have very affordable SWAP kits available, but of course I was prepping for this project mere hours before the meeting, so no time for something like that.  Besides, I figured we could wing this one!


Lollipop SWAPS

Supplies:
Multi-colored pipe cleaners, cut in half
Popsicle sticks, cut in half
Hot glue
Flat-backed pins

Instructions:
1.  Twist two different colors of pipe cleaner together to form a candy cane stripe.
2.  Start at one end and roll up flatly to form the lollipop.
3.  Place a dab of hot glue on the back to attach the Popsicle stick.
4.  Use hot glue to add the flat-backed pins.
5.  Print out your troop number (and the name of the event if you want) on cardstock.
6.  Cut out small tags, attach with pin.
7.  Now Share With A Pal!

Close up of flat-backed pins we often use for our SWAPS

Since it was a Christmas Candyland Carousel Camp (how's that for alliteration?!), I also came up with a quick candy cane swap, that I didn't see anywhere beforehand, but I'm sure is out there somewhere already.  In other words, it was my original idea but probably not the original idea.


And yes, all of these photos are of actual SWAPS made my my actual Brownies, with only a little help with the glue-gun from me!  Soooo, they aren't perfect and they don't all have the right same number of beads on them, but they are pretty darn cute!  And they are equally easy to make!


Candy Cane SWAPS

Supplies:
Red and White pipe cleaners cut into thirds
5 Red pony beads and 5 White pony beads
Hot glue
Flat-backed pins

Instructions:
1.  Turn a small hook on one end of the pipe cleaner to prevent beads from slipping off the end.
2.  Thread red and white pony beads onto the pipe cleaner, alternating colors as you go.
3.  Hook the top end of the pipe cleaner over last pony bead to prevent beads from falling off.
4.  Bend beaded pipe cleaner into the shape of a candy cane.
5.  Attach pin with hot glue.
6.  Add your tag (see above) and exchange!