The title has such a nice ring to it, don't you think!
Too bad I can't say the same about the rest of this project . . .

I spied this antique window pane in Canton back in my single lady 'daze' and knew it was just the piece my shabby chic little duplex in Cowtown needed! Back in my 'cabbage rose sofa' days (you know what I'm talkin' about!) it was used to display demitasse cups and saucers in my dining room. When my job took me south on I-35, it hung above an antique pie safe and was adorned with paper roses. Once Speed and I tied the knot and moved into our home, it decorated my kitchen and displayed antique linen hand towels (so stinkin' cute btw) Soon after though, it's presence was needed upstairs in our new little Sheep's bedroom, where my father's baby clothes would come to hang on satin hangers from it's panes. This little 'Friday Find' has served me well over the years and it's a piece I have grown to love and cherish like part of my family! So I knew that it needed to be incorporated into the JV squad's bedroom redo in some way, but how??
Sheep has long since outgrown the baby clothes on the window pane and was using it to hang tutus and fairy wings instead, but I have had my heart set on turning into a picture frame (even before Snacks came on the scene) so with the bedroom redo in progress, it was time to figure something out!
My idea was to cover pieces of tin cut to fit into the panes with fabric or paper so that I could use magnets to change the pictures. Sounds easy enough, right??
Sooooo wrong!!!
My first trip to the big box hardware store (frown) got me back home with a roll of flashing - aluminum flashing - that WASN'T magnetic! Too bad I didn't realize this until I had already cut out the first piece so it couldn't be returned (frown).
On my trip back to attempt the return it hit me that we had a large piece of insulating foam core in the garage that I could use as my inserts instead! My revised idea was to simply paint the pieces with 'magical' magnetic paint and then paper over them. Even better right?? Because the foam core would just wedge into the panes without even needing top be tacked in somehow - yay!!
BOO!!
The Rustoleum Magnetic Paint was a complete bust in my opinion. It doesn't work! Let me repeat that - IT. DOESN'T. WORK!! Too bad I didn't figure that out until I had already covered the pieces with scrapbook paper, which in itself was 2 trip ordeal!!

Despite my measuring and cutting out the foam core pieces the night before, it never dawned on me that the panes were larger than a 12 X 12 sheet of scrapbook paper . . . until I got home with them and tried to put them on - grrrr!

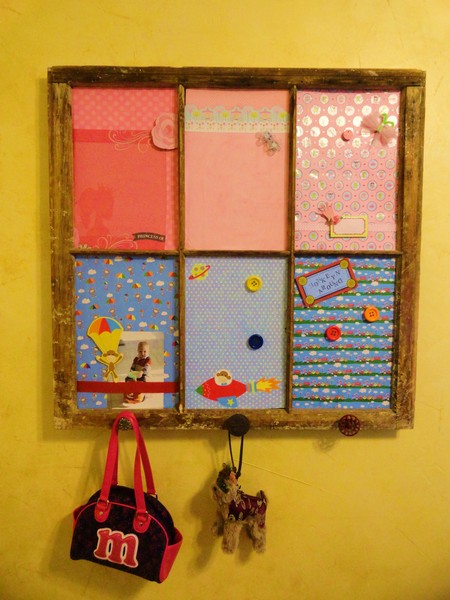
Back to the scrapbook store only to discover that not one, not two, but THREE of the papers I chose were the last sheet of that paper, which meant I had to come home and do some pretty crafty piecing together to even get my panes covered. Sooooo disappointing when I tried to hang up my pictures with the cute little button and otherwise embellished magnets. As you can see, the magnets stick, but they cannot hold up a photo. Not even a sheet of notebook paper (insert sad face here)!!!
I even went surfing through blogland in an attempt to salvage this project somehow, some way and came across a bloggy sistah who had been thwarted by magnetic paint found ceramic magnets at Radio Shack that worked on job when regular magnets did not . . . But no, trip number FIVE for this project did not solve the problem.
With a soon-to-be-two year old sharing the room, I really don't want to use pushpins and they will make permanent holes in the paper (not to mention the pictures) anyway. So, I am still searching for a solution.

I love the way the project looks, especially with the last minute addition of the door knobs across the bottom to add some always-needed storage in a shared space. Too bad it can only hold one picture underneath the ribbon.
Any ideas?
HI! THANKS SO much for the sweet lil note you left me about my burlap stuff! HOW SWEET YOU ARE!!! I don't know why I have always been drawn to it. OH and I have a few old windows.. so I'm glad I stopped by, because now I know what I want to do with one of them!!!
ReplyDeleteCome back and visit me again soon!
XOXO
Andrea
I love it - just so disappointed about the magnets! If you're OK with permanent pictures or changing out paper - you'll love it! Can't wait to show the whole room but it's not quite thee yet! Stay tuned!!
ReplyDeleteI know your pain. I hate it when a seemingly simple project turns into the impossible! My friend used magnetic paint and said she needed to do a few coats to get it to work, but also mentioned you need a really good magnet too.
ReplyDeleteMaybe you could put ribbons across each pane so that you could hold the pics that way. No pins, no magnets. Good luck!
Thanks for the suggestion and for stopping by Kim. Still not sure what I'm going to do . . . can't wait to see what you have going on! Don't forget about the Sassy Sunday Linky party going on until midnight tonight! Would love it if you would link up!
Delete