Last year I decided to put away the gold and glass and turn my Christmas decorations into something kid-friendly instead. Along the way, I settled on red and white as my all-new 'Peppermint Kissmas' theme! It was a lot of work! Fortunately, it means I have most of my big decorations already made this year, including a swag for the mantle (and just about every other horizontal surface in my house), a wreath for my chandelier and a bright, red, burlap runner for my table!
One of the projects I wasn't able to get to until just before Santa arrived was a set of stockings for everyone! There are literally TONS of cute stocking ideas on Pinterest, and Martha Stewart crafts had some cute red and white felt stockings that I thought would do the trick, so I decided to go with those . . . and make them my own of course!
I'm not sure if Martha had a stocking template somewhere, but if you know me, then you know I was doing these things much too last minute to bother with any of that, so I simply grabbed a stocking I already had and used it as my template, making sure to add some on all sides to leave room for stitching!
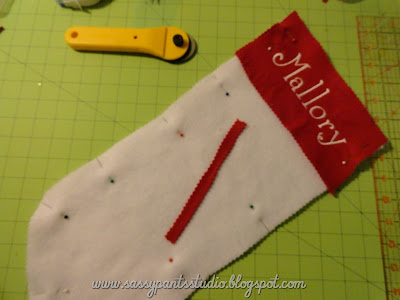
Then I cut a wide stripe of contrasting felt (in this case red) for my cuff and embroidered the name across the band. I used my machine, but you could certainly do this by hand or use fabric paint for the names. Puffy paint would probably look great!
I decided to cut everything out using pinking shears - just because - because one of the fun things about working with felt is that you don't have to worry about fraying or finishing your seams. That makes this whole project even easier!
I really was in a rush to get these stockings finished, so rather than adding a cuff on both the front and the back, I simply laid it over the top piece of the stocking, and stitched it down! Certainly hot glue or fabric glue would do the trick here as well, though perhaps not quite as quickly - ha!
I decided on designs for the front of each of the stockings, cut them out with the pinking shears, and sewed them on to the front piece! Again, hot glue or fabric glue would work here too!
Once the design is what you want, cut a small strip of felt to use as the loop for hanging and pin the front and back pieces together, inserting the looped strip of felt at the top corner before sewing or gluing it all down.
Now all you have left to do is hang them up and enjoy!
I added a small checkered ribbon for the ornaments on this one - so stinkin' cute!
Probably the hardest part about this project was decided what to do on everyone's stocking. Though some ideas came more easily than others! Don't stress too much if your designs aren't perfect. In this case I think it sort of adds to the charm of the handmade piece!
Sheep's included her signature 'big bow' of course . . . a a bit of bling!
I also decided to use contrasting thread color for the seams. I started with a triple stitch on the first one, but it really didn't make much difference visually, and is much slower to sew, so I switched to a simple straight stitch instead - perfect!
I think they came out great!! And with Speed heading way out west this weekend, I will be home with the kids pulling out
Sharing this Thankful Thought @ Mop It Up Mondays, Meet Me Monday, Debbie Doo's Newbie Party, Take-A-Look Tuesday, Wow Us Wednesdays, Cowgirl Up, Whimsy Wednesdays, Show and Share, Overflowing with Creativity, Creative Me, Made U Look, It's a Hodgepodge Friday


They are so cute. I love how they coordinate with all having the red and white, but they are individual at the same time. I made stockings for everyone in the family a few years ago and it was a lot of work. You can see them in this post: http://gracie-senseandsimplicity.blogspot.ca/2010/12/stocking-are-hung-by-chimney-with-care.html I would have coordinated the fabrics a bit more if I was doing it now. I love the personal touch though, of having home-made stockings.
ReplyDeleteWhat pretty stockings! I love how they are coordinated without matching.
ReplyDelete