Pages

Monday, December 10, 2012

How to Wrap Presents Like a Pro: Part One - The Package


Long before I was a bloggy mom with 2-5 children and 1-2 dogs and a small, home-based business, I worked as a professional.  Yes, as a genetic counselor, but also as a professional gift wrapper!  Through college and graduate school, I spent the Christmas season behind the counter at both Foley's (now Macy's) and Dillard's in the gift wrap section of Customer Service.  Let me just tell you, long hours, little pay and way too much Barbara Mandrel Christmas music - ha!

But I did learn a few things.  Now, you might be thinking that a gift wrap job would be easy to acquire, but much like genetic counseling (ha!) it actually required some schoolin' and a certification before I could commence with wrapping gifts for others!  Little did you know . . .

The good news for you is that I have decided to share this insider information with all of you so that you too can have professional-looking packages under your tree this year!

Like most projects, the key to success is having the right tools, so grab yourself a good pair of scissors, some medium to heavy weight paper (gridded works best) and some double sided tape and let's get started!

1.  To measure your paper length correctly, line one end of the box up with the end of the paper and 'flip' your box over 4 times to get the right length with just a bit extra for overlap.  Whenever possible, work horizontally across the paper, cutting the entire length across and then trimming if necessary, rather than working vertically (parallel) with the direction the paper unrolls.

2.  To measure your paper width correctly, pull the paper up on the short side, then cut along the opposite edge of the box.  This will give you just enough to make your folds on the sides, without having lots to trim.

3.  Once you have cut your paper, line it up so the straight edge (uncut) is even with one edge of the box.  Using the precut edges of the paper keeps things neat!


4.  Make sure you crease your paper at the box edges so that you get a nice, tight fit.  it also helps keep things in place while you are taping.


5.  Now put double-sided tape along the length of the paper and secure to form a clean edge.

6.  Always tuck your sides in first, rather than tucking the top down first.  This leaves the top and bottom edges free to meet in the middle, securing once again with double-sided tape.  Double-sided tape really is the professional gift wrappers secret!

 
7.  Now it's time to embellish, usually with a bow.  Fabric ribbon is another 'must have' for a professional finish and wired fabric ribbon works really well.  Personally, I like to use tulle for my embellishments because tulle pom-poms make such a statement and I believe that a well-wrapped gift makes the recipient feel extra special!


So, stay tuned for Part Two of 'How to Gift Wrap Like a Pro' and learn how to make pom-pom bows!
 
Merry Christmas Y'all!

Friday, December 7, 2012

Ready, Set, SWAPS!


As many of you know, I've got a Brownie in my house and this year our girl scout troop has taken the plunge and started camping!  We started back in October with a Mother-Daughter overnight hosted by our service unit, but last weekend was our first camping trip without moms (Dun, Dun, Duuuuuun)!!

There was lots and lots to do to get ready and to tell you the truth I was more than a little nervous about taking 7 girls to the woods for the weekend with only one other chaperone, but it was wonderful!!  Thanks in no small part to the Host(ess) troops who came up with the cutest theme for a winter campout ever - CANDYLAND!!

Hats off to those girls because they put on a spectacular program, filled with crafts, archery, canoing and all the candy you could eat (and then some!!).  Girl Scout camps with a pre-set program of activities are called carousels and I would definitely recommend them as a "next step" in your camping progression, because it means all the troop camper (ME!) and chaperones need to take care of is food and sleeping arrangements!  And for our first time out without back-up, that was enough!

One of the things we did to get ready for our campout was make SWAPS!  SWAPS are either Special Whatchamacallits Affectionately Pinned Somewhere or Something Shared With A Pal - either way, they are something little to exchange with other girl scouts you meet at camp and elsewhere.  They usually have a pin so they can be worn and/or displayed while you're out and about!

Pinned Image


Swaps are fun,  but can also be somewhat of a challenge when you're asking little ones to do the work.  Luckily,  I found this idea on Pinterest and knew it was something my Brownies could tackle!  BTW, I have since checked out SWAPS-A-Lot and they have very affordable SWAP kits available, but of course I was prepping for this project mere hours before the meeting, so no time for something like that.  Besides, I figured we could wing this one!


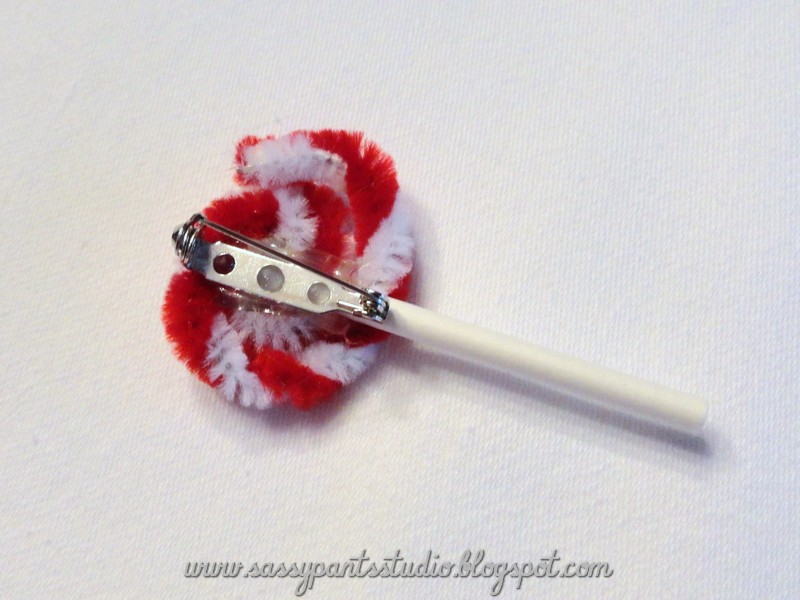
Lollipop SWAPS

Supplies:
Multi-colored pipe cleaners, cut in half
Popsicle sticks, cut in half
Hot glue
Flat-backed pins

Instructions:
1.  Twist two different colors of pipe cleaner together to form a candy cane stripe.
2.  Start at one end and roll up flatly to form the lollipop.
3.  Place a dab of hot glue on the back to attach the Popsicle stick.
4.  Use hot glue to add the flat-backed pins.
5.  Print out your troop number (and the name of the event if you want) on cardstock.
6.  Cut out small tags, attach with pin.
7.  Now Share With A Pal!

Close up of flat-backed pins we often use for our SWAPS

Since it was a Christmas Candyland Carousel Camp (how's that for alliteration?!), I also came up with a quick candy cane swap, that I didn't see anywhere beforehand, but I'm sure is out there somewhere already.  In other words, it was my original idea but probably not the original idea.


And yes, all of these photos are of actual SWAPS made my my actual Brownies, with only a little help with the glue-gun from me!  Soooo, they aren't perfect and they don't all have the right same number of beads on them, but they are pretty darn cute!  And they are equally easy to make!


Candy Cane SWAPS

Supplies:
Red and White pipe cleaners cut into thirds
5 Red pony beads and 5 White pony beads
Hot glue
Flat-backed pins

Instructions:
1.  Turn a small hook on one end of the pipe cleaner to prevent beads from slipping off the end.
2.  Thread red and white pony beads onto the pipe cleaner, alternating colors as you go.
3.  Hook the top end of the pipe cleaner over last pony bead to prevent beads from falling off.
4.  Bend beaded pipe cleaner into the shape of a candy cane.
5.  Attach pin with hot glue.
6.  Add your tag (see above) and exchange!

Sunday, November 18, 2012

Simple Stocking Tutorial


Last year I decided to put away the gold and glass and turn my Christmas decorations into something kid-friendly instead.  Along the way, I settled on red and white as my all-new 'Peppermint Kissmas' theme!  It was a lot of work!  Fortunately, it means I have most of my big decorations already made this year, including a swag for the mantle (and just about every other horizontal surface in my house), a wreath for my chandelier and a bright, red, burlap runner for my table!

One of the projects I wasn't able to get to until just before Santa arrived was a set of stockings for everyone!  There are literally TONS of cute stocking ideas on Pinterest, and Martha Stewart crafts had some cute red and white felt stockings that I thought would do the trick, so I decided to go with those . . .  and make them my own of course!

I'm not sure if Martha had a stocking template somewhere, but if you know me, then you know I was doing these things much too last minute to bother with any of that, so I simply grabbed a stocking I already had and used it as my template, making sure to add some on all sides to leave room for stitching!


Then I cut a wide stripe of contrasting felt (in this case red) for my cuff and embroidered the name across the band.  I used my machine, but you could certainly do this by hand or use fabric paint for the names.  Puffy paint would probably look great!


I decided to cut everything out using pinking shears - just because - because one of the fun things about working with felt is that you don't have to worry about fraying or finishing your seams.  That makes this whole project even easier!


I really was in a rush to get these stockings finished, so rather than adding a cuff on both the front and the back, I simply laid it over the top piece of the stocking, and stitched it down!  Certainly hot glue or fabric glue would do the trick here as well, though perhaps not quite as quickly - ha!


I decided on designs for the front of each of the stockings, cut them out with the pinking shears, and sewed them on to the front piece!  Again, hot glue or fabric glue would work here too!


Once the design is what you want, cut a small strip of felt to use as the loop for hanging and pin the front and back pieces together, inserting the looped strip of felt at the top corner before sewing or gluing it all down.


Now all you have left to do is hang them up and enjoy!


I added a small checkered ribbon for the ornaments on this one - so stinkin' cute!


Probably the hardest part about this project was decided what to do on everyone's stocking.  Though some ideas came more easily than others!  Don't stress too much if your designs aren't perfect.  In this case I think it sort of adds to the charm of the handmade piece!


Sheep's included her signature 'big bow' of course . . .  a a bit of bling!


I also decided to use contrasting thread color for the seams.  I started with a triple stitch on the first one, but it really didn't make much difference visually, and is much slower to sew, so I switched to a simple straight stitch instead - perfect!


I think they came out great!!  And with Speed heading way out west this weekend, I will be home with the kids pulling out my hair all my Christmas decorations and hopefully have the transformation completed by the time he returns!  I can't wait to see them again!

Sharing this Thankful Thought @ Mop It Up Mondays, Meet Me Monday, Debbie Doo's Newbie Party, Take-A-Look Tuesday, Wow Us Wednesdays, Cowgirl Up, Whimsy Wednesdays, Show and Share, Overflowing with Creativity, Creative Me, Made U Look, It's a Hodgepodge Friday

Friday, November 16, 2012

Footprint Turkey Napkin Rings

Good morning and Happy Friday everyone!
 
I have been one busy little elf this week with Christmas t-shirt orders (Yes, it's that time of year again!!  Yippee!!), but I didn't want you (my adoring fans - ha!) to think I had forgotten about you, so I thought I would share this quick Turkey Day craft from last year!  The kiddos will be out all next week, so there's plenty of time to make these - Enjoy!!
 
 
_______________________________________________________________ 

Footprint Turkey Napkin Rings

Supplies:
Toilet paper rolls, cut in half
Brown, red and yellow or orange construction paper
1 small, clean foot
Googly eyes
Good ol' Elmer's glue

You probably have most, if not all, of these items around your house already! So get everything together and do a lil' cipherin' to figure out how many napkin rings you're gonna need. Then add one more because you're going to want to make sure you have one to keep for yourself - those little feet grow fast!!

If you don't save toilet paper rolls like we do, well then you are MISSING OUT! There are just tons of things you can do with those things and you know you're not remembering to put them in your recycle bin anyway - ha!! Around here, we have much more trouble finding a small CLEAN foot than an empty toilet paper roll. In fact, it seems like there's an empty roll on the holder whenever I sit down. I don't know how it is in your house, but I am apparently the only one who knows how to change the toilet paper . . . but I digress!! If a clean foot's not possible, I recommend chasing down a dirty one with a wipey and proceeding!

Step 1:
Trace around your small, clean foot on brown construction paper to create a template for your turkeys (Let's face it, that foot's not gonna stick around to do a dozen, so just trace once and then set Snacks, I mean the foot, free.) Use template to create the number of turkeys you need for dinner.

Step 2:

Glue your feet to your toilet paper rolls, using the heel of the foot as the head and the toes as the body of your turkeys. Glue The rolls closer to the toes than the head, especially if you want your turkeys to stand up on your place settings. Let dry.


Step 3:
Cut out small diamonds in yellow construction paper and small wavy red shapes for waddles. Embellish your feet. Remember to use the heel of the foot as the head and the toes at the body. They sort of look like feathers now don't they?! Fold diamonds in half to make beaks and glue over or next to your waddles - your call. Add your eyes as well and let it all dry. Sheep is 6 and did a great job with this while I played 'Oh my Gosh, He Has the Scissors/Sharpie/Glue' with Snacks. This game is played in rounds!!!

Aren't they looking cute?!?!!
 
Step 4:
Take your napkins and lay them flat. Fold your napkins into pleasts, back and forth accordian-style. Once it has been pleated, fold in half lengthwise, the same way you used to to make paper fans when you were a kid! Sorry I didn't take a picture of this step, but hopefully you get the idea. Sheep got pretty good at this too, but I'm not sure anyone younger (she's almost 7) would be able to do this part. You also have to decide how much 'imperfection' you're willing to have at your Turkey Day Feast, so I will leave that up to you. I will tell you that sometimes, after she's moved on, I have been known to redo straighten things a bit, but I would NEVER tell her that!!!

Step 5:
Stuff that turkey!! In this case, with your pleated napkin, folded side down so that the napkin fans out behind the turkey foot- voila!!


I was having trouble getting my pleats to stay together at the top, because I did not iron (much less starch) my napkins beforehand, but I would recommend adding that step if you like the look of them standing up. Sheep seemed to think they looked better laying down so - problem solved!!


Tuesday, November 13, 2012

30 Days of Thankful - Days 11 & 12


Yes, I know.
I'm behind on my Thankful List
But the truth is I have trouble ticking with anything for 30 days. 
Probably why I'm still working on that same 20 pounds - ha!

Anyhoo, over the weekend we went to the Texas Renaissance Festival in Plantersville, Texas so today I am thankful for shared memories!


I used to LOVE the Renassaince Festival when I was a kid.  All rainbows and crystals and unicorns - yes, an actual unicorn was there one year.  I don't know where or how it came to be, but it was there and I saw it.  Back then, unicorns were absolutely my most favorite animal/creature/magical being (you pick) - I was such a child of the eighties!


Anyway, the first thing I realized when we arrived was that some things you thought were amazing and awesome as a kid are . . . hmmm, how can I say this . . .  really kind of weird when you're a grown-up!  All the costumes and swords and corsets (oh my!) on people who were just attending. Definitely a sight to behold!  I had Sheep put on some fairy wings before we left, which she questioned . . . until she got there and realized a measly pair of fairy wings wasn't nearly enough for the spirit of Ren Fest!

source


Speed was having the same sort of flashbacks and realizations I was, but to the kids it was 100% fun!


There are lots of shows to see!


Rides to ride!
 
With a Medieval theme of course!
 
 
Even exotic animals!  How many of you can say that you've ridden an elephant!
 
We ate turkey legs and watched jousting and tromped across all 55 acres until we found the glassblowing display - which was still as awesome as I remember it!  Though Snacks will be too young to remember it, Sheep LOVED it!  And it was absolutely unforgettable to be able to experience the festival through her eyes!  As well as hearing all of Speed's memories and observations - he's a wry one! 
 
So very grateful for the memory we all have together!
 
Dont forget to link up your own stories of thankfulness at the 30 Days of Thankful Blog Hop going on all this month!

Saturday, November 10, 2012

30 Days of Thaknful - Days 9 & 10


This weekend I am thankful for my bloggy friends, who turn me on creatively, lift me up spiritually and really encourage me with their sweet and often funny comments.  This month marks the 1 year anniversary of my 'return to blogging' and I have learned so much from everyone and made some special friends along the way {smile}.

Transitioning from a working mom to a full-time stay-at-home-mom was more challenging than I could have anticipated.  And frankly, there's still some aspects of stay-at-home-mommyhood that I struggle with.  But I wouldn't trade this opportunity for anything!  That being said, blogging has been a way for me to connect with other grown-ups and more importantly, other creative souls.

I love finding a kindred spirit and I am constantly amazed by all the imaginative and entrepreneurial adventures going on out there.  I feel privileged to be a part of the blogging community and am just so thankful for having friends joining me on this journey.  I only hope that I am returning the favor to you in some  way!

So here's to us!


Thursday, November 8, 2012

30 Days of Thankful - Day 8


Today I am thankful for second chances.
And thirds.
And fourths.
And, well . . . you get the idea.

I don't know for certain, but I'm guessing that everyone has something they're struggling with.  Some problem, or behavior, or relationship that you just can't seem to get right.  Or some issue that you thought you'd seen the last of but here it comes round again??  For me it's my weight.  Not that I don't have others (ha!), but this is the one I'm stressing about focused on right now.  And I've got so much wrapped up in the issue at this point that I won't bore you with the details, but I've got a goal (again), I am taking action (again) and I am moving forward (again)!

Truly this would not be possible without God's grace.  Because when it comes to dreaming thinking about food and exercise (what I want to eat, what I should be eating, what I shouldn't be eating, am I hungry or am I stressed, when to eat, how much to eat) the incessant, internal dialogue has just. worn. me. out.


Recently I have been reading a book with a friend (kind of a two-woman Bible study of sorts) about the power of prayer.  It's Called The Circle Maker by Mark Batterson.  I'm a little more than half-way through the book and it has really given me some 'food' for thought - pun totally intended!   This quote, in particulr, really stood out to me.  I would love to see one of my graphically-gifted, bloggy friends (Kristi?!) make this into a fabulous free printable because I think others would find it motivational as well.  This was my 'ghetto graphics' attempt at something . . . . What can I say.  Everyday graces welcome too!

source
 
 God is so good.  He will always give you another chance.  And He is always ready to help you out with your stuggles.  The challenge for us is to simply leave them at His feet.  Easier said than done, I know, but here I go again!

Don't forget to link up your own personal stories of thankfulness at the 30 Days of Thankful Blog Hop going on now!

Wednesday, November 7, 2012

30 Days of Thankful - Day 7

Quick note tonight, because it has been a long day, and right now all I can say is that today I am thankful for clean kids, footie pajamas and silence . . . . !

Tuesday, November 6, 2012

'Handy' Thankful Tree

 
I've seen these projects all over Pinterest this year, but my twist on the Thankful Tree was actually part of our holiday decor last year.  It's very simple to do and it's something everyone in the house can get in on too!
 
 
I simply taped together two big pieces of package wrap that I had left over upstairs, temporarily taped in on the door to our pantry and drew the shape of a tree that would fit in the space.  Then I cut out my tree and taped it right back up there!
 
 
My 'handy' twist on this quick craft is that I traced Sheep's handprint onto colored construction paper and cut those out to use for our leaves.  We traced some of Snack's hands too, but his little paws didn't leave much room to write.  We ended up using Sam's feet for another project I will be (re)sharing with you soon!
 
 
I also added a quick 'Give Thanks' banner across the top using the leftover paper, ribbons and markers.  Sometime simple crafts are the best!  And we enjoyed this project for weeks.  The kids really liked showing it off and asking guests to add to the tree.  In fact, it got so popular that we had to trace a few more leaves before it was all said and done!
 
 
I hope you have fun with this project, and enjoy your own Handy Thankful tree this year!

Sharing this sassy idea at Mop it Up Mondays, Meet Me Monday, Debbie Doo's Newbie Party, Take-A-Look Tuesday, Wow Us Wednesdays, Cowgirl Up, Whimsy Wednesdays, Show and Share, Overflowing with Creativity, Creative Me, Made U Look, It's a Hodgepodge Friday

Thirty Days of Thankful - Day 6

Today I am thankful for  . . . . my mother-in-law!
 
"What?!" you say.
 
It's true!  And those of you who know me, know just how good I have it!
 
Not unlike everyone I know, my life is hectic, busy, over-scheduled, whatever you want to call it.  All I know is that most mornings I hit the ground running at 5 AM and fall into bed between 10 and 11 most nights with my 'To Do' still bigger than my 'Ta-Done'!  But I love my kids, my hubby, my girl scouts, my CCE class, my crafts, my blog . . . . well, you get the idea.  So keeping all my plates in the air requires help.
 
Or one really awesome grandma!
 
Seriously.
 
I could ask for no better help than my mother-in-law.
I can't tell you how blessed I am to have someone to watch my children who loves them (almost) as much as I do.  She is an amazing woman, one of my closest friends and the star of one of one of my more popular posts too - ha!
 
She's been away taking care of a friend after surgery recently, and boy do we miss her!!
 
Someone once told me that the best way to give someone a compliment is to tell someone else, so today I am telling her and all of you . . .
 
Gram . . .