
Isn't it GORGEOUS!!
Sew . . here's how ya do it!
Step 1:
Pick your top fabric and lining fabric. I chose this amazing RED burlap (have you seen it - colored burlap!! To die for!!) and some coordinating cotton/ploy blend for the lining. Determine the length you want for your runner. My table is 5 feet or 60" and I noticed while breezing through HL that most of their table runners were a standard 72" by 14" - sew I went with that! Next determine how many rows of ruffles you want and buy some coordinating fabrics for those. I bought 1/4 yard of three different fabrics and grabbed some large white pom-pom fringe as well. Truth is, I LOVE pom-poms almost as much as ruffles - tee hee!
Step 2:
Cut your table runner and lining, adding 1 inch to your measurements for your seam allowance. Remember, we're gonna sew this bad boy!
Step 3:
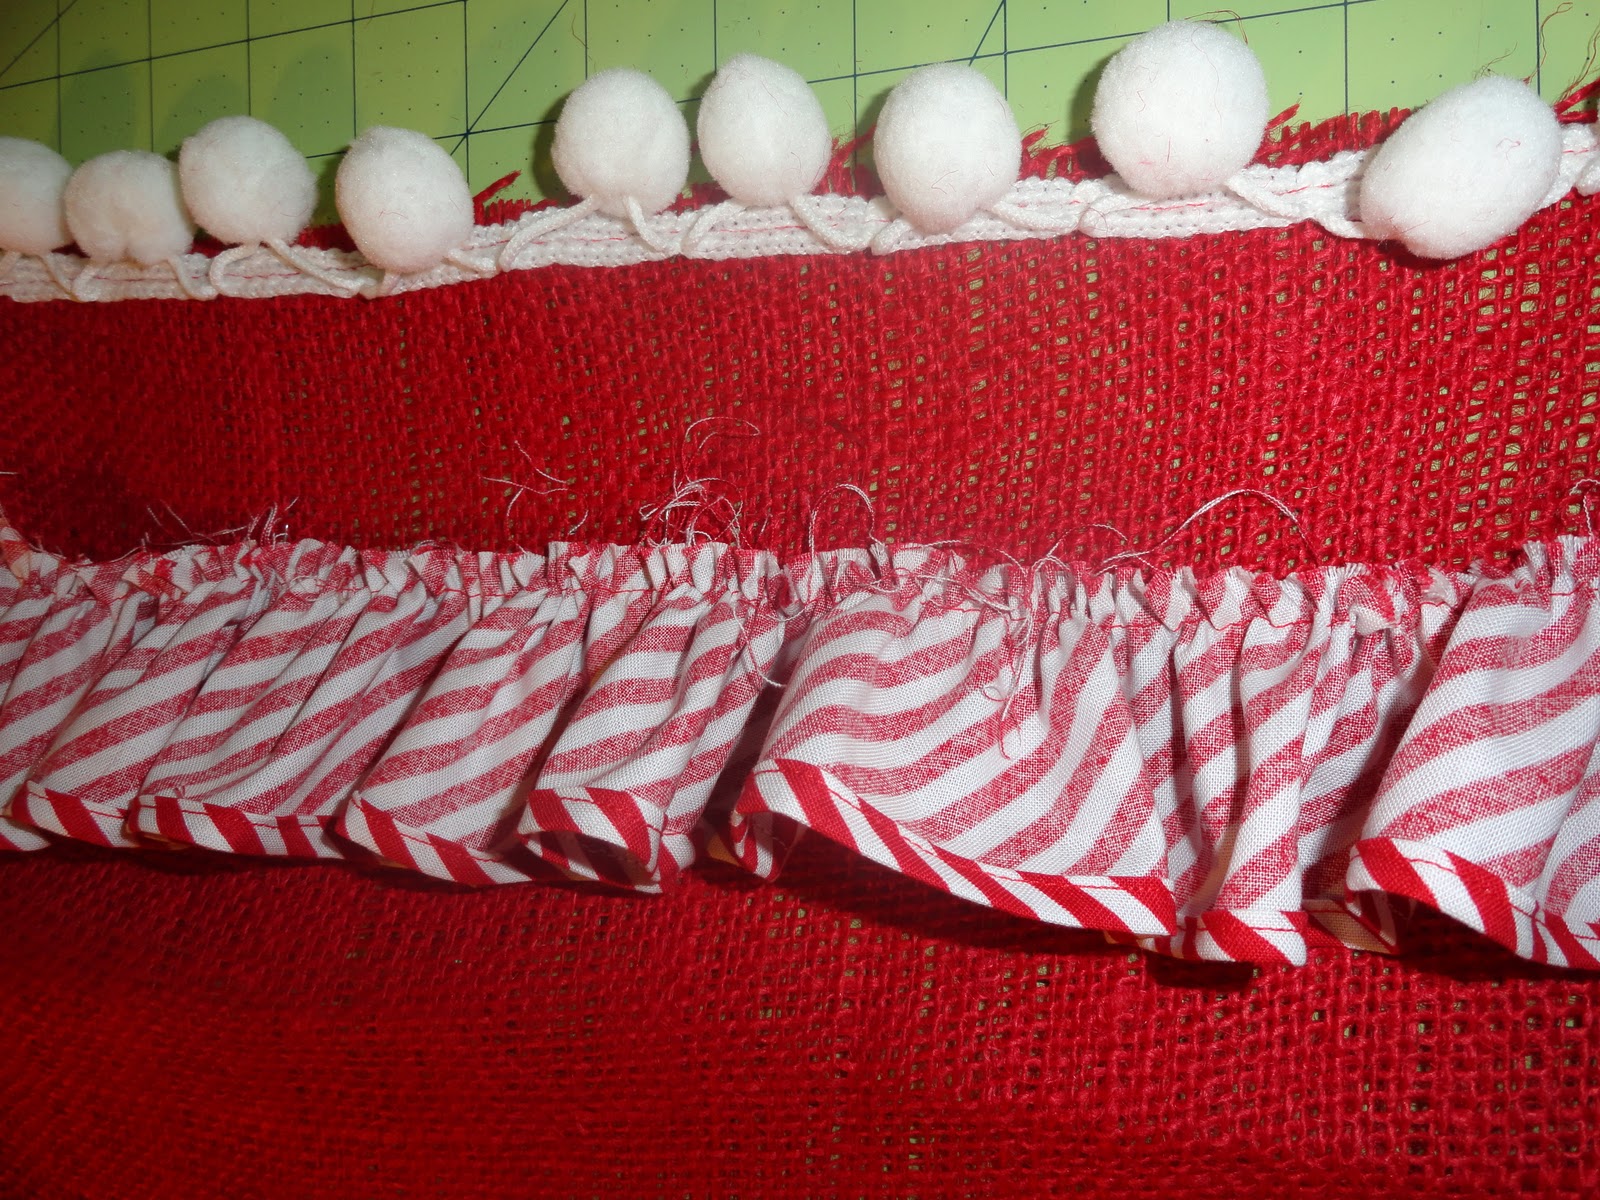
Attach your pom-pom fringe to both ends using a straight stitch, making sure that your pom-poms are facing inward. Don't worry, they'll hang properly once you add your lining. You'll see!!

Step 4:
Decide how many, what type and how big you want your ruffles. Decisions, decisions!! This is always the hardest part for me! I went with 2 'traditional' ruffles and 1 ruffled fabric strip on each side. I like very full ruffles, sew I just used the entire width of the 45" fabric, but you can decide for yourself how long to make your strips. When you cut them out, make sure you add at least an inch to the width of the traditional ruffle for seam allowance and gathering stitch. On the fabric strip, you will double the width you want AND add for a seam allowance as well. Also, don't forget that you'll cutting and sewing twice, since you want to do the same thing on both sides!!

Step 5:
Make a small, rolled hem on both of your fabrics for the first two ruffles. (I only showed the first one, but you will do the same for both - or however many you decide to do on yours!)

Step 6:
Sew your gathering stitch (I use the basting stitch on my machine) on the other side of your fabric strips for the 'traditional' ruffles.

Step 7:
Fold your fabric for the ruffles strip in half lengthwise and sew (make sure you change back from your basting stitch to a straight stitch - as me how I know!)

Step 8:
Press your fabric strip down with the seam in the middle, opening up your seam as you go.

Step 9:
Use a large safety pin or bodkin to turn your fabric right side out and press down again with the seam in the middle.

Step 10:
Place your first ruffle fabric on your runner to determine how far it needs to be from the fringe. I wanted mine to be close enough to hide the edge of the runner but still allow the pom-poms to be seen. That looked like about 2 inches from the edge of the trim, NOT the edge of the fabric.

Step 11:
Lay your ruffled strip down on the runner with the gathering stitch facing the pom-poms. This might seem backwards, but we're going to flip it over afterwards to hide the seam. Trust me!! Pin your fabric strip to your runner, evenly spacing fabric with pins. Pull the bobbin thread and work fabric through pins until it is gathered to your fabric but laying flat against it. Use plenty of pins to keep things in a straight line!

Step 12:
Attach your ruffled strip using a straight stitch just inside your gathering stitch.
Step 14:
Now flip your ruffle over so that the right side is showing and the hemmed edge is pointing toward the pom-poms. Top stitch very close to the first stitch to keep your ruffle pointing in the right direction and to cover the raw edge of the gathered fabric at the same time!! I suppose you could skip all this IF Santa bought you a Serger for Christmas (hint, hint) but if not, this will work just as well!

Step 15:
Now determine how close you want your second ruffle and do the same thing. Repeat for as many 'traditional' ruffles you want to add, but remember, you're doing all this again on the other side, so two 'traditional' ruffles were enough for me!

Step 16:
Moving back to your ruffled fabric strip. Sew a gathering (basting) stitch down the center of your strip, with the seam side DOWN.

Step 17:

Step 18:
Once you've completed your ruffles on BOTH sides of your runner, it's time to attach the lining! You're getting close!! Match your lining fabric to your runner, with right sides together, pinning as you go around. Make sure your corners match and that your pom-poms and ruffles stay tucked in and out of the way of your seam. Use a straight stitch to sew the runner and lining together, leaving a large opening in the MIDDLE on one side so that you can turn everything right side out (Sorry I forgot to snap a picture of this step - oops!).
Step 19:
Turn right side out and press. Press in the seam allowance for your runner and lining at the opening and pin closed. Use a straight stitch VERY CLOSE to the edge to close everything up and you're done! You might not be able to complete this in one nap time, but definitely in two!

Step 20:
Enjoy your FABULOUS ruffled table runner this season and for years to come!!

Merry Christmas y'all!
Ruffles and pom poms and polka dots - you've included all my favorites and I think they look great!
ReplyDeleteThanks Laurel! The best thing about decorating with red is that it works for so MANY hoolidays! Thanks for stopping by! You can link your projects to our Sleepy Sunday party here: http://sassypantsstudio.blogspot.com/2012/01/at-hop.html
Delete